
I conducted a very non-sientiffic study on my Facebook page about pumpkin beer. To be honest with you, I have always been a touch hesitant of fruit flavored beer. And although pumpkin is a squash, therefore not a fruit, it seems to fall under the same umbrella in my mind since I make pies out of them.
But I love nothing more than trying new and exotic beers. And I always want input and feedback from other craft beer fans. So, my very un-scientific study yielded the final conclusion: based only on comments and likes, I want to search the town for the following Pumpkin Beers for another non-scientific Beer Tasting Study:
Dogfish Head, Pumpkin
Avery, Rumpkin
St Arnold, Pumpkinator
Southern Tier, Pumpking
If you have any suggestions, please chime in. I’m looking to expand the reach of my non-scientific study.

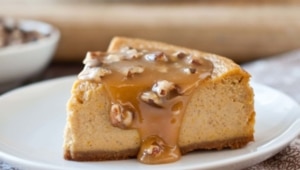
Pumpkin Ale Cheesecake with Beer Pecan Caramel Sauce
Ingredients
For The Cheesecake
- 9 standard sized graham crackers
- 2 tbs brown sugar
- 4 tbs melted butter
- 1/2 cup brown sugar
- 1 cup white sugar
- 16 oz cream cheese softened
- 4 eggs
- 2 tsp vanilla extract
- 2 cups pumpkin puree
- 1 tsp cinnamon
- 1/2 tsp nutmeg
- 1/2 tsp salt
- 1 1/4 cup pumpkin ale
- 1/4 cup plus 2 tbs flour
For The Caramel Sauce
- 1 cup sugar
- 1/2 cup pumpkin beer
- 1/4 cup corn syrup
- 1 tbs butter
- 1/4 cup cream
- 1/3 cup pecans
Instructions
- In a food processor add the graham crackers and brown sugar, process until only crumbs are left. While the food processor is still running, add the melted butter and process until it resembles wet sand. Dump into the bottom of a 9 inch spring form pan. Press into the bottom until well compacted.
- In the bowl of a stand mixer, add the brown sugar, white sugar and cream cheese. Mix until well combined. One at a time, add the eggs and vanilla, mixing until well combined, scraping the bottom, before adding more.
- Add the pumpkin puree, cinnamon nutmeg and salt, mix until very well combined.
- Add the beer and stir until combined.
- Sprinkle the flour over the bowl, stir on medium speed until just combined.
- Pour over the crust.
- Bake at 350 for about one hour or until the center no longer jiggles when you shake the rack the cheesecake sits on, it will still look wet in the center. The secret to a great cheesecake is not to over bake it, it's better to slightly under bake it for a smooth mousse like texture.
- Chill until set, about 3 hours.
- To make the caramel sauce, add the sugar, beer and corn syrup to a pot and stir over medium high heat for about 1 minute. Stop stirring and allow to boil, untouched, until it turns an amber color, about 10 minutes (230 on a candy thermometer). Add the butter and cream, stir until combined. Add the pecans and stir. Allow to cool to approximately room temperature before serving over chilled cheesecake.