One Hour No Knead Artisan Hefeweizen Bread
![]() Jackie Dodd-Mallory
(Senior Editor)
Jackie Dodd-Mallory
(Senior Editor)
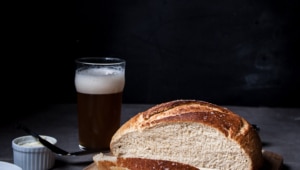
One Hour No Knead Artisan Hefeweizen Bread

Yeast bread is a lot like replacing a ceiling light. You have this mental block that screams at you, "you can’t do that, it’s not for you. That’s for other people who know things you don’t know."
Replacing light fixtures hardwired into the ceiling and baking bread are also things I do when I’m stressed out. As is repainting rooms before I remember that I hate painting.
For a long time I avoided both things, assuming I wasn’t capable and the knowledge needed to complete said tasks was acquired from such a lengthy learning process I wasn’t up to it. Turns out, both tasks are really simple, and just basically require a few simple "just follow the directions" steps.
Last week I finally removed the hideous 1980’s ceiling fan from my kitchen that I’d been avoiding. I just couldn’t take it anymore. The YouTube videos were so simple, it made me feel like a coward for never having attempted it. You literally just twist a few wires together. One video ended with the motivational sentence of, "Handymen aren’t exactly rocket scientist, if they can do it, you can do it." I CAN DO IT, TOO!
I was actually a little surprised when it worked, convinced that it couldn’t be that easy and that a flip of the light switch would prove that I wasn’t up to the task. In a very anticlimactic ending, it worked. It took about 20 minutes.
Yeast bread was the same progression for me. Yeast?! I can’t do that! Oh, wait, it’s just heating water to the right temperate and waiting? Ok, let’s try it. Well, look at that. It worked.
If history is any predictor you can logically assume that I’ll be continuing to replace light fixtures when I’m stressed out. Not as cheap as baking bread, but possibly just as therapeutic.
One Hour No Knead Artisan Hefeweizen Bread
Ingredients
- 4 ½ cups 540g all-purpose flour
- 2 ¼ teaspoons 6g rapid rise yeast (one packet)
- 2 tablespoons 42g honey
- 2 tablespoons 24g olive oil (plus additional for glaze)
- 12 ounces wheat beer
- 1 teaspoon 6g kosher salt
- ½ teaspoon flaky
Instructions
- Preheat oven to 400F.
- Add the flour, yeast, honey and olive oil to a stand mixer fitted with a dough hook.
- Heat the beer to 125F.
- While the mixer is running, slowly add the beer. Once all the dough has been moistened, sprinkle with kosher salt.
- Turn the mixer to high, beating until the dough gathers around the blade, about 8 minutes.
- Line a Dutch oven with parchment paper. Add the dough ball to the prepared Dutch oven. Cover and allow to rise until doubled in size, 20-30 minutes.
- Make a shallow slit in the top of the dough with a shark knife, brush with olive oil, sprinkle with flakey salt.
- Cover with the Dutch oven lid and bake for 20 minutes or until the top is golden brown.


Comments
Nancy Worsham March 9, 2017 um 1:08 pm
Super easy recipe that makes a loaf large enough for sandwiches. Great taste with a hint of sweetness. Only comment is that I had to watch the video to see that the Dutch oven needs to be covered while the bread bakes. I would suggest adding that to the directions.
Jackie March 9, 2017 um 3:48 pm
Thank you! Super helpful, I’ll do that now 🙂
Kristine March 2, 2018 um 8:30 am
Can I do this with a cast iron lidded pot?
Jackie March 3, 2018 um 2:04 pm
yes, you should be able to but I’m a little worried it may burn on the bottom.
David May 6, 2018 um 12:28 am
Thanks for great inspiration … it’s a 4-ingredient bread: flour, beer/water, salt and yeast – no need to add sugars or fats to this simple and delicious recipe. Using a cast-iron pot is easy and bakes the best looking loaf, and I’m no rocket scientist (or handyman)… I place the formed, unbaked loaf on a floured strip of parchment paper about 9″ wide while it rises the second time. In the last 15 mins of rising, I preheat an empty 10″ cast iron pot at 425 degrees with the lid on. Just before baking, I dust the top of the loaf with flour and slash with a blade or a serrated knife about 1/4″ deep. Wearing oven gloves, I remove the cast iron pot from the oven onto a heat proof surface, and remove the lid (carefully), and, using the parchment paper strip as a sling, I lift and lower the loaf into the pot (or Dutch Oven), replace the lid, return the pot to the oven and bake for 30 – 35 mins. I remove the lid for the last 10 to 12 minutes in the oven to form the crust that keeps moisture in the bread – I don’t need a pan of water in the oven – the lid of the pot keeps the loaf moist, and removing it for the last 10 minutes or so 'seals' the loaf with a perfect crust. After 40 – 45 mins., I remove the lid and use the parchment paper 'sling' to lift the loaf out of the pot and place on a cooling rack, slide out the paper from under the loaf and let cool for 45 minutes or as long as we can stand it…!
David May 6, 2018 um 12:33 am
Edit, please … After 40 – 45 mins., (the lid is off …) I use the parchment paper 'sling’…etc.
May Linn September 29, 2019 um 10:54 am
Okay, so add a cup of cheddar cheese and 1 chopped jalepeno the dough. Let it cook as already described then add some cheese and sliced jalepeno near the end of the off lid cook. Super amazing!