Have you ever had one of those "What Would You Want Your Last Meal To Be?" conversations?
I have. Partially because I’m a touch more morbid than most, and partially because I think about food nearly constantly. Also, between food writers, food bloggers and chefs, I hang out with quite a few food people and that tends to dictate the sway of conversation.
Julia Child ate French onion soup as her last meal. James Dean had apple pie and a glass of milk at a road side dinner. JFK ate a pretty typical breakfast of eggs, toast and coffee. John Lennon had a corned beef sandwich. Ernest Hemingway had a steak and potatoes.
(*have I totally creeped you out with death talk on my potatoes post?)
Really, what that conversation comes down to is what food could you not bear never eating again. For most people, that’s comfort food, or meals that remind them of childhood. To be honest with you, I can’t really decide on an answer to the super-morbid Last Meal question. But, I can tell you I would want potatoes to be a part of the meal.
I’ve been making these potatoes for a while. Really simple, easy and always turn out great, without much effort. They also just so happen to be vegan and gluten free, how great is that?
Last meal or not, I’ll be having these again soon.
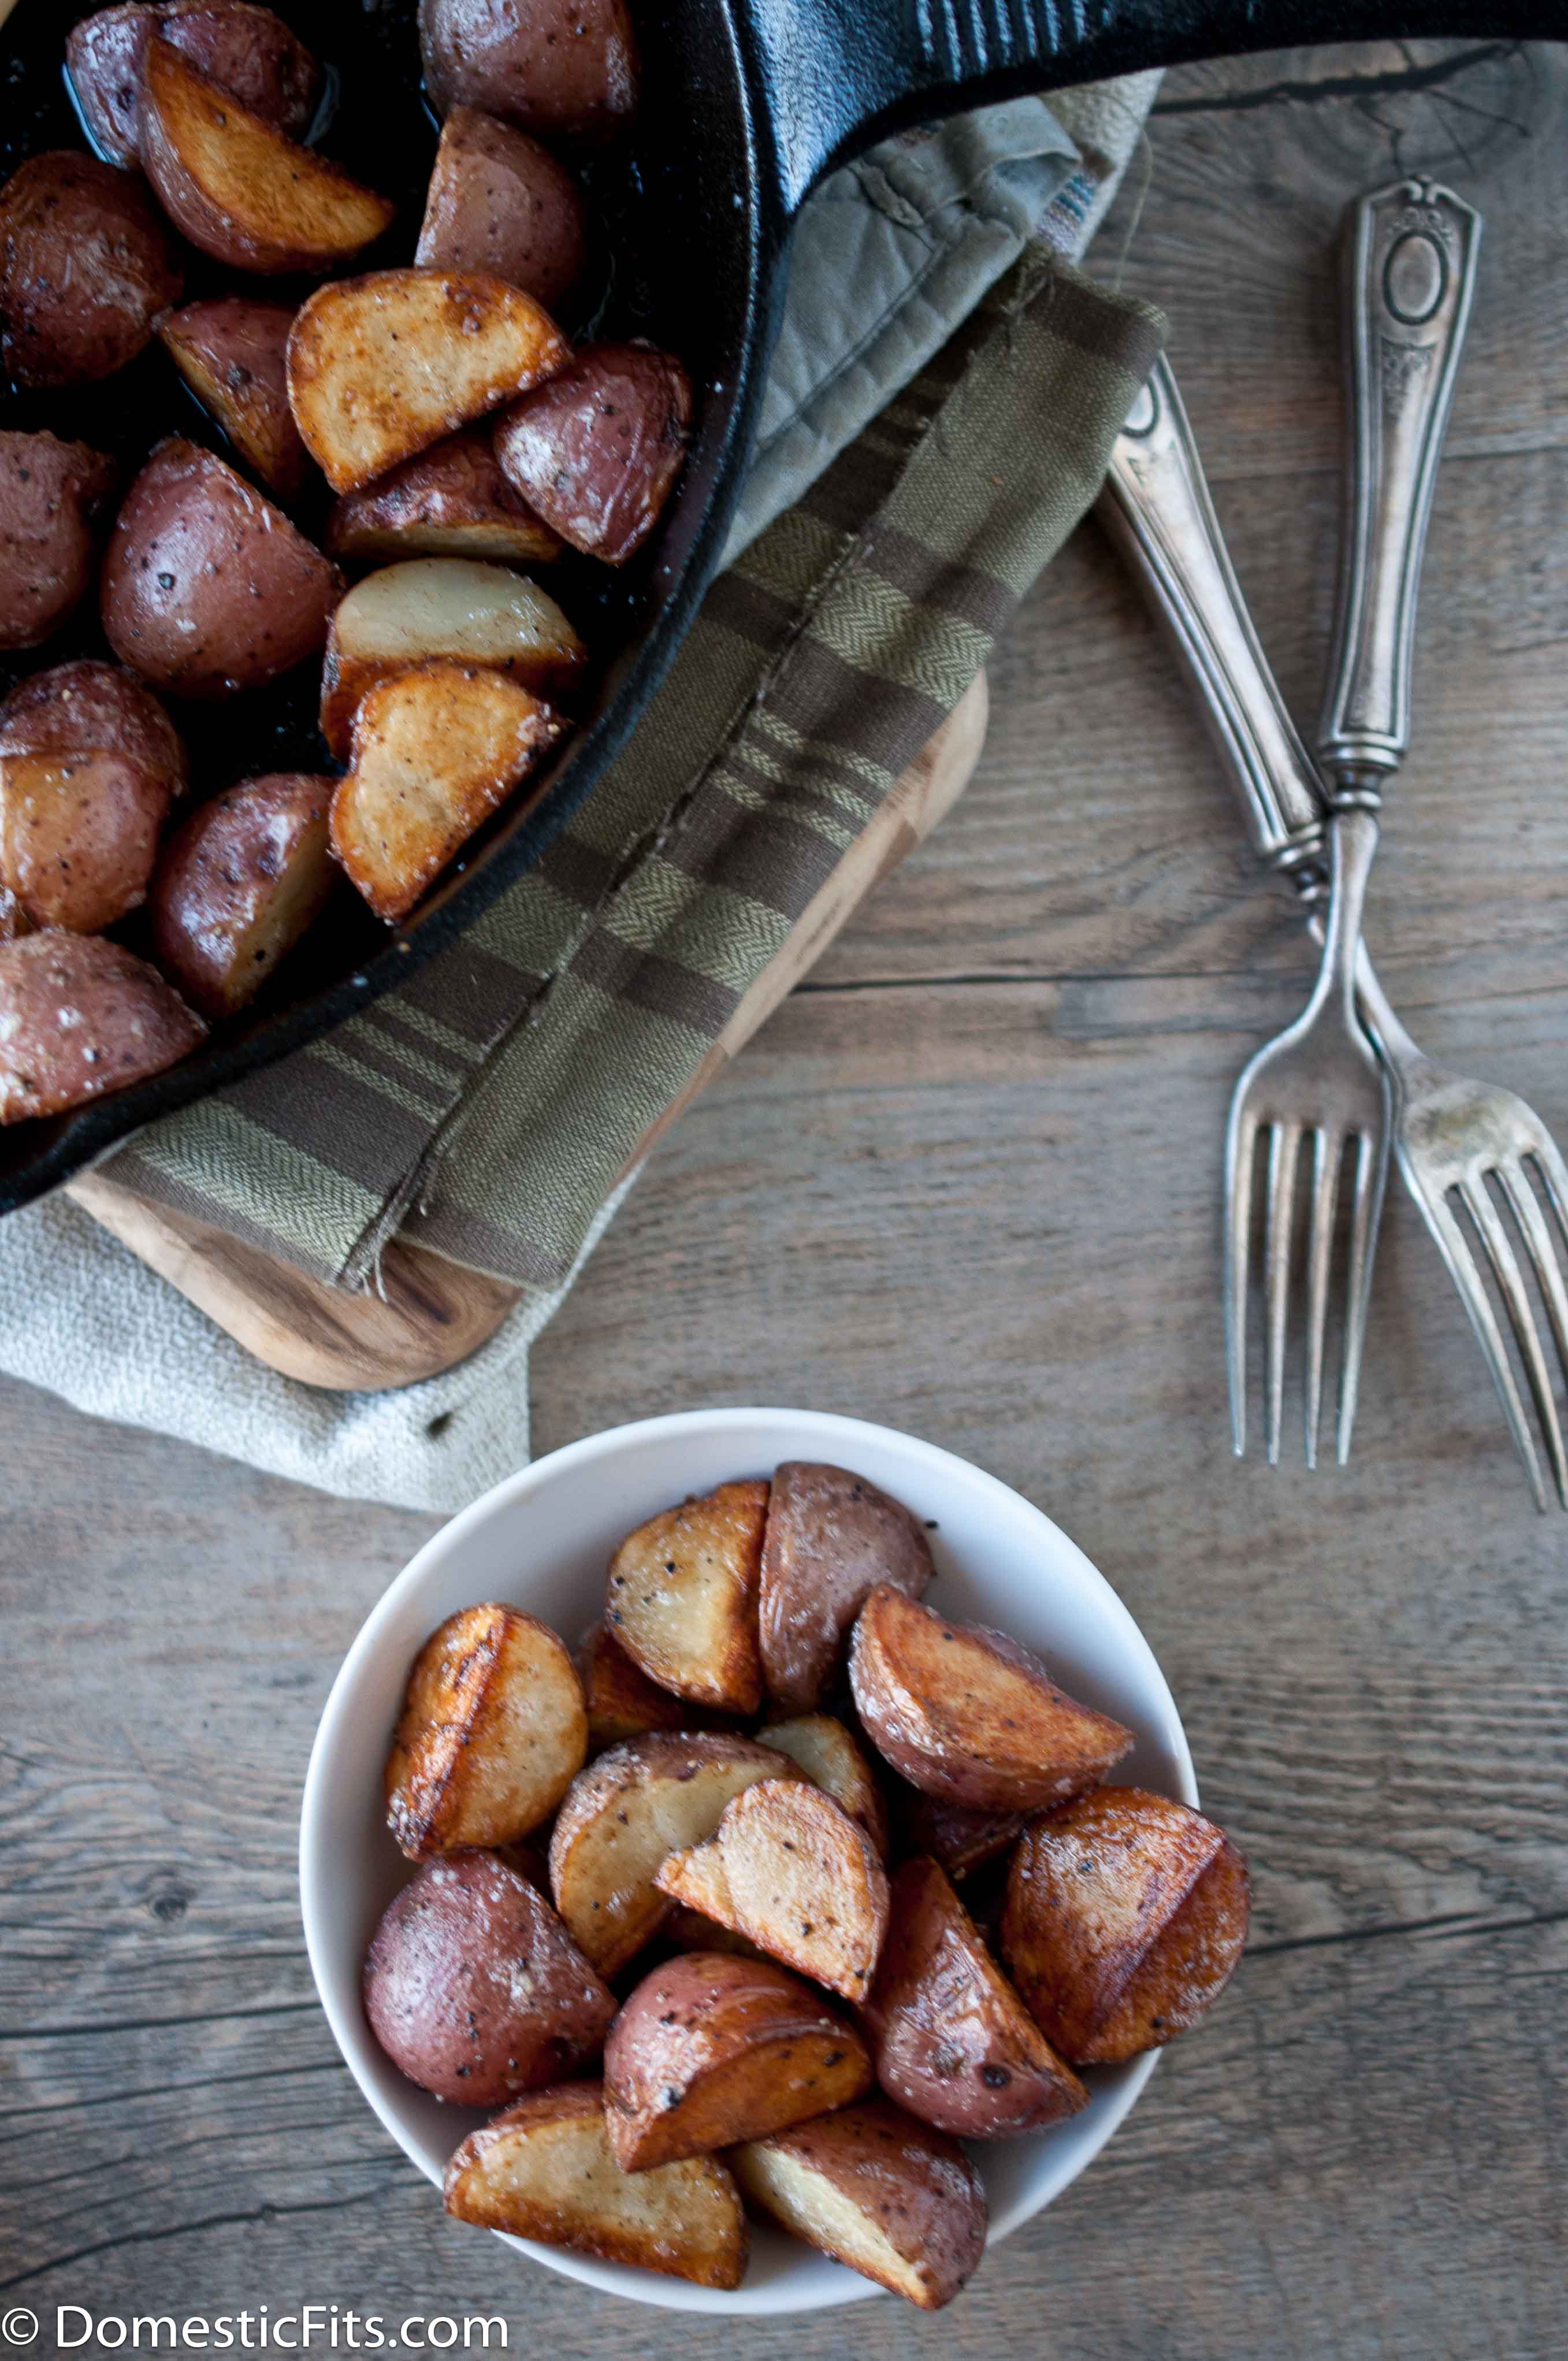
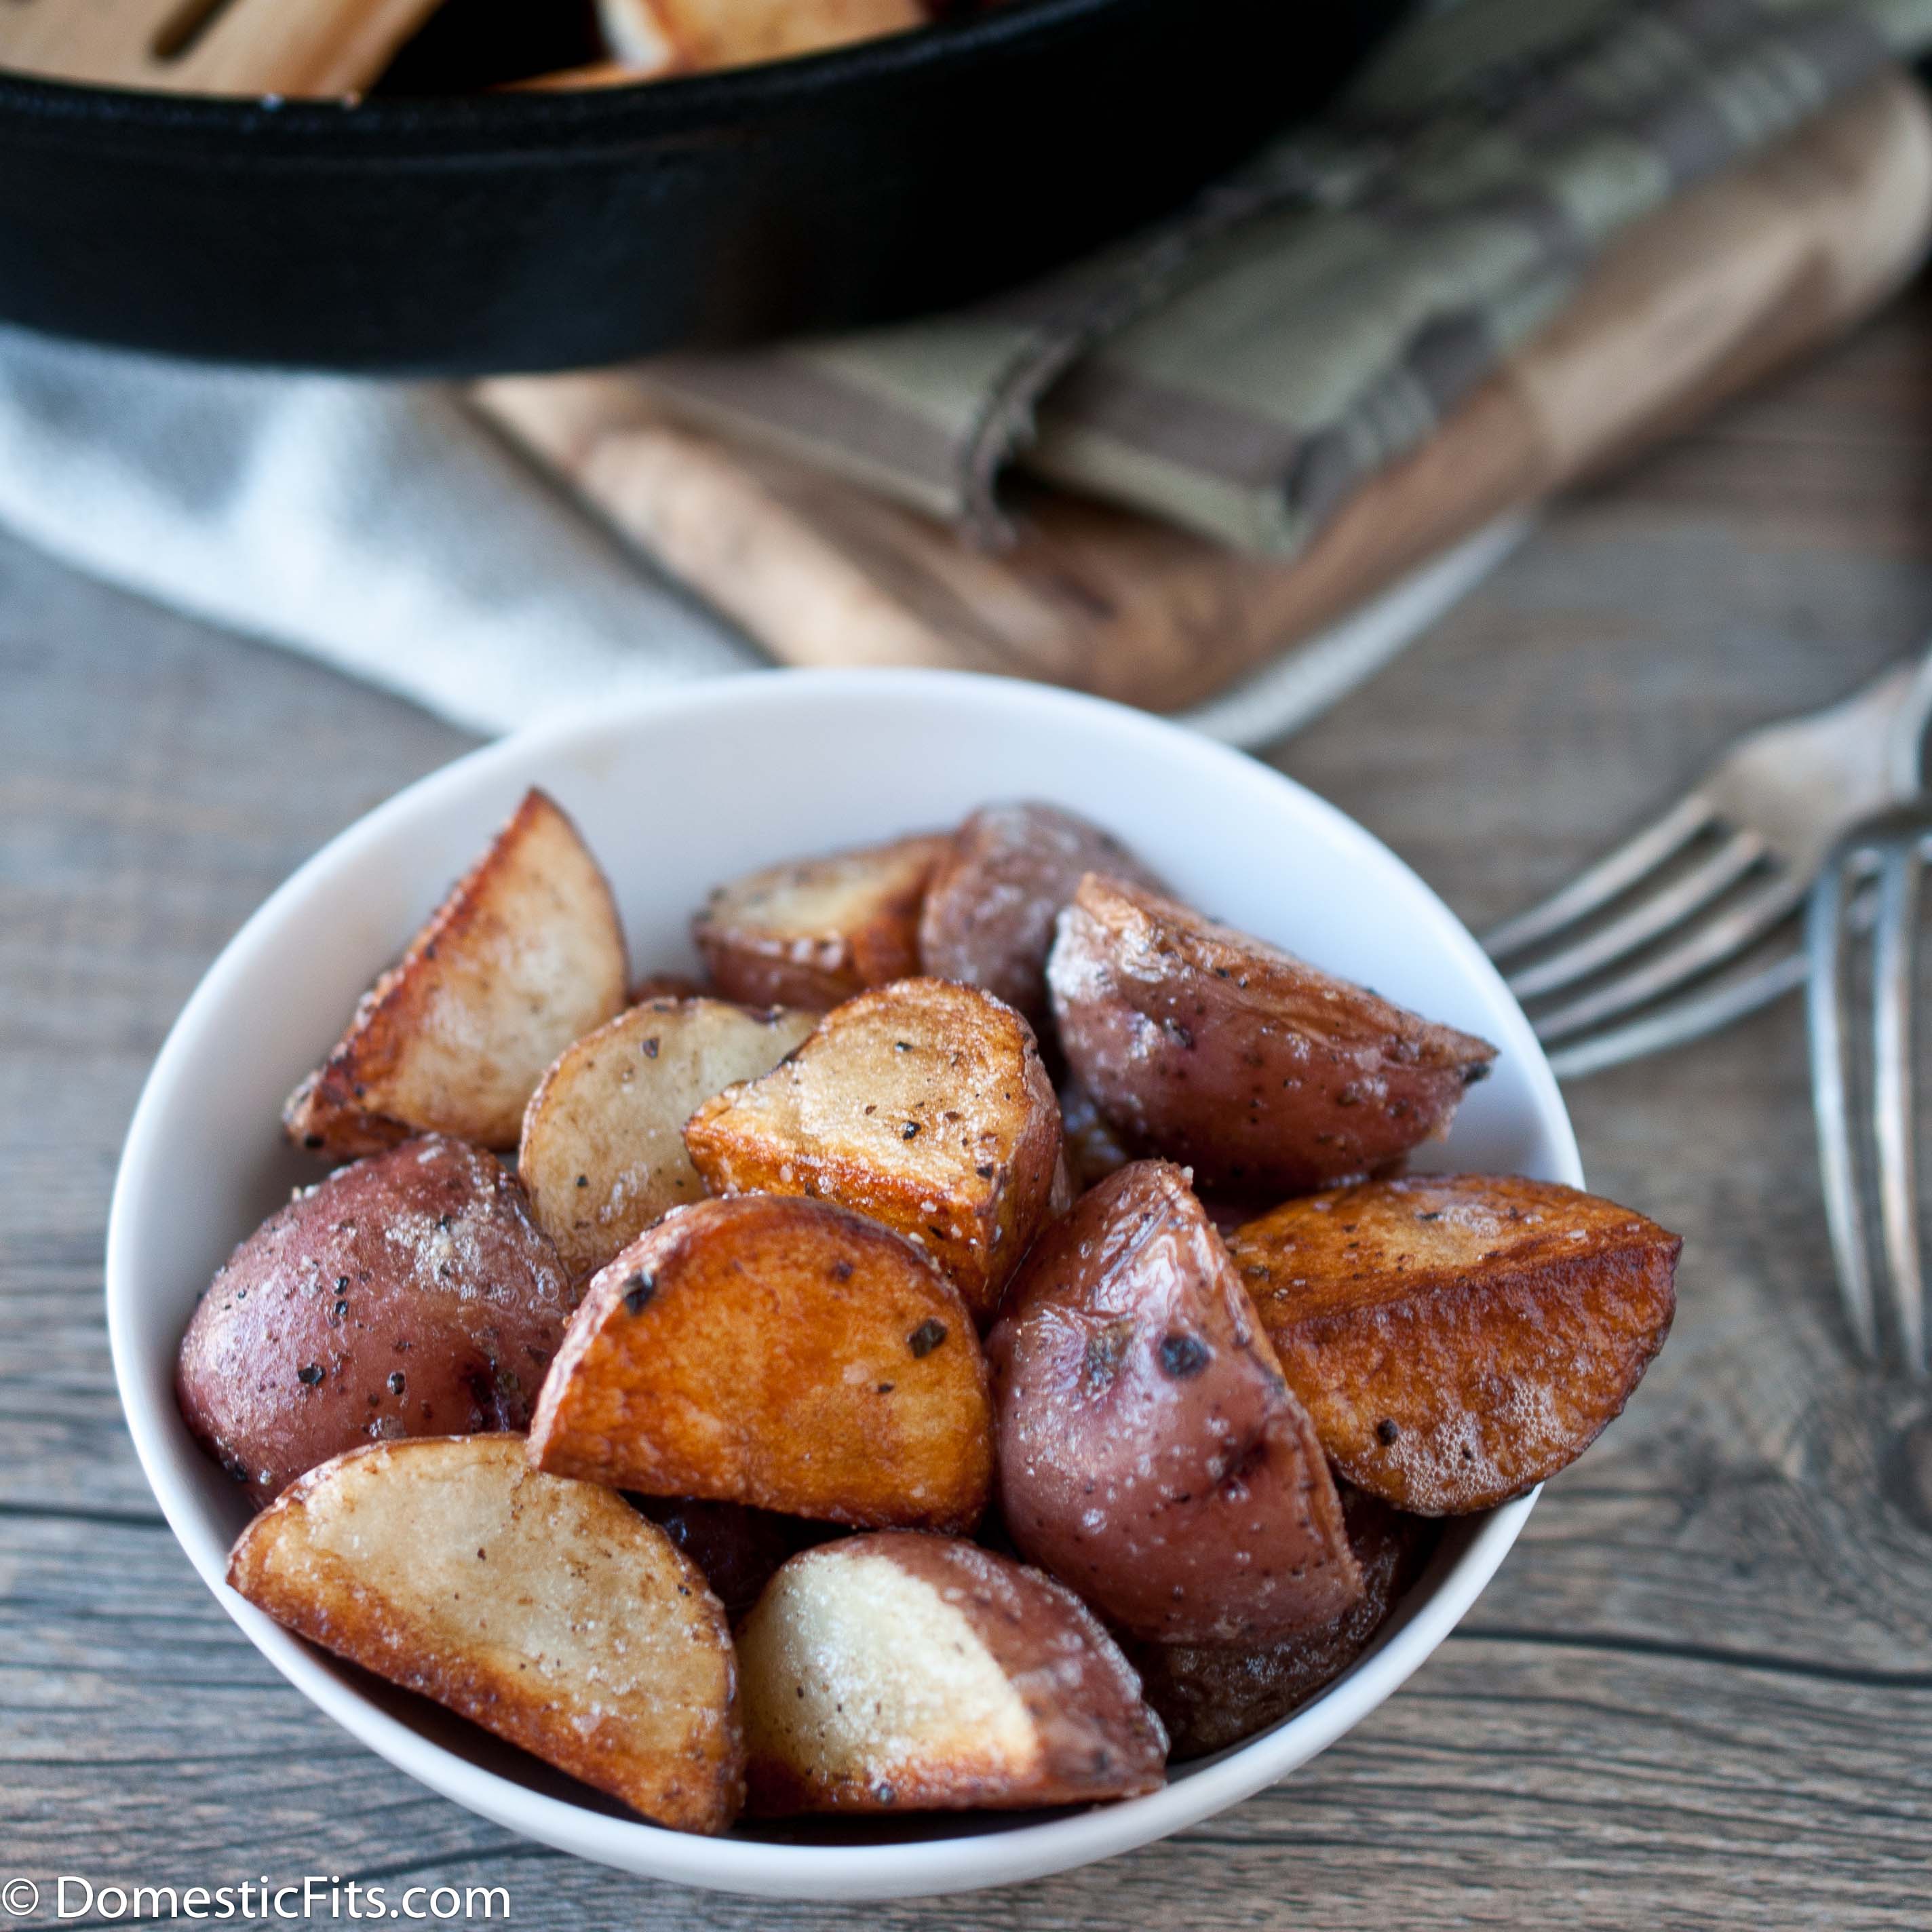
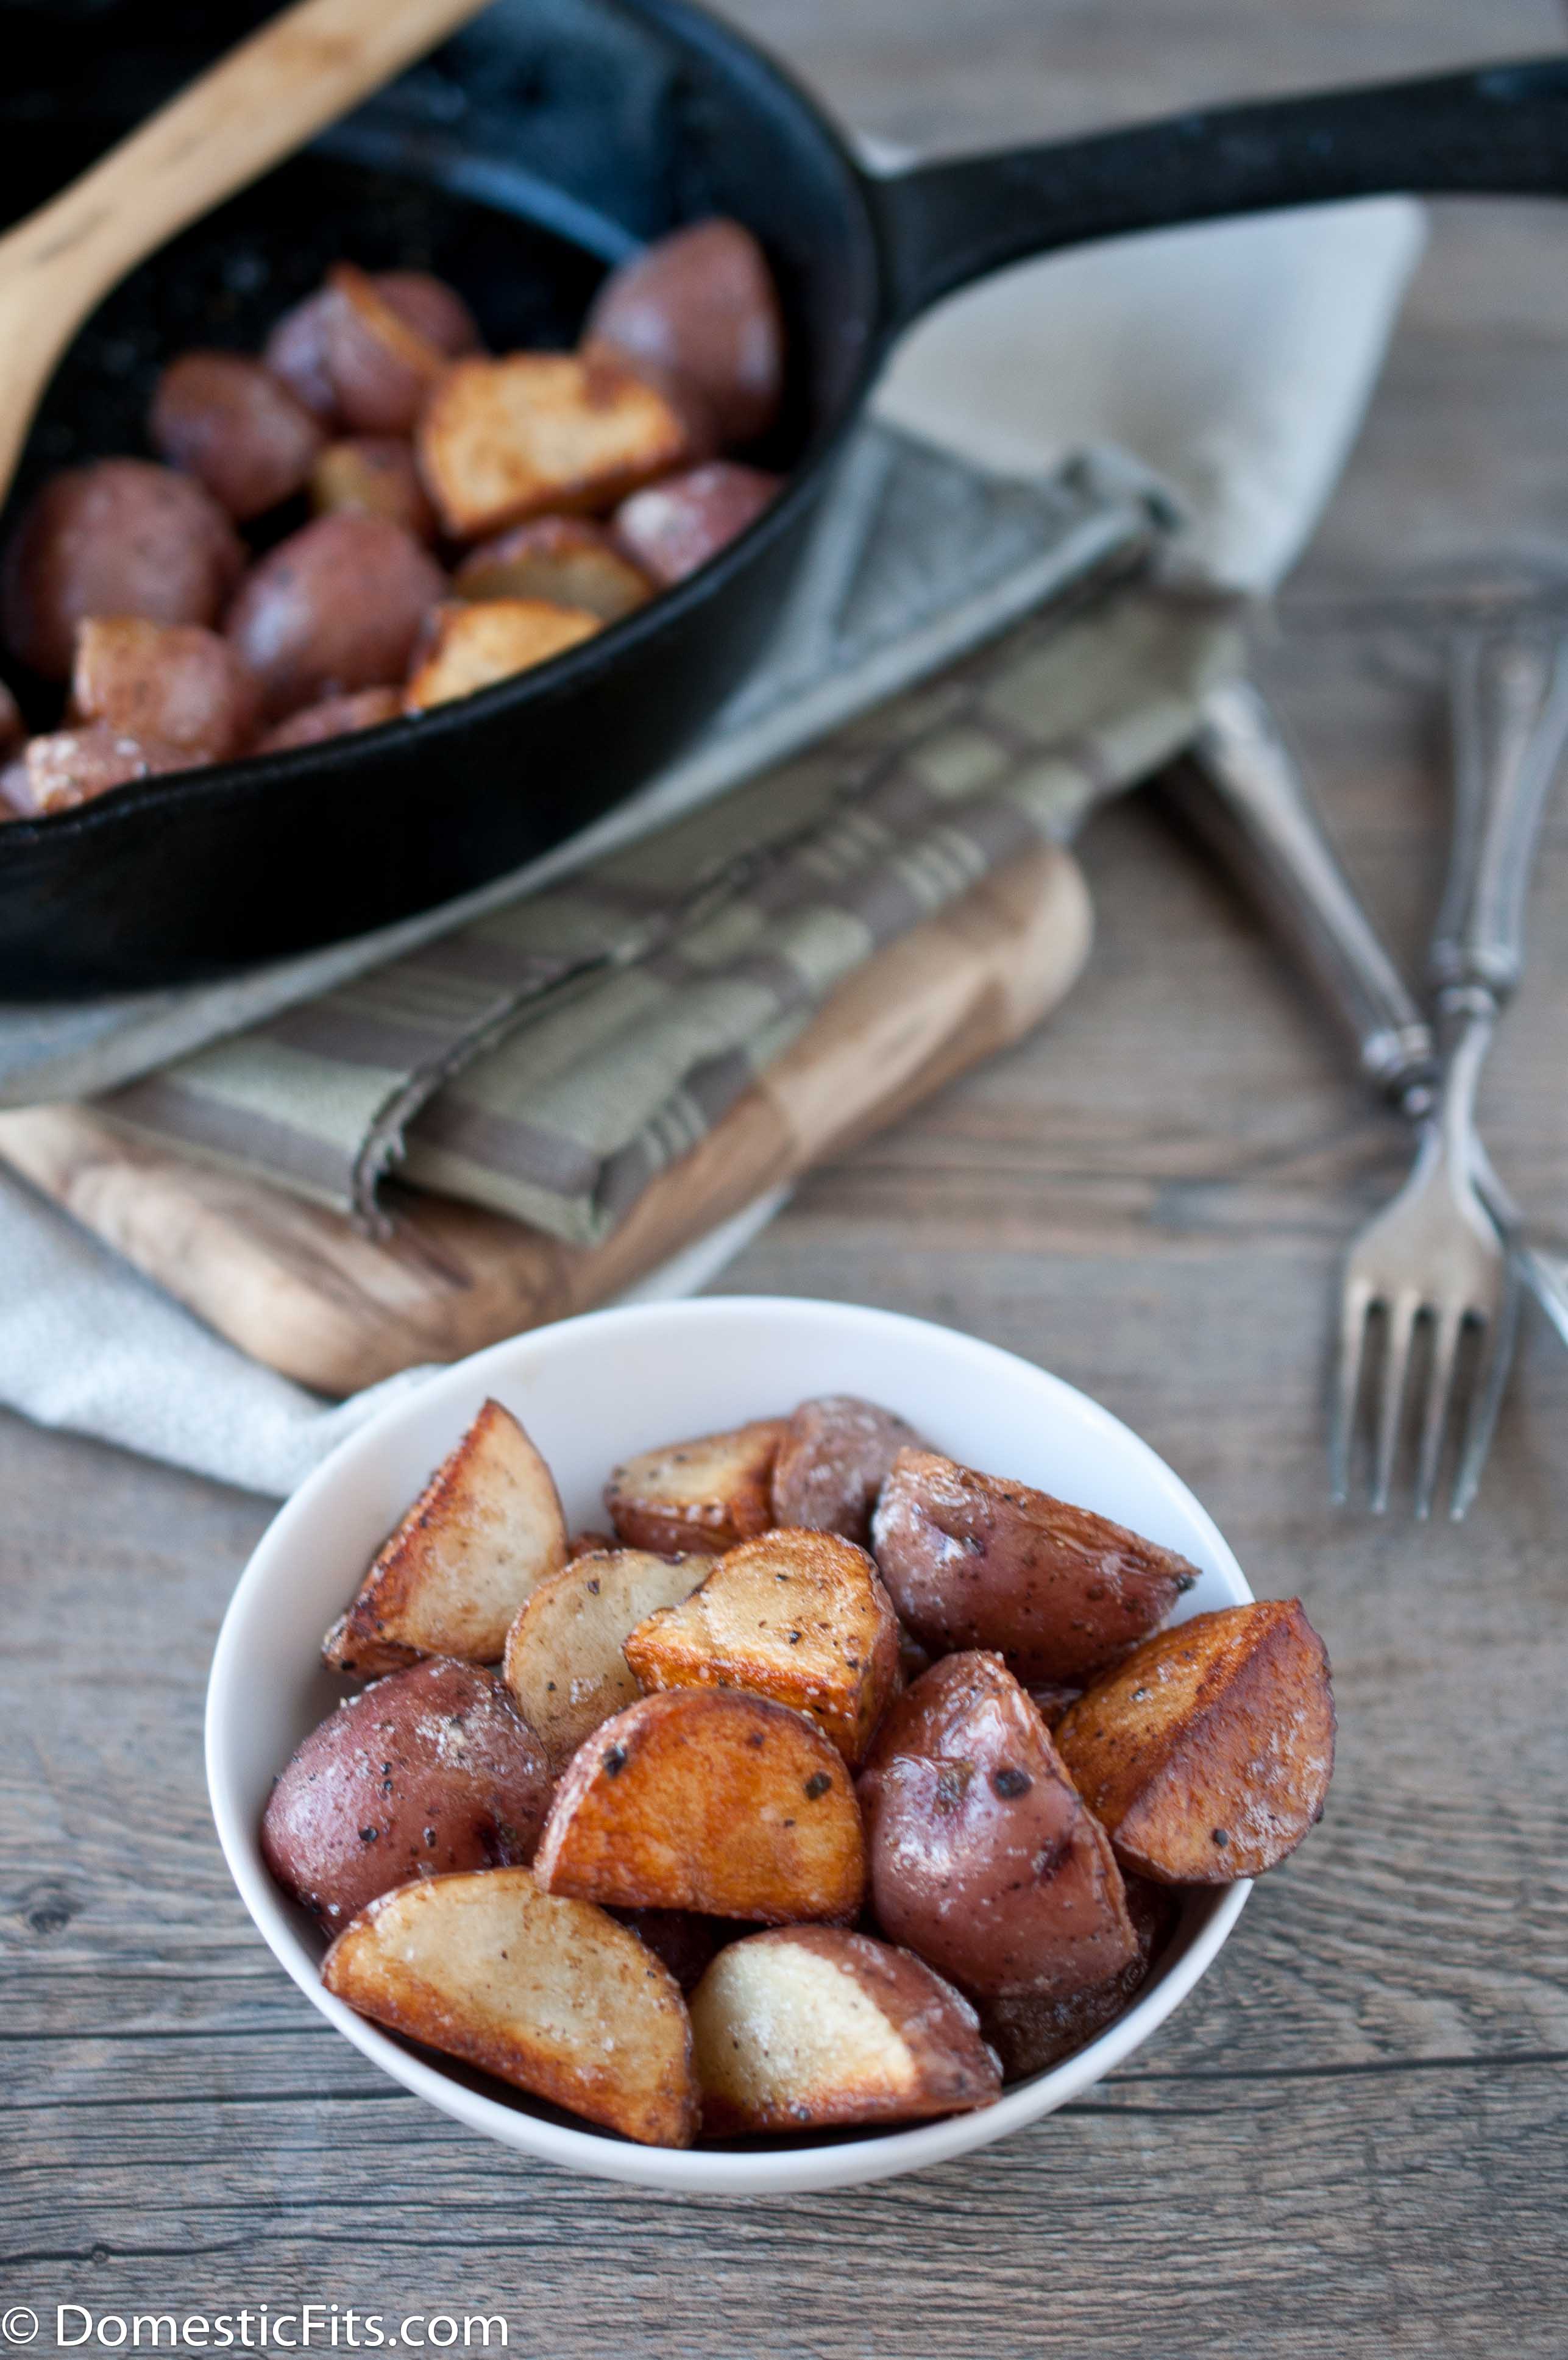
Perfect Skillet Roasted Potatoes
Ingredients
1.5 lb baby red potatoes, cut into quarters
3 tbs olive oil
1 tsp sea salt, or kosher salt
1 tsp black pepper
Instructions
Preheat the oven to 375.
Add olive oil to cast iron skillet over medium high heat until hot but not smoking.
Add the potatoes, one of the cut sides down.
Cook until browned, about 3 minutes.
Push each piece of potato over, toggling it onto its un-browned cut side.
Cook for one minute, transfer skillet to the oven and cook for 15 minutes or until potatoes are fork tender.
I’ve been wanting to make you some beer fried chicken for a while now, but it’s a bit intimidating.
The best fried chicken comes from the south, it’s a fact of sorts. As is the fact that, other than a few weeks in Atlanta, I haven’t spent much time in the Southern states. And, let’s be honest, a white girl from Washington State isn’t exactly your go-to when you want the worlds best fried chicken.
But I have some confidence in this recipes because it isn’t really mine. I’ve added a few things, but the heart and soul of it belongs to a woman who’s chicken was so incredible, Ruth Reichl spent weeks, and copious amounts of beer, extracting the recipe from her. Even 40 years after plying Claritha with enough beer to obtain said recpe, Ruth not only remembers it, she writes about it in Tender at the Bone: Growing Up at the Table.
Like any great recipe, it travels. How I hope my recipes become your recipes. My Chocolate Stout Cake becomes your Chocolate Stout Cake, the one your boyfriend begs you to make him for his birthday and tells his friends, "My girl makes the best cake." Because once your hands have cut the butter, stirred the batter and frosted the cake, it’s not my recipe any more, it’s yours. As it should be.
So, from Claritha, to Ruth to Random House to me and finally to you, is the best fried chicken I’ve ever made. I hope it becomes your fried chicken too.
Beer and Buttermilk Fried Chicken
Adapted from Claritha's Fried Chicken, Ruth Reichl, Tender at the Bone
Place chicken in a wide bowl. Cover with salt, place uncovered in the refrigerator for 2 hours. Remove chicken from the bowl.
Rinse the chicken well and clean the bowl to remove all the salt. Add buttermilk, beer and onion slices to the bowl, stir to combine. Add the chicken back in the bowl, cover and refrigerate overnight, 8 to 20 hours.
Add the flour, salt, cayenne, brown sugar, and pepper to a bag, shake to combine. Drain the chicken. add chicken to the bag, shake until the chicken is well coated. Place chicken on wax paper or parchment paper. Allow to sit at room temperature for 1/2 hour.
In a large skillet melt the vegetable shortening and butter over high heat. Add chicken (working in batches if necessary), cover and lower heat to just above medium. Cook for 8 to 10 minutes or until golden brown, turn and cook on the opposite side for about 8 additional minutes or until cooked through.
I’ve reached a goal of sorts, and I wanted to tell you about it. When I started this blog in 2011, it was as a direct response of having to put my 4 month old in the arms of stranger, turn around, and drive to an office.
I love my job, and I love my babysitter, she has become a part of the family. But at the time, I didn’t know her, she was just the woman who had babysat my friends daughters. If you’ve never had to leave your baby, it might not sound that terrible, but at the time it felt like a part of my heart was being torn out.
Every morning when I left her I cried, and my babysitter understood. She has four grown boys of her own, and started watching babies as a way to stay home with them, "I’d worry about you if this didn’t bother you. It’s OK, everyone cries when they leave their babies," She had told me. Somehow, that made me feel better.
I decided to try and find a way to work part time, in order to stay home with her more and maybe, when I decided to have Baby #2, I would be able to stay home longer. For some reason, a blog was my brilliant idea. It wasn’t until after I had fallen in love with blogging that I discovered that the average blogger only makes $40 a month. Although I am lucky enough to make much more than that off my ad revenue, it isn’t enough to quit my job. Even though the income isn’t what I hope, my complete love and utter obsession with food writing, blogging and recipe develop makes up for that. But I needed other ways to make money. Little by little, small job by small job, I’ve been able to nickel and dime my way to part time.
I’m part time!
I only have to go to an office 3 days a week. It really is amazing. One of the ways I’ve been able to do this is freelance writing. I wrote an article last year for Honest Cooking that I was so proud of, I just have to tell you about it. More than 100 food writers and bloggers pitched for only 10 slots in the new Honest Cooking iPad magazine and I was given one of those spots. I was so grateful, but once I got the green light, I froze. Could I do it? Could I really write something I was proud of, that could stand up to the work of real life food writers? Writing this article I was able to prove to myself that I am able to do this. It was a turning point for me, proof that I really can do this. I can move forward in this world I so badly want to be part of. And next time, maybe I wont have to put my infant in the arms of a stranger.
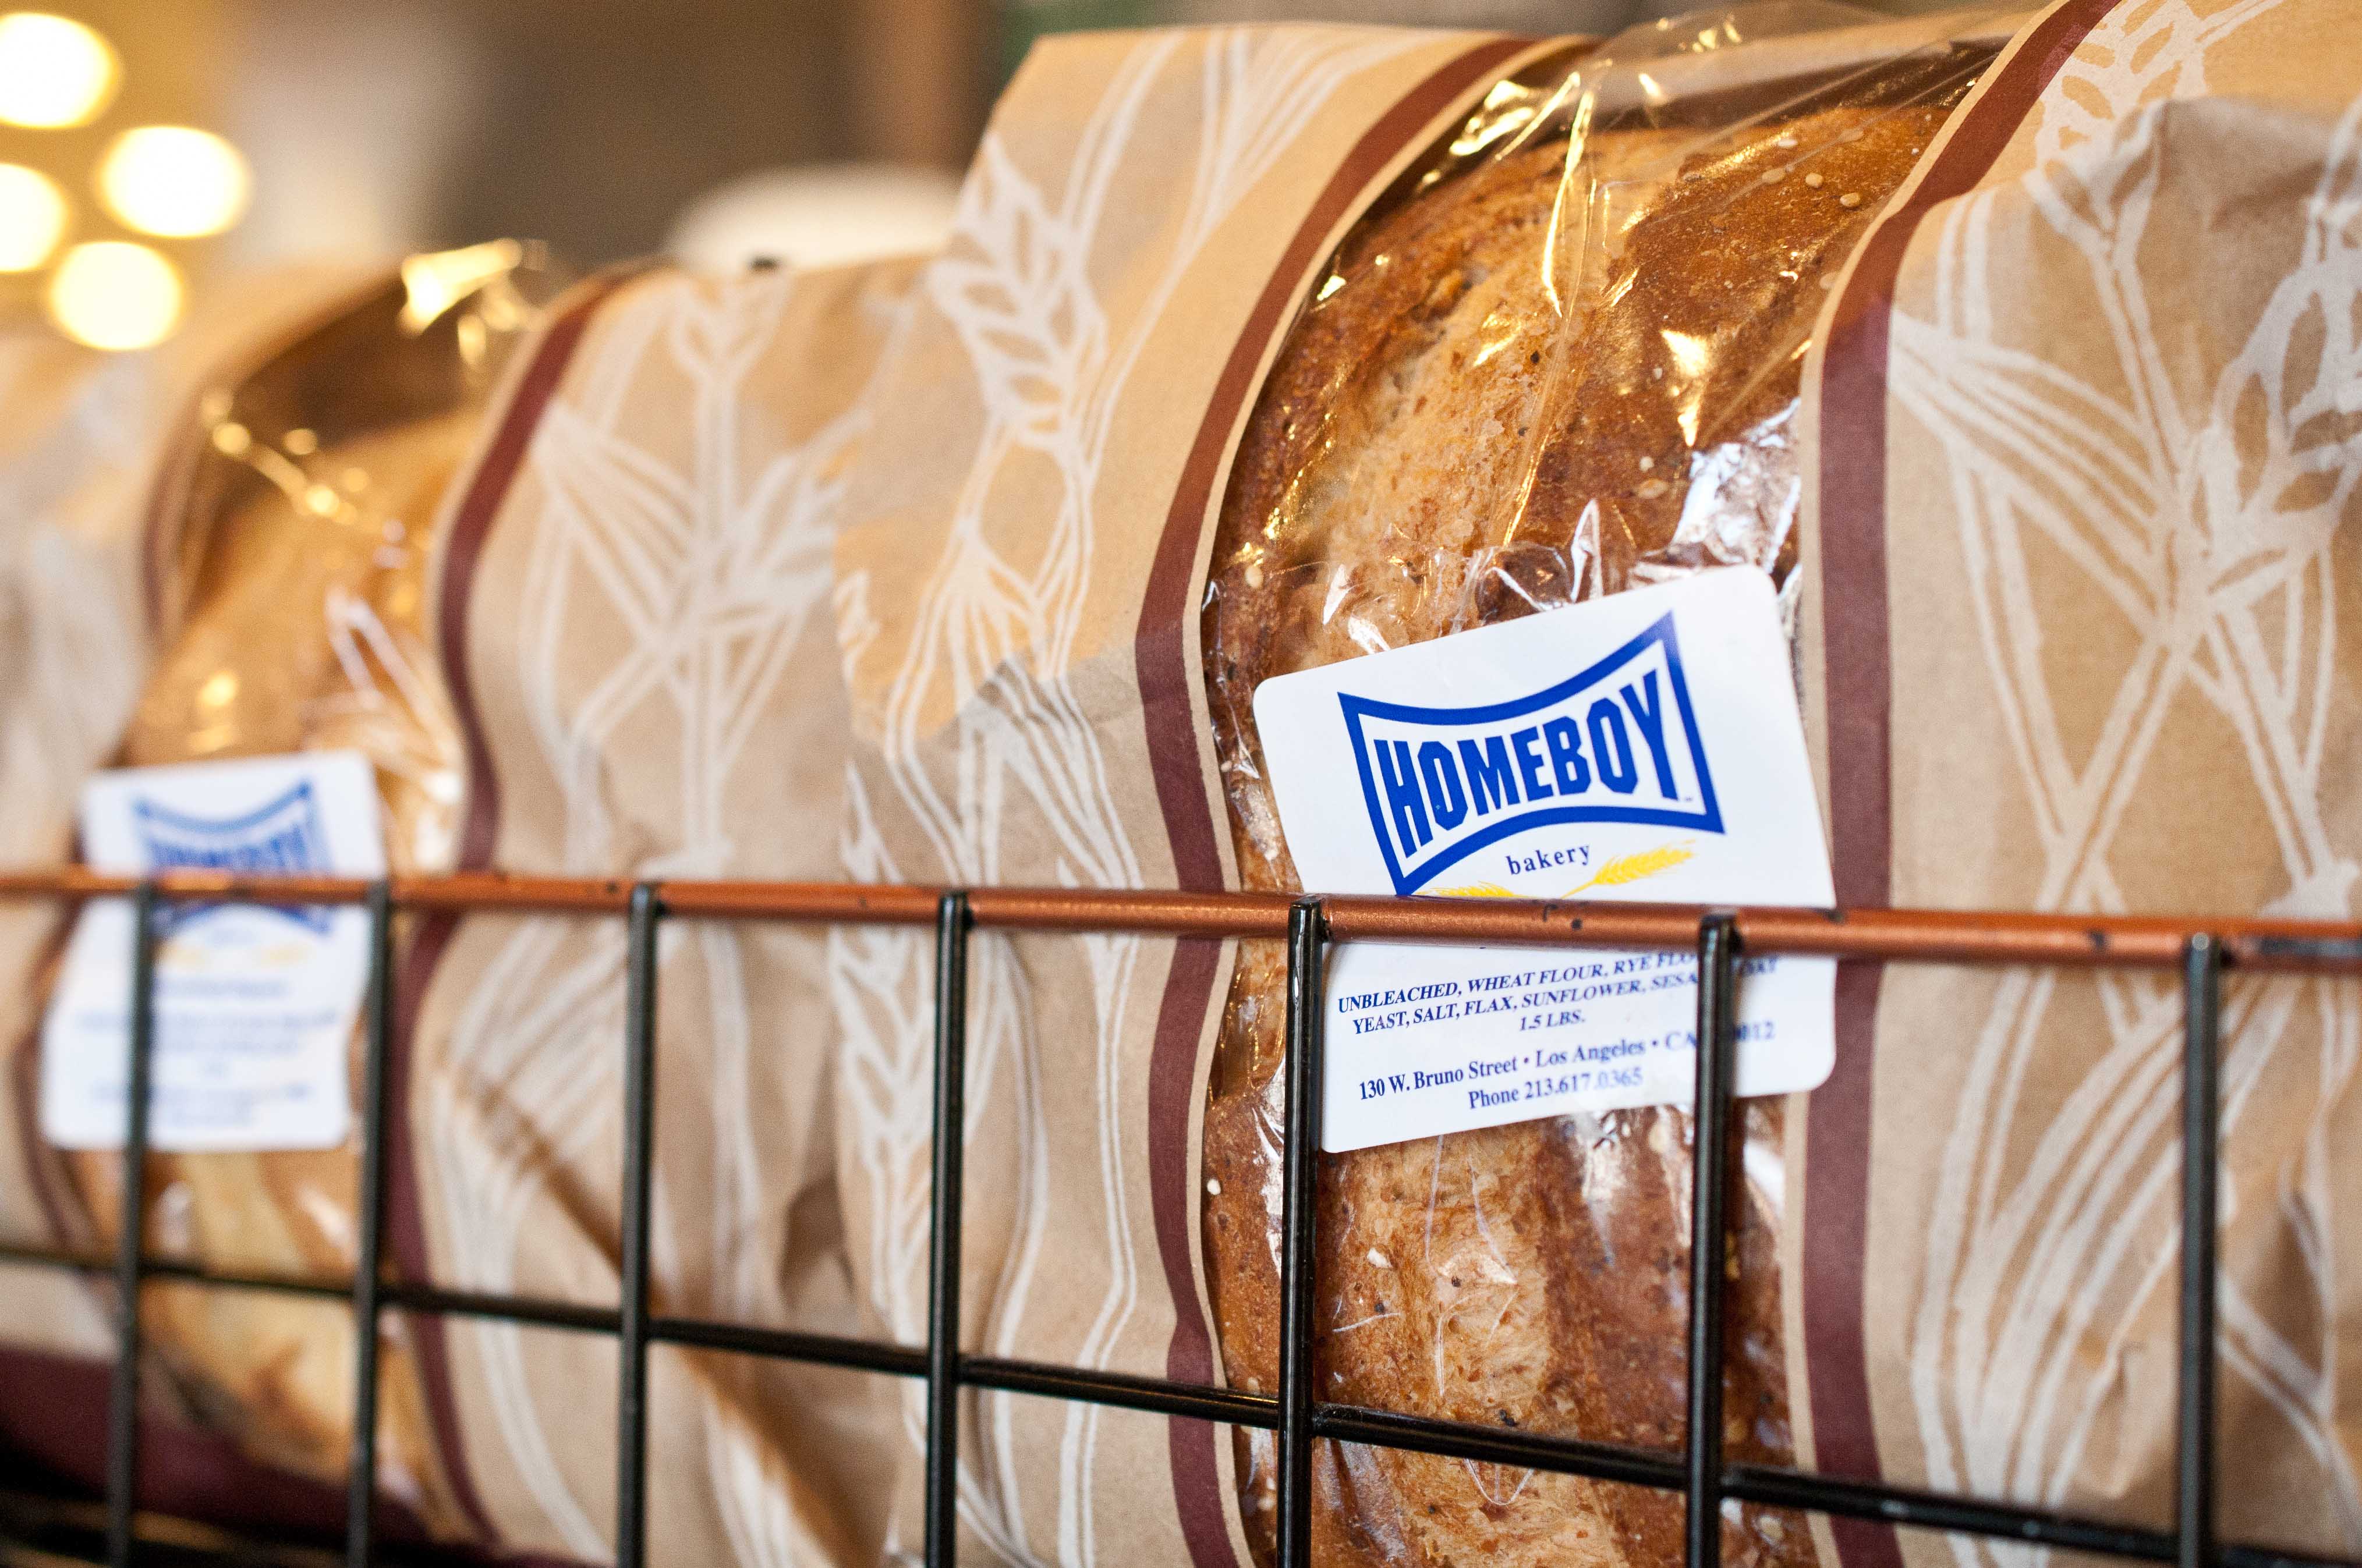
The article I pitched was on a non-profit that I’m a bit starry eyed over. Homeboy industries helps Los Angeles gang members get out of gangs by turning them into chefs and bakers. It’s an incredible organization and for so many people, the only way out of gang life. It is the most successful gang rehabilitation program in the world.
I spent three days interviewing ex-con, ex-gang members, visiting "urban gardens" spread across East Los Angeles, farmers markets and Homeboy Cafes. I left so inspired, by the people, their stories and the fight they fight daily to pull themselves out of the gangs they were often born into and give themselves and their children a good life.
So, please, if you have an iPad, please download the app and read my article. It’s a free app full of great food related articles and inspiring stories.
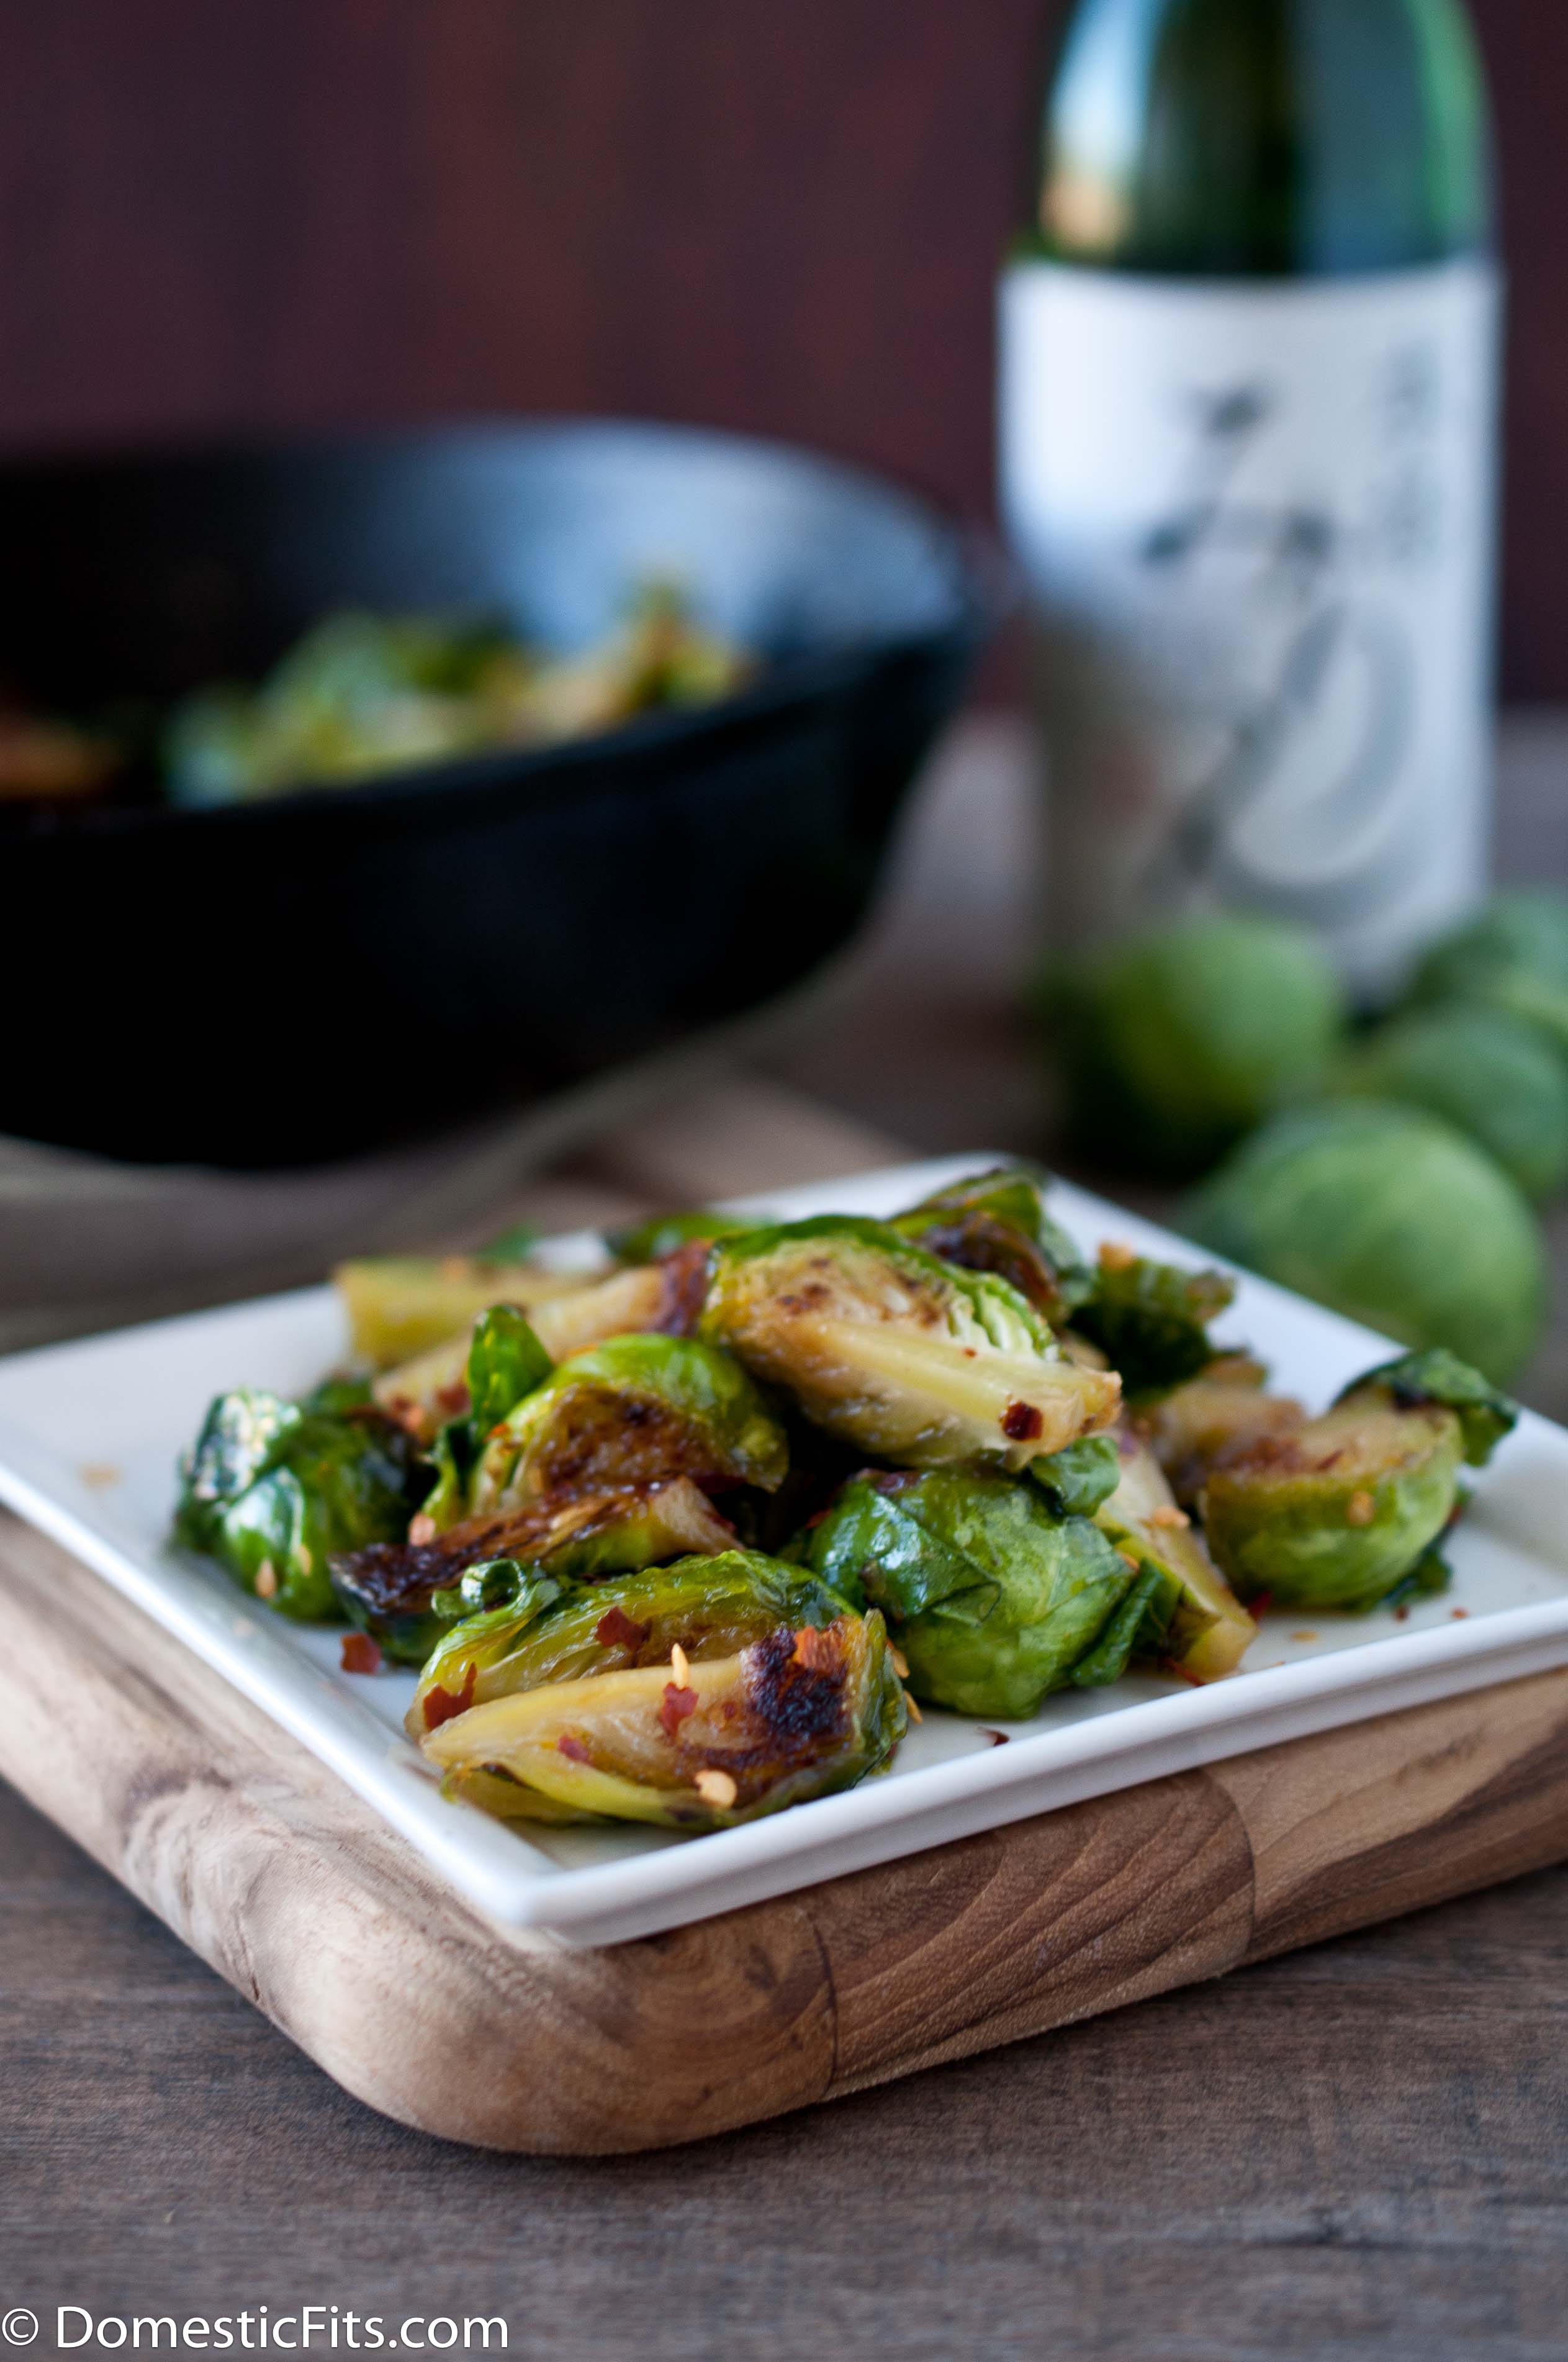
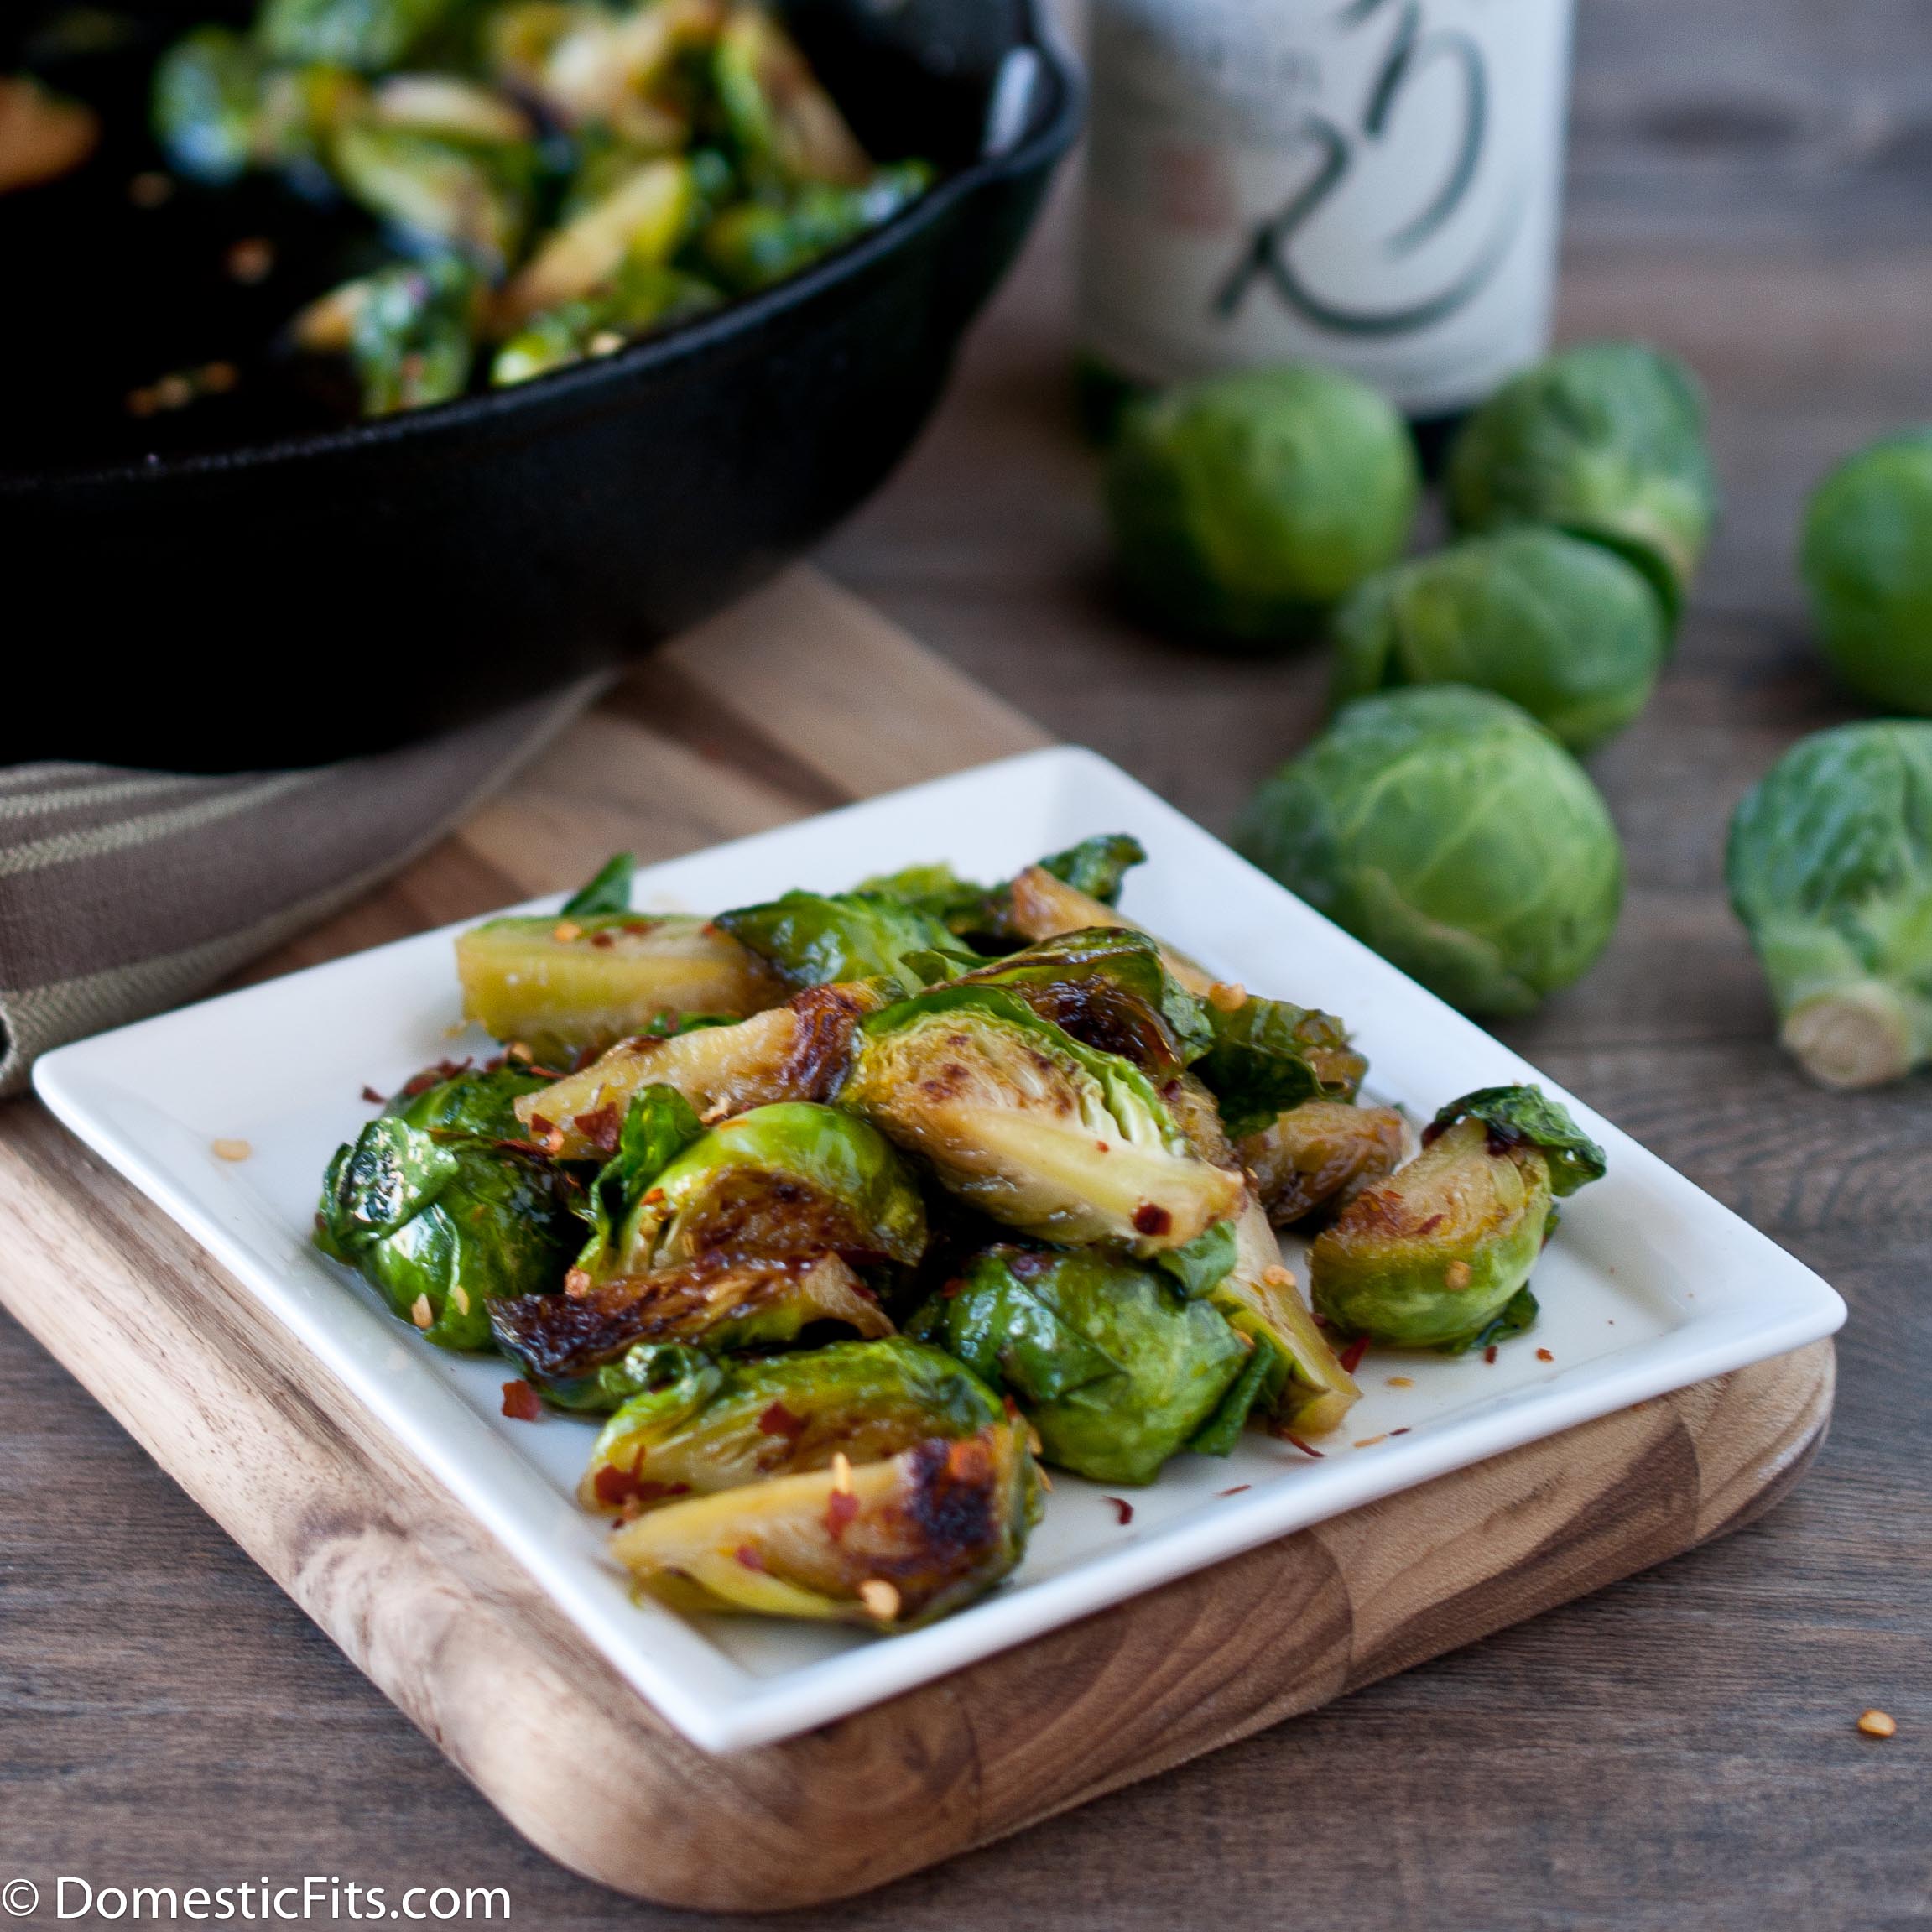
I also have some Brussels sprouts for you! I love these vegetables, but so far, my husband isn’t a fan. I’ve tried so many methods, braising, bacon fan, roasting and yet he remains unimpressed. Until I poured some Mirin into a cast iron skillet. It gets a bit sweet and caramelized, giving a new life to there little green guys.
He loved these, more than even the bacon fat version. I hope you do too.
Mirin Caramelized Brussels Sprouts
Ingredients
2 tbs olive oil
3 cups Brussels sprouts, quartered
1/3 cup mirin
½ tsp red chili flakes
¼ tsp Kosher or sea salt
Instructions
Heat olive oil in a cast iron skillet over medium-high heat, add Brussels sprouts and cook until Brussels sprouts start to brown. Add Mirin and cook, stirring occasionally, until mirin has reduced and thickened and the sprouts are fork tender. Sprinkle with chili flakes and salt, stir to combine.
If you’re new to the Craft Beer scene, it might surprise you how many vegetarian and vegans there are here.
While I am a meat eater (clearly, I put bacon in desserts), I did spend three years as a vegetarian. Mostly, this was a response to growing up on a farm and getting up close and personal to the butchering process as well as the jarring realization of knowing the first name of my dinner. It did, however, give me a profound respect for the food I eat and the farms that share that respect.
I still eat vegan quite often, and there are some dishes, like lasagna, that I just think are just better in vegetarian form.
My true and honest feeling about vegan cooking is that regardless of what your typical diet is if you can’t cook a vegan meal that you love, you just aren’t that good of a cook. Produce is amazing, you get to use all the grains, seeds and nuts that you want and by the way, for the most part beer is vegan.
I first heard about Cashew Cream from this guy, and the idea was intriguing, given that I would have a much easier time giving up meat than sour cream and goat cheese. I like the idea of having a creamy element when I want to go non-dairy. This cashew cream was a really beautiful creamy addition to a vegan chili, when sour cream isn’t an option. I wanted to balance the sweetness so I added some acid and some spices, but feel free to experiment. This would also be a great place to add a little chipotle.
Add the cashews to a bowl, pour almond milk over cashews until covered. Let stand for 4 hours.
Drain cashews and add to a food processor with 1/3 cup almond milk, IPA, salt, pepper, onion powder, garlic powder and vinegar. Process until smooth, about 5 minutes, possibly longer. Add additional almond milk or beer for a thinner consistency.
In a pot over medium high heat, add the olive oil, onions, red peppers and mushrooms. Cook until onions and peppers have softened and the mushrooms have darkened.
Add the garlic and the soyrizo, stir, breaking up the soyrizo.
Add the stout, broth, tomato paste, black beans, kidney beans, tomatoes and chipotle, allow to simmer for about 10 minutes.
Add the quinoa, bulgur, cumin, smoked paprika, salt and garlic powder, simmer until the quinoa has cooked, about 15 minutes. The longer chili simmers, the thicker it will be.
Plate on top of tortilla chips, if desired, top with cilantro, avocado, and cashew cream.
I heard this theory of negative calories foods about a year ago. And while this idea would be a dream come true, I’m not actually convinced of it’s validity.
The theory is that some food cost your body more energy in calories to consume and digest than the food actually contains.
Take celery for instance. A stock of celery is 5 calories, but between chewing, swallowing and digesting, it takes 15 calories to actually eat a stalk of celery, for a net loss of 10 calories. Now, if celery could just taste better, and not like, well, celery, than we’d be all set. Clearly, this theory doesn’t apply to French fries.
On the list of "Negative Calorie Foods" are:
-Asparagus
-Beet Root
-Broccoli
-Cabbage
-Carrot
-Cauliflower
-Celery
-Chicory
-Hot Chili
-Cucumber
-Watercress
-Garlic
-Green Beans
-Lettuce
-Onion
-Radish
-Spinach
-Turnip
-Zucchini
-Apple
-Blueberries
-Cantaloupe
-Cranberry
-Grapefruit
-Honeydew
-Lemon/Lime
-Mango
-Orange
-Papaya
-Peach
-Pineapple
-Raspberry
-Strawberry
-Tomato
-Tangerine
-Turnip
-Watermelon
While this theory has been widely discredited, there is no arguing with the fact that this is an incredible list of foods. If more than half of your diet was pulled from the above list, and the rest of your diet was "sensible" you would never have to diet again and those skinny jeans would be yours.
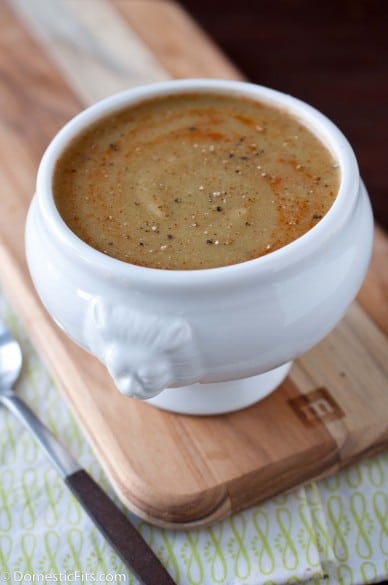
I did a bit of a test of my own. I made a batch of this soup and ate it for lunch every day for a week.
I lost 2 lbs. Which is a lot for me, given that I have a BMI of 20.6.
That doesn’t really prove anything. Other than the fact that a low calorie vegan soup is a good route to take when looking to drop those holiday pounds. Believe the theory or not, this is still a fantastic list of healthy foods.
Even if this soup isn’t "Negative Calorie," it still only has 78 calories per serving.
Negative Calorie Roasted Asparagus and Cauliflower Soup
Ingredients
2 lbs chopped cauliflower (about 8 cups)
1 lb fresh asparagus stalks, trimmed
4 cups veggie broth
½ tsp onion powder
½ tsp garlic powder
½ tsp salt
½ tsp pepper
pinch cayenne pepper
yield: 6 cups
Instructions
Preheat oven to 400.
Place asparagus and cauliflower on a baking sheet. Roast at 400 for 15 to 20 minutes or until asparagus is fork tender and the cauliflower has started to brown.
Add broth to a large pot, add asparagus and cauliflower and bring to a simmer. Simmer for 10 minutes or until the vegetables have started to break down. Using an immersion blender, puree until smooth. Add the seasonings, adjust to taste.
I love hearing other peoples Culinary Bucket Lists. It’s always a really interesting mix of classic recipes, mastering techniques, and difficult dishes. I love that, it shows range.
But seriously people, start crossing some of this stuff off. You can do it. Just jump right in, and do it.
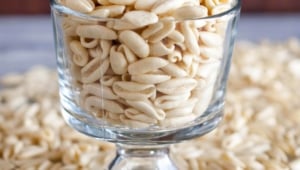
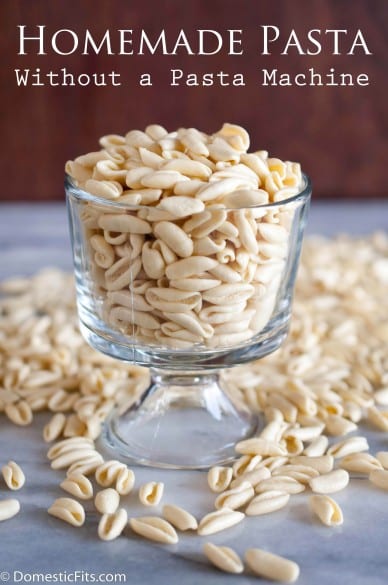
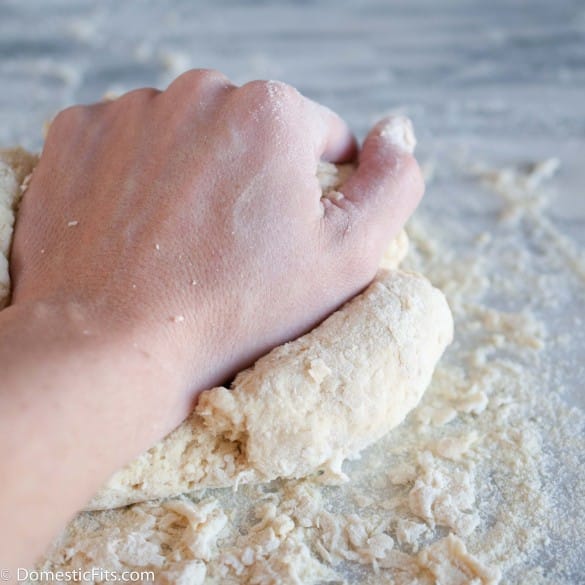
This is a great recipe for everyone that has "Make Pasta From Scratch" on your list because you don’t need any fancy equiptment. Just some flour, water and a knife.
You’ve go this.
I’m going to be honest with you, this is a bit labor intensive. But you can finally draw that satisfying line though the item that’s been taunting you on your bucket list for years. You can finally say things like, "This one time, while I was making pasta from scratch…" and "Well, when I make my pasta…"
It’ll be fun.
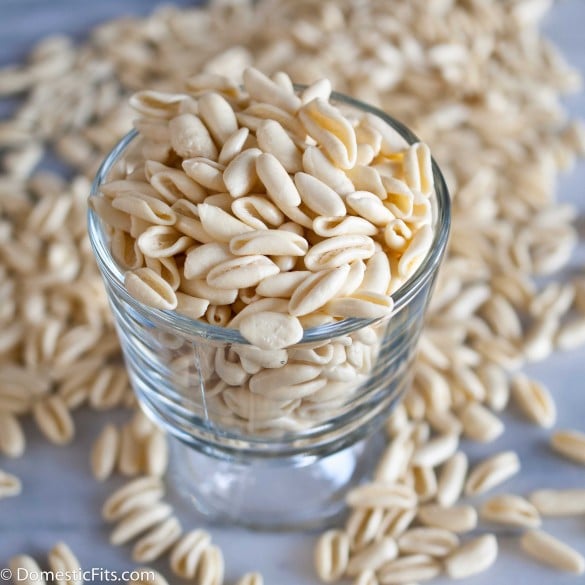
Homemade Cavatelli Pasta
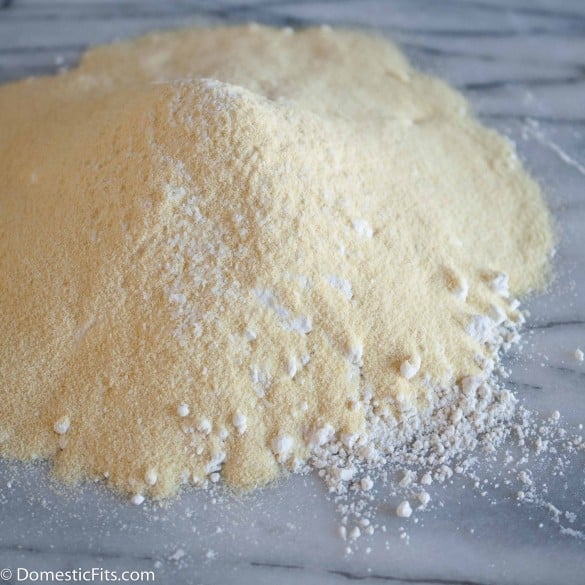
2 cups All Purpose flour
1 cup Semolina flour
½ tsp salt
1 cup warm water
1. Add both kinds of flour and salt to a flat surface, mix to combine.
2. Make a well in the middle and add the water.
3. Stir the liquid and the flour together until combined. Then knead until smooth, about 5 minutes.
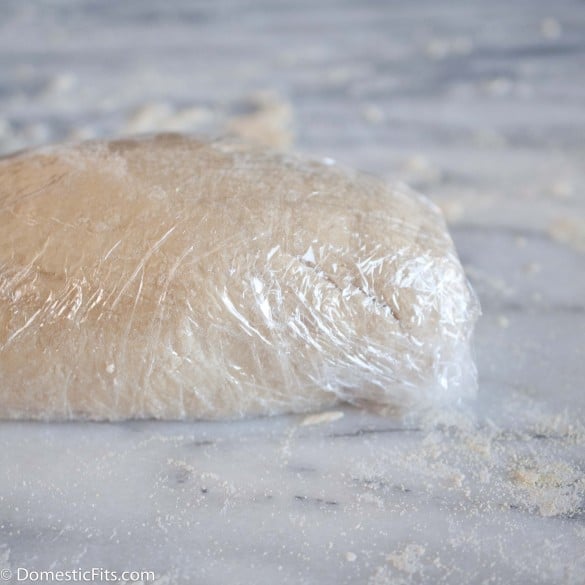
4. Cut into 4 pieces, wrap in plastic wrap and chill in the refrigerator for 1 hour.
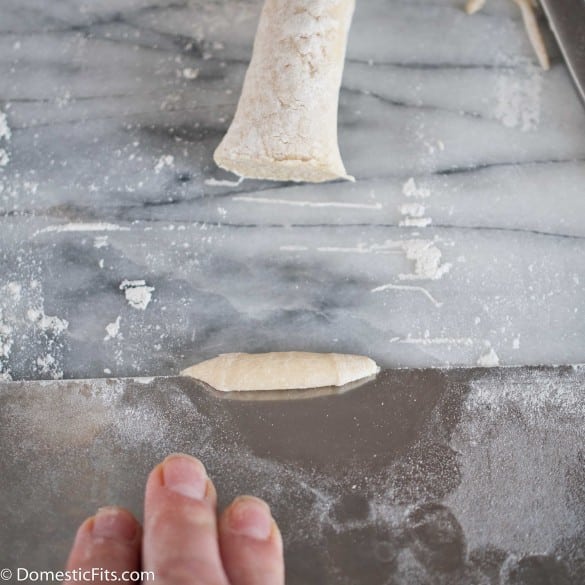
5. One at at time, take a piece of dough and form into a long log about 1/4 to 1/2 inch in diameter.
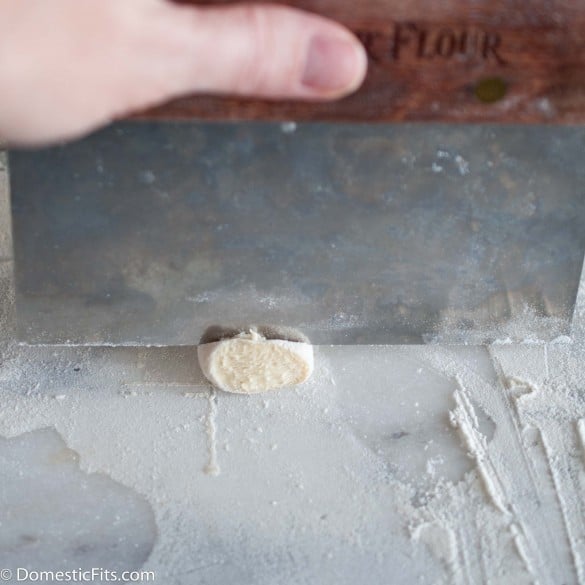
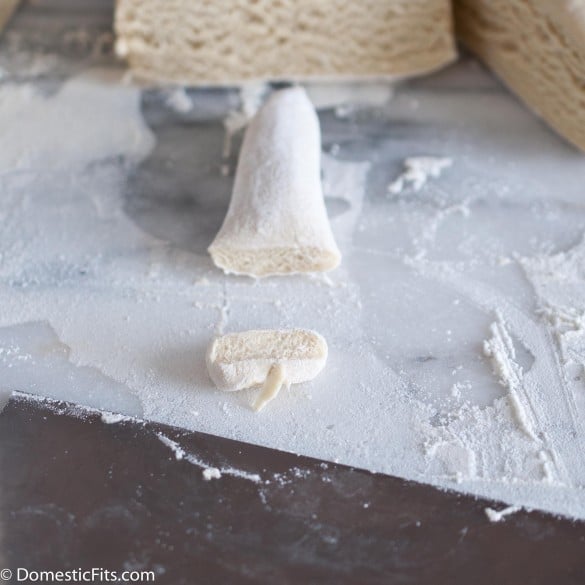
6. Cut off about 1/4 inch slice and place in front of you. It should be about the size of a dime.
7. Place a bench knife (I use this one, I love it), or the dull side of a butter knife, on the far side of the dough circle, pull towards you smearing the dough against the counter. The dough should curl up over the knife.
8. It should look like a little canoe.
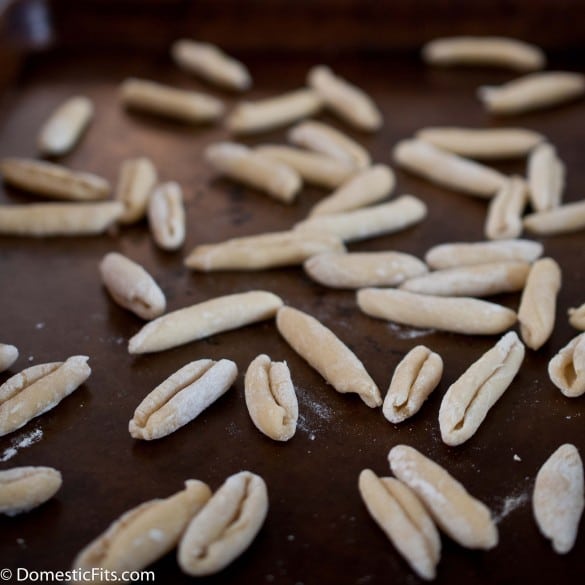
10. Place on a baking sheet that has been lightly dusted with flour until ready to use. Basically, if you mound them on top of each other, they’ll stick.
11. Cook immediately in lightly salted water until al dente or allow to dry and store in an air tight container.
I’m somewhere around halfway done with this cookbook, and I need some feedback. I have about 50 recipes ready to go, but they have never been cooked outside of my kitchen.
I want to know if they work for you, if you like them (or didn’t), if the directions make sense. This part is important to me, it increases the chances that we can catch some of the flaws, some of the directions that may be misleading, or some factor I might have overlooked.
This book means so much to me, and the recipes working for as many people as possible is a high priority.
And I can’t do this on my own. If you are willing to make one (or more) of the Top Secret recipes I have in the works, keep it secret until the book goes to print, and give me your honest opinion, I need that.
If you’re at all interested, Please, check out my Book Page for more info. Please.
3cupsmini pretzels twistslightly crushed (about 1 ½ cups once processed)
2tbsbrown sugar
½cupmelted butter
24ouncescream cheese
½cupsour cream
pinchsalt
2tbsflour
1 ½cupsgranulated sugar
2eggs
½tspvanilla
Instructions
Place dried cherries in a bowl or tall glass. Pour stout over cherries until fully submerged. Allow to sit at room temperature for 1 to 2 hours. Drain, reserving ¼ cup of the soaking liquid.
Preheat oven to 400.
In a food processor, add the pretzels and brown sugar, process until only crumbs remain, about 3 to 5 minutes. Slowly add the melted butter while the processor is running. Pour into the bottom of a 9 X 13 inch baking pan. Use the flat bottom of a heavy glass, measuring cup or mug to press the crust really well into a flat even layer.
In the bowl of a stand mixer, add the cream cheese, beat on high until creamy, about 3 minutes. Add the sour cream and beat until well combined. Add the salt, flour and sugar, mix until well incorporated. Add the eggs and vanilla, one at a time, mixing well between additions. Add ¼ of the stout used to soak the cherries, mixing until just incorporated. Stir in the cherries.
Pour cream cheese mixture over the crust, smooth out into an even layer.
Place in the oven and reduce oven temp to 350. Bake at 350 for 28-32 minutes or until the cheesecake has puffed slightly and center no longer jiggles when you shake the rack it sits on. Don’t over bake, it will firm up once it chills. Remove from oven (allow to stand at room temp until slightly cooled, about 10 minutes) refrigerate until chilled and set, at least 4 hours and up to 24. Cut into squares for serving
Apparently, I like to torture myself. Sometimes it’s in small ways, like keeping my size zero jeans from my modeling days that I will never fit into again. Ever. Ever.
This needs to be made with an IPA. The buffalo sauce (which has to be Franks, let’s just get that out of the way) needs a big kick to the face. The only beer up for that job is an IPA. read more
I love resolutions, I just don’t make those "I’m going to remove things I love from my life" kind.
I make resolutions that are more inline with goals. As in:
-I’m going to take a homemade pasta class
-I’m going to read more food lit
-I’m going to explore vegan cooking, because produce is amazing
Someday I’ll set the "I’m going to start homebrewing this year" resolution, but I’m not there yet.
It’s possible that were you live, it’s actually cold right now. And maybe you set a resolution about cooking more often, if that’s the case, I have the perfect thing for you.
Chicken pot pie, with cornbread build right in. Oh, and some beer.
4boneless skinless chicken thighschopped into bite sized pieces
3tbsflour
3cupschicken broth
4sage leavesminced (about ½ tsp)
½tspsalt
½tsppepper
1/3 more, plus more chicken
Cornbread top:
3/4cupyellow cornmeal
3/4cupflour
1tbsbaking powder
1/2tspsalt
½cupbeerpilsner or low to medium hopped pale ale
1large egg
3tbsmelted butter
Yield: 6 servings
Instructions
Preheat oven to 400.
Cut the corn off the ears, set aside.
In a large pot, melt 2 tbs butter. Add the shallots and cook until softened, about 3 minutes. Add the carrots, peas, and celery, cook until the vegetables have soften about an additional 5 minutes. Remove from pot, set aside.
Heat the olive oil. Add the chicken, cook until browned on all sides, about 5 minutes, remove chicken from pot.
Add remaining 2 tbs butter, heat until melted. Spinkle flour on top, whisk until well combined. Add the chicken broth and bring to a low simmer. Return the chicken and vegetables to the pot along with the corn, allow to simmer for about 10 minutes.
Place 6 individual, oven safe bowls (about 1 ½ cup sized) on a baking sheet. Pour chicken soup into bowls until about 2/3 full.
Ina large bowl, add the cornmeal, flour, baking powder, salt and stir until combined. Make a well in the dry ingredients, add the beer, egg and melted butter. Stir until just combined.
Top the bowls with cornbread mixture (it’s OK if the batter sinks, it’ll rise during baking).
Bake at 400 for 20 minutes or until cornbread is golden brown.
8. Winner, Winner Chicken Dinner! I won the Foster Farms regional cook-off in San Diego.
9. Trip to San Francisco and Napa valley for the Foster Farms National Cook off Finals. I didn’t win, but I did get an amazing weekend trip to San Francisco and Napa Valley, the opportunity to cook at the CIA, and some cash out of the deal. Not bad.
10. I signed my first book deal! with Adams Media.
13. Joy and I had a couple of drinks. And then picked up sharp knives. She made a salad, and I mostly just giggled.
14. Christmas Eve at The Dresden a long running tradition. Although most people just know it as "That Place They Filmed The Movie Swingers" It’s a Los Angeles landmark.
15. I rearrange my entire living room to take pictures. Of food. During my lunch break.
16. I gave my daughter a trampoline for Christmas and she doesn’t want to get out of it. Ever
I had such an incredible year, truly a year that was blessed by the blogging community and those who have supported me, the online friendships that turned to lasting ones and the connections we feel through food.
One of the my favorite events this year was The Feast of the Seven Fishes, a small dinner party and Fancy Schmancy Pot Luck thrown by Greg and Alaska SeaFood (see numbers 12 &13 above). A truly incredible night, hoisted up by the stellar seafood, an epic example of how essential it is to buy the good stuff when cooking a meal from the sea. Alaska Seafood is focused on providing the world with incredible, sustainable, wild seafood and were they gracious enough to provide each of the seven cooks who participated with the best Alaska has to offer.
There are two ways to buy scallops, "wet" and "dry." A wet scallop with be soaked in a phosphate solution to preserve it. This makes it taste soapy and gives it a bit of a rubbery texture, but the vast majority of scallops sold in US markets are wet. Dry scallops are more expensive, harder to come by and infinitely tastier.
If you can’t find dry scallops, the best way to treat a wet scallops is a quick brine.
If you can find some dry Alaskan scallops, I highly recommend that you grab them.
Also, I used this smoker. It’s less than $50 and stores in your cabinet, perfect for me and my occasional smoking needs.
Scallops On Smoked Sweet Corn Puree With Stout Balsamic Glaze
Ingredients
5 ears of corn, shucked
1 stick butter, divided in half
1 leek, chopped, white and very light green parts only
1/2 cup cream
¼ tsp salt
1/3 cup stout beer
2/3 cup balsamic
1 tbs honey
2oz pancetta
12 scallops
Maldon salt & fresh cracked black pepper
Yield: 6 appetizer portions
Instructions
Brine scallops if necessary.
Smoke one ear of corn for 8 minutes over alder-wood chips according to smokers manufactures specifications. (in lieu of this add 1/4 tsp smoked paprika or replace the salt with smoked salt).
Cut the kernels off all ears of corn, including the smoked ear of corn. Set aside.
In a large pot, melt 1/2 stick butter. Sautee leeks until soft, about 5 minutes. Add the cream and corn kernels, cook until softened, about 8 minutes. In a food processor or blender, puree until very smooth, abut 5-8 minutes.
Pass through a chinois or strainer.
In a medium sauce pan, add the stout, balsamic and honey. Boil until reduced to a thick syrupy consistency, stirring occasionally, about 15 minutes.
Dry the scallops well by placing between two stacks to paper towels.
In a pan over medium high heat, melt the remaining 1/2 stick butter.
Season the scallops on top and bottom with salt and pepper.
Sear on both sides until cooked thorough, about 3 minutes per side.
Cook the pancetta until crsipy.
Plate the corn puree, top with two scallops per plate, drizzle with balsamic glaze, then top with crispy pancetta.
I was interviewed by a baking magazine a few weeks ago, because apparently I am the foremost expert on cooking with beer. This was the second interview I’ve done on the subject for a print magazine. One question always gets asked, so I figure some of you might have this same question:
"Does the alcohol cook off? Is it safe for kids?"
The short answer is: yes. The long answer, it depends.
Let me explain. No matter how much you cook beer, or any alcohol for that matter, some trace amounts remain. So trace, that their effects will never be felt, nor will the alcohol enter your blood stream. The USDA deems the consumption of cooked alcohol safe for all ages as well as pregnant women, you can see evidence of this when you are able to order steak in a red wine sauce or a rum raisin cake without being carded.
In order for the beer to be cooked enough to remove the alcohol it must be cooked at 170 (or above) for at least 10 minutes. This isn’t much. Everything that is baked will meet these requirements. Pan fried items generally will also meet the requirements, and although beer battered items aren’t cooked for ten minutes, the heat is so high and the amount of alcohol so small (about 1tbs per serving) the amount of alcohol actually left behind is minimal.
Because of this, I see no health concerns with the consumption of cooked beer. The only concerns that I do have are moral. I cook often, and have a diverse group of friends, among them are people who have moral conflicts with alcohol, such as Mormons and people in recovery. I would strongly suggest that if you are cooking for others, let people who may be morally opposed to consuming alcohol know what they are about to be served. Someone in AA might be triggered by the taste of beer, and some religions condemn the consumption of alcohol in all forms, even trace amounts.
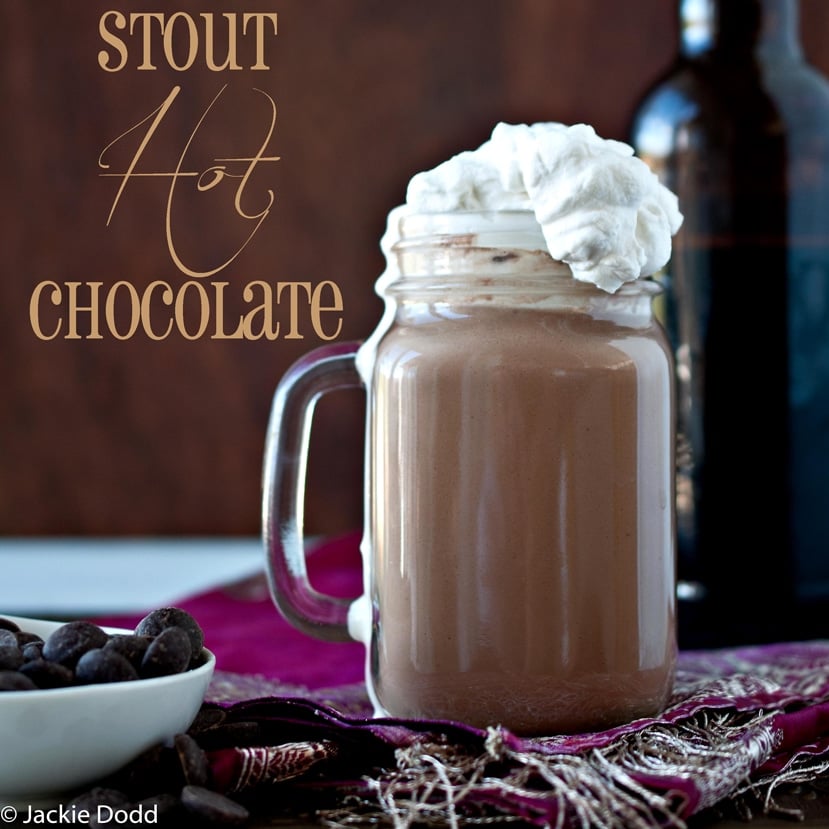
Wow, not that thats out of the way, I have a Stout Hot Chocolate for you. And with your newly acquired beer cooking knowledge you have full control over how boozy you make it.
Let’s stop vowing to cut things out of our lives at then beginning of each year, and start promising ourselves we’ll add some great things in.
Can’t we all just agree that those “I’m going to lose weight/stop eating sugar/give up carbs/cut out coffee” resolutions are just going to leave us feeling hungry, guilty and eventually shameful when they go enormously ignored about the second week in January?
Maybe you have a bigger capacity for restraint than I do, or a higher guilt threshold, but I gave up those types of personal promises years ago. Although I do still love a good resolution and tend to make them year round.
How about we agree to ADD things to our lives instead of taking away? There is something about making a decision to add something great to our world that just reminds us what an amazing life we have ahead of us. And adding greatness has a way of pushing out some of those not as great things.
Let’s give it a try.
Here are my favorite food resolutions, all about adding more amazingness, not about taking things away.
1.Start a food tradition: Maybe a once a month Sunday Supper with your family, or a quarterly Food Friends Pot Luck, or even just New Recipe Wednesday where you try a new dish. Food traditions are memories that you’ll be glad you made.
3. Join a CSA or other Organic Produce Delivery Program. Before my recent move, I got a box of organic produce delivered to my doorstep every Wednesday from Love Delivery. Mostly local, in season and very fresh fruits and vegetables. This also gets you to eat more good stuff, because it’s there. And you hate to waste it. Supporting local farmers and eating healthier, it’s a total win. There are several in most cities and states, consult Google for ones in your area.
4. Try New Foods. This is for the picky eaters. Pick one new food a month and cook it, and eat it. Or, order that one thing on the menu that you would never normally eat. After a year you’ll have 12 foods that you never otherwise would have tried. And I’m going to bet you a batch of cookies that you will be surprised at how much you like at least one of those new foods.
5. Master A Recipe or Technique. Maybe you’ve always wanted to learn to make a soufflé, or homemade pasta. What better resolution to make than the acquisition of culinary knowledge you can someday pass down to future generations? Just go into assuming that the first time may not be a huge success, and by that I mean don’t plan an entire dinner party around skills you haven’t acquired just to end up in tears when your husband has to have pizza delivered. It will probably go fine, and you will probably post the results on Facebook (yay!), but take it slow and know that to master a technique takes a lot of practice, each time you try it you’ll learn something new.
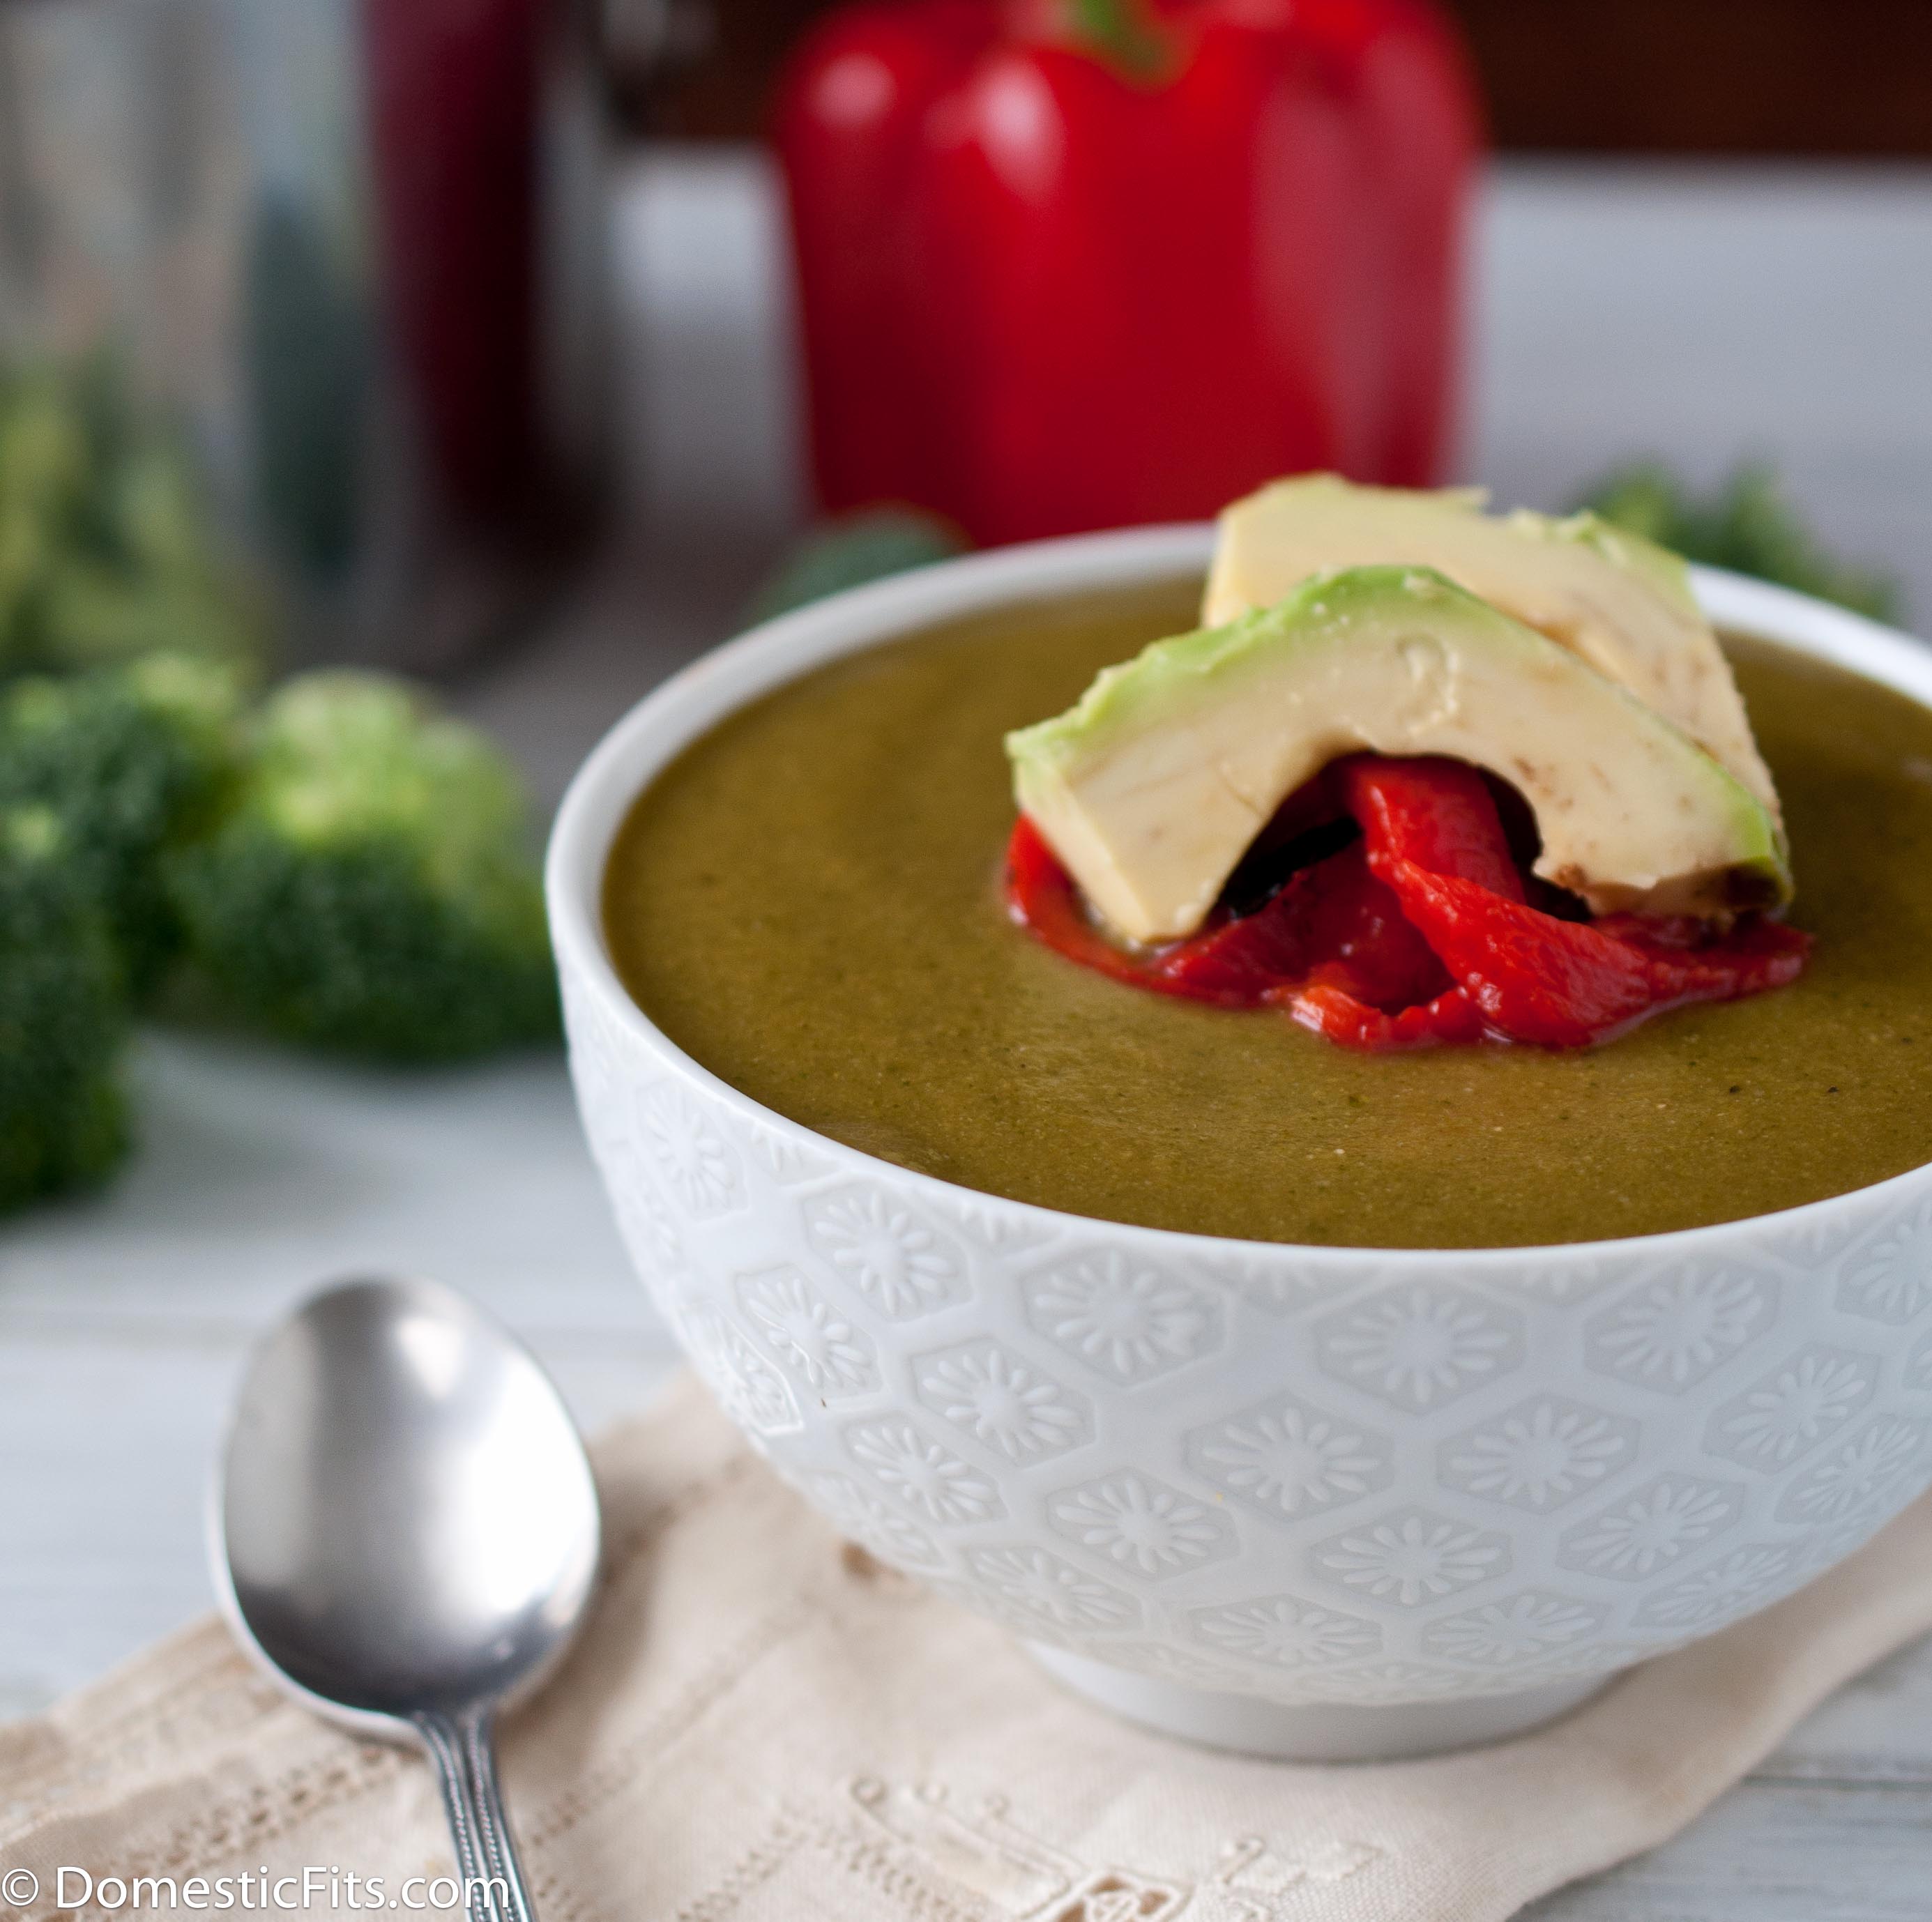
One of my resolutions is to explore vegan cooking more, even though I have no plans to give up meat or dairy. There really isn’t any arguing with the fact that produce is the best thing you can put in your body. The more I focus on the beautiful flavors of fruits and vegetables, without using meat and dairy as a crutch, the better my cooking becomes over all.
Here is a vegan soup, inspired by this Bon Appetite recipe. Without garnishes, it’s about 170 calories a serving.
Here is a How To Roast Red Peppers post by Kitchen Treaty. If you are going to use them right away, you can skip the oil and the jar.
Creamy Vegan Broccoli Avocado Soup
Ingredients
1 tbs olive oil
1 shallot, chopped
2 cloves garlic, minced
4 cups low sodium vegetable stock
1 large red potato, peeled and chopped
6 cups chopped broccoli florets
½ to 2 cups water
½ tsp salt
½ tsp onion powder
½ tsp black pepper
pinch chili powder
1 tbs fresh lemon juice
1 lage avocado, diced
1 red pepper, roasted, cut into strips
Instructions
In a stock pot or Dutch oven heat the oil. Add the shallots and cook until soft, about 3 minutes. Add the garlic and stir. Add the vegetable stock and potatoes, cooking until the potatoes are almost soft, about 10 minutes. Add the broccoli and cook until the broccoli and potatoes are both tender, about 5-8 minutes. Using an emersion blender, puree until smooth. Add water, if desired, to thin to desired consistency. Add spices and lemon juice.
Garnish with avocados and red peppers prior to serving.
If you want to know how I made the garnishes "float" on top of the soup for the picture, check this out.
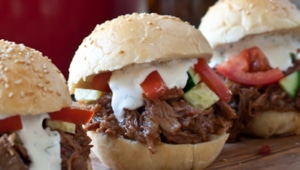
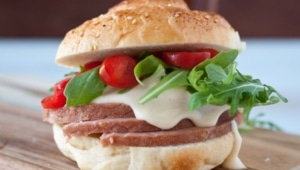
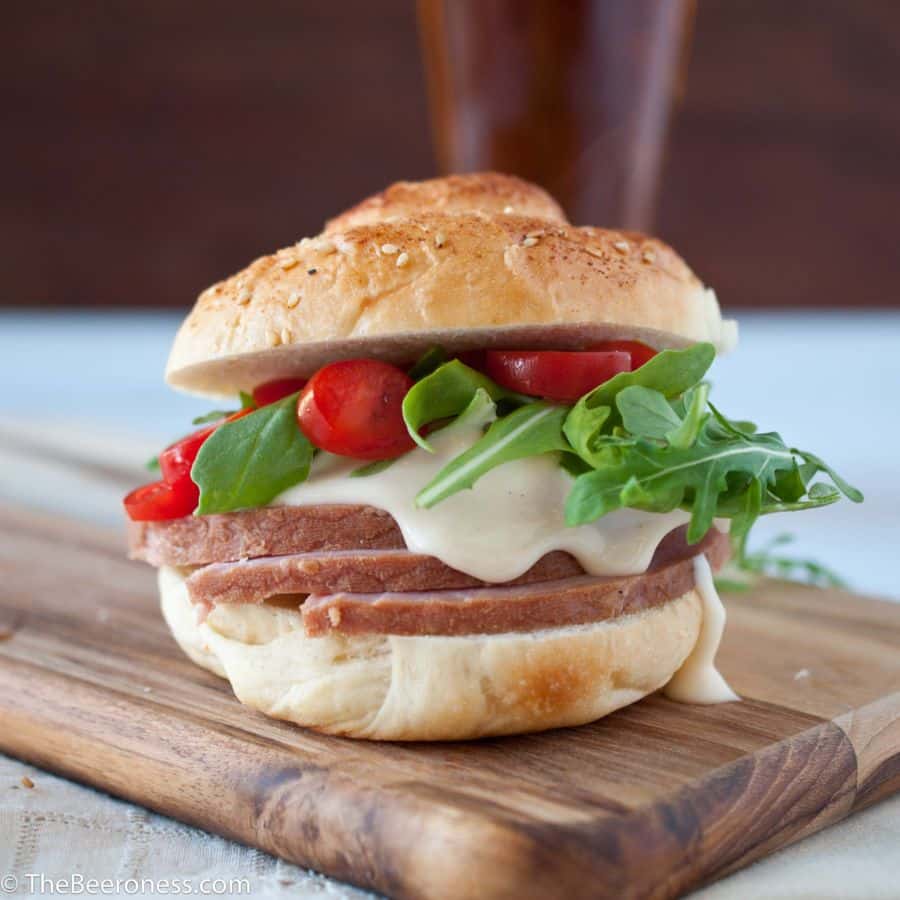
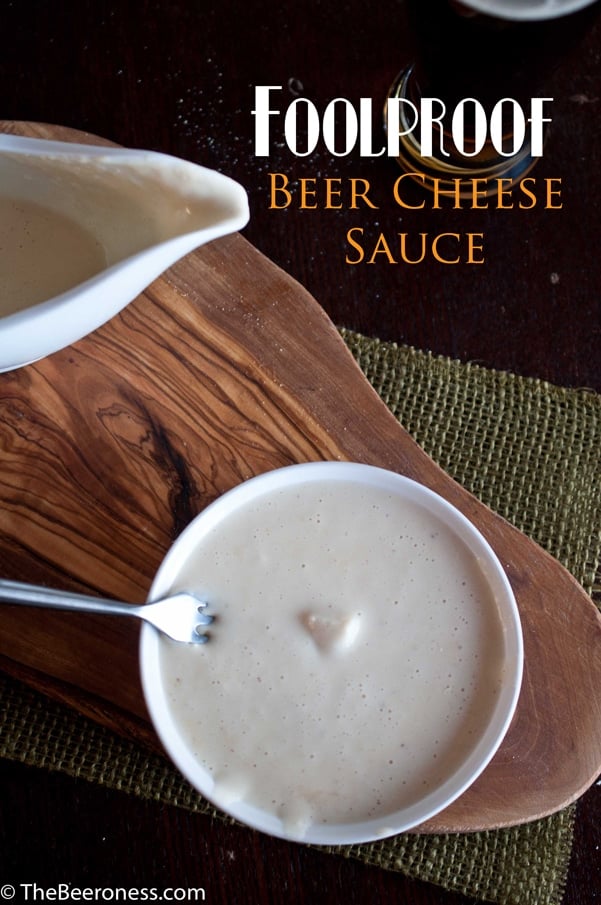
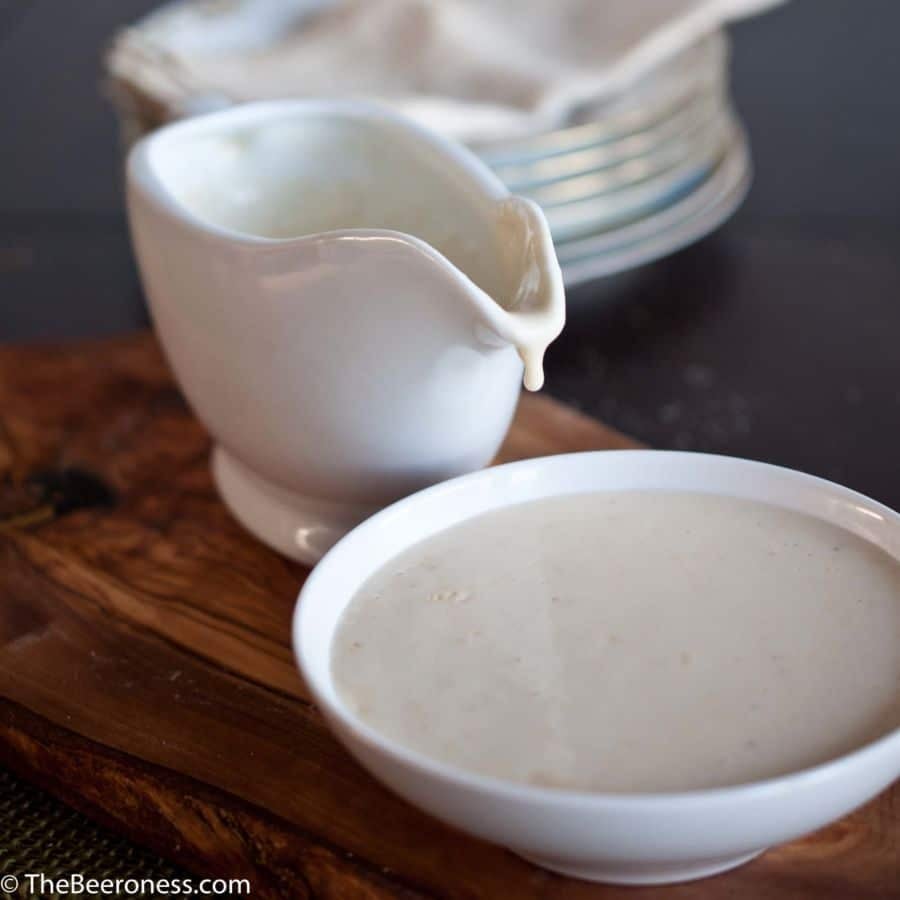
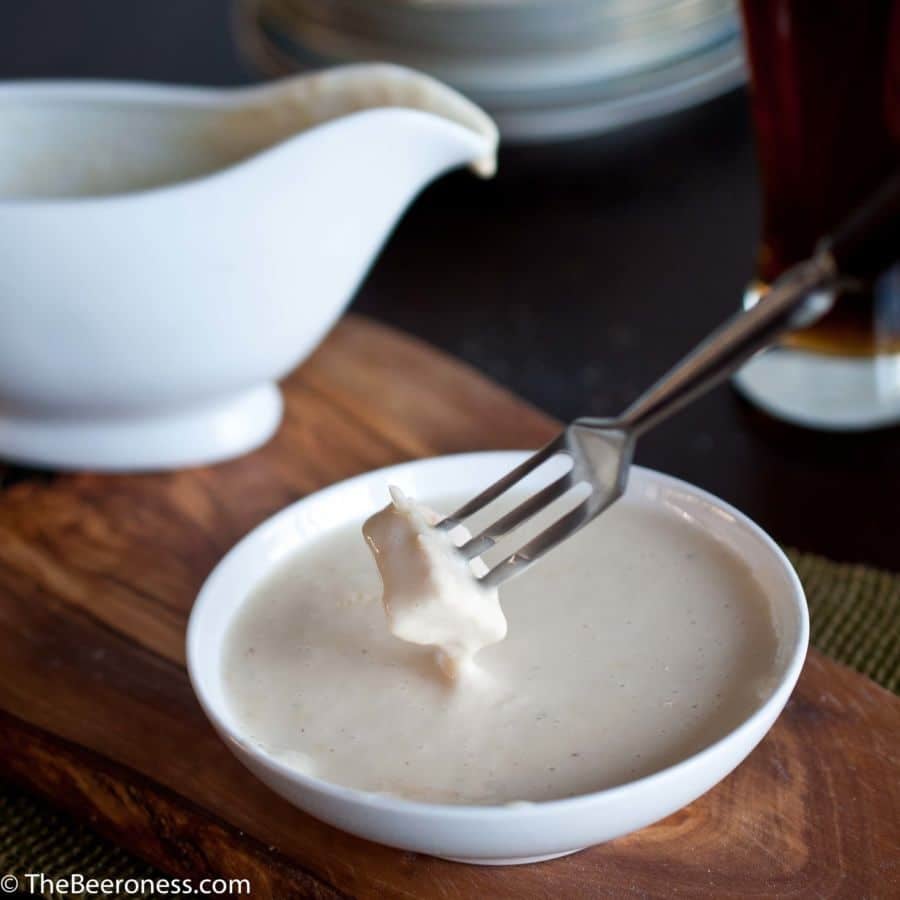
Smothered in delicious beer cheese and served on a leftover dinner roll.
And don’t be afraid if your previous beer cheese ventures haven’t gone so well. This one is foolproof, I promise. I’ve cracked the beer cheese code. Mostly for selfish reasons. Regardless of the reason behind the failure, I hate when my recipes don’t work for you. And beer cheese, since the dawn of time, has always been difficult. Except this one. It also takes about 5 minutes, and it will work.
I made three Galettes in the past week. This one, one I’m working for the cookbook I’m writing and a small caramelized onion and cheddar one that got devoured.
These are like a secret weapon, in a way. The crust (which you absolutely MUST be made from scratch) is one of my favorite recipes I’ve ever made. It’s soft and buttery and flakey and takes about 8 minutes to throw together.
Eight minutes and you have yourself the best homemade crust you have ever tasted. It does need at least an hour to chill, but the best part is that you can make it days ahead of time and it’s all ready to go when you need it. You can even double the recipe and freeze the extra in a ziplock freezer bag for up to a month.
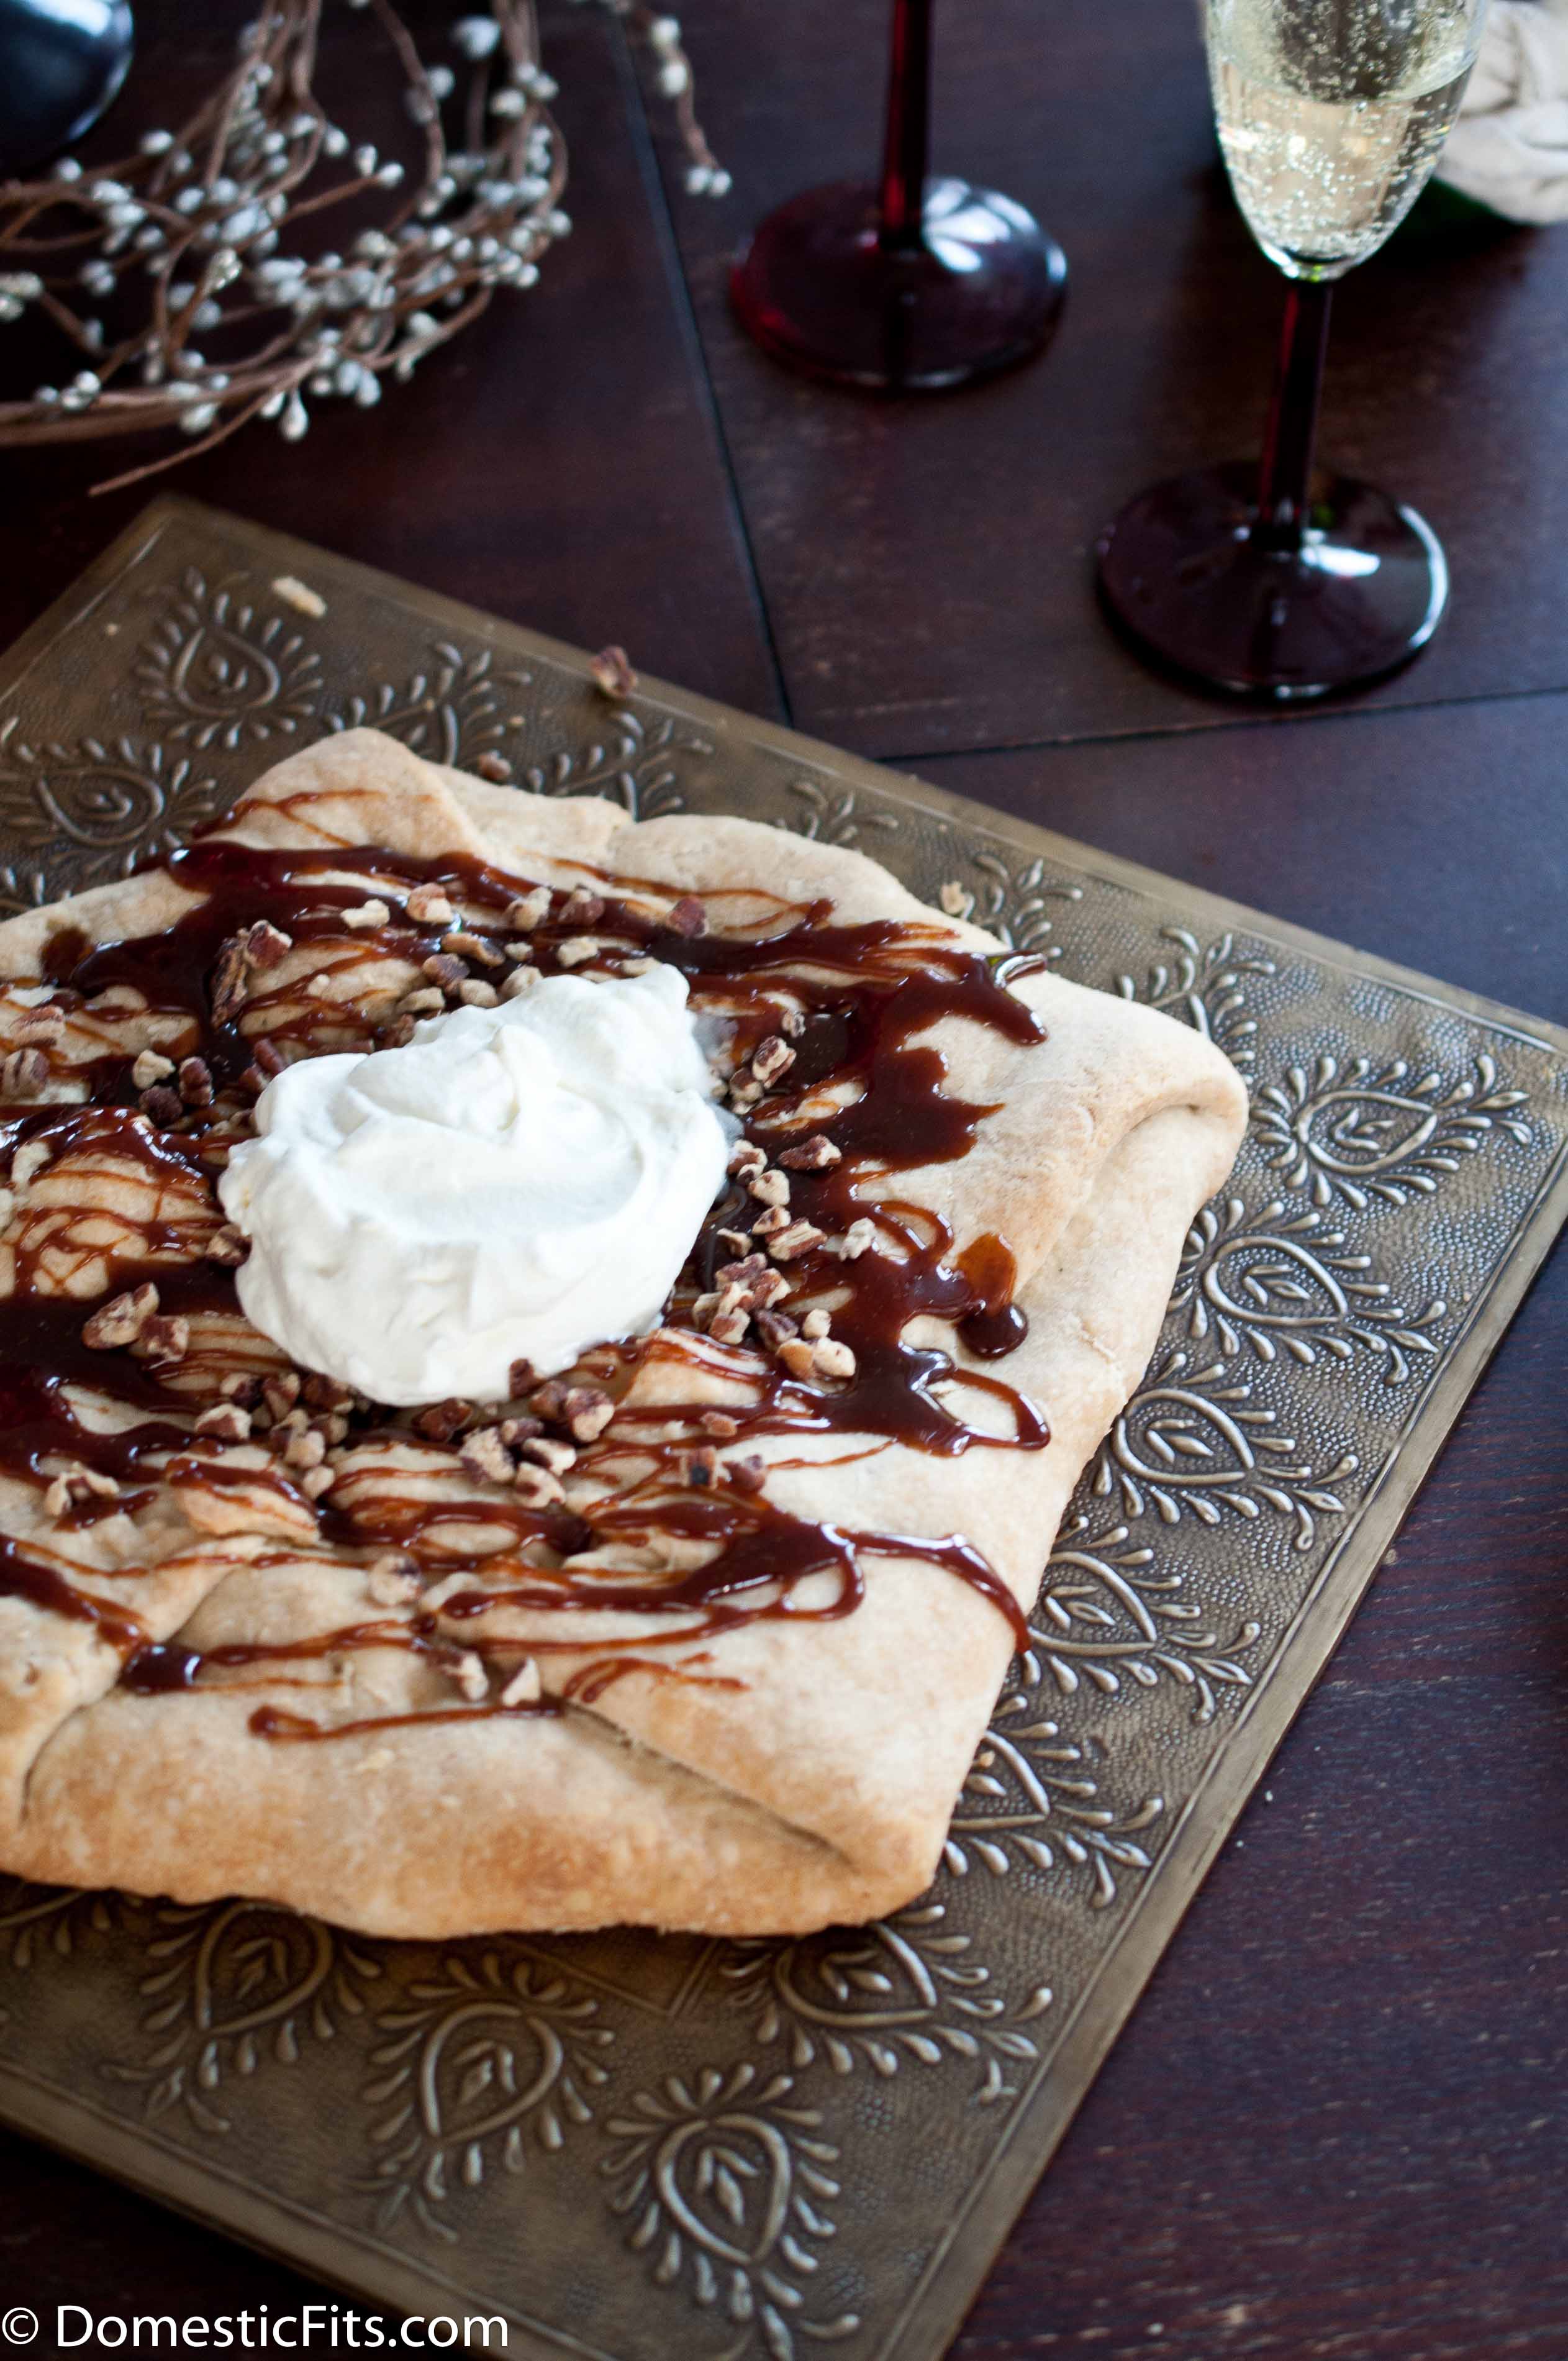
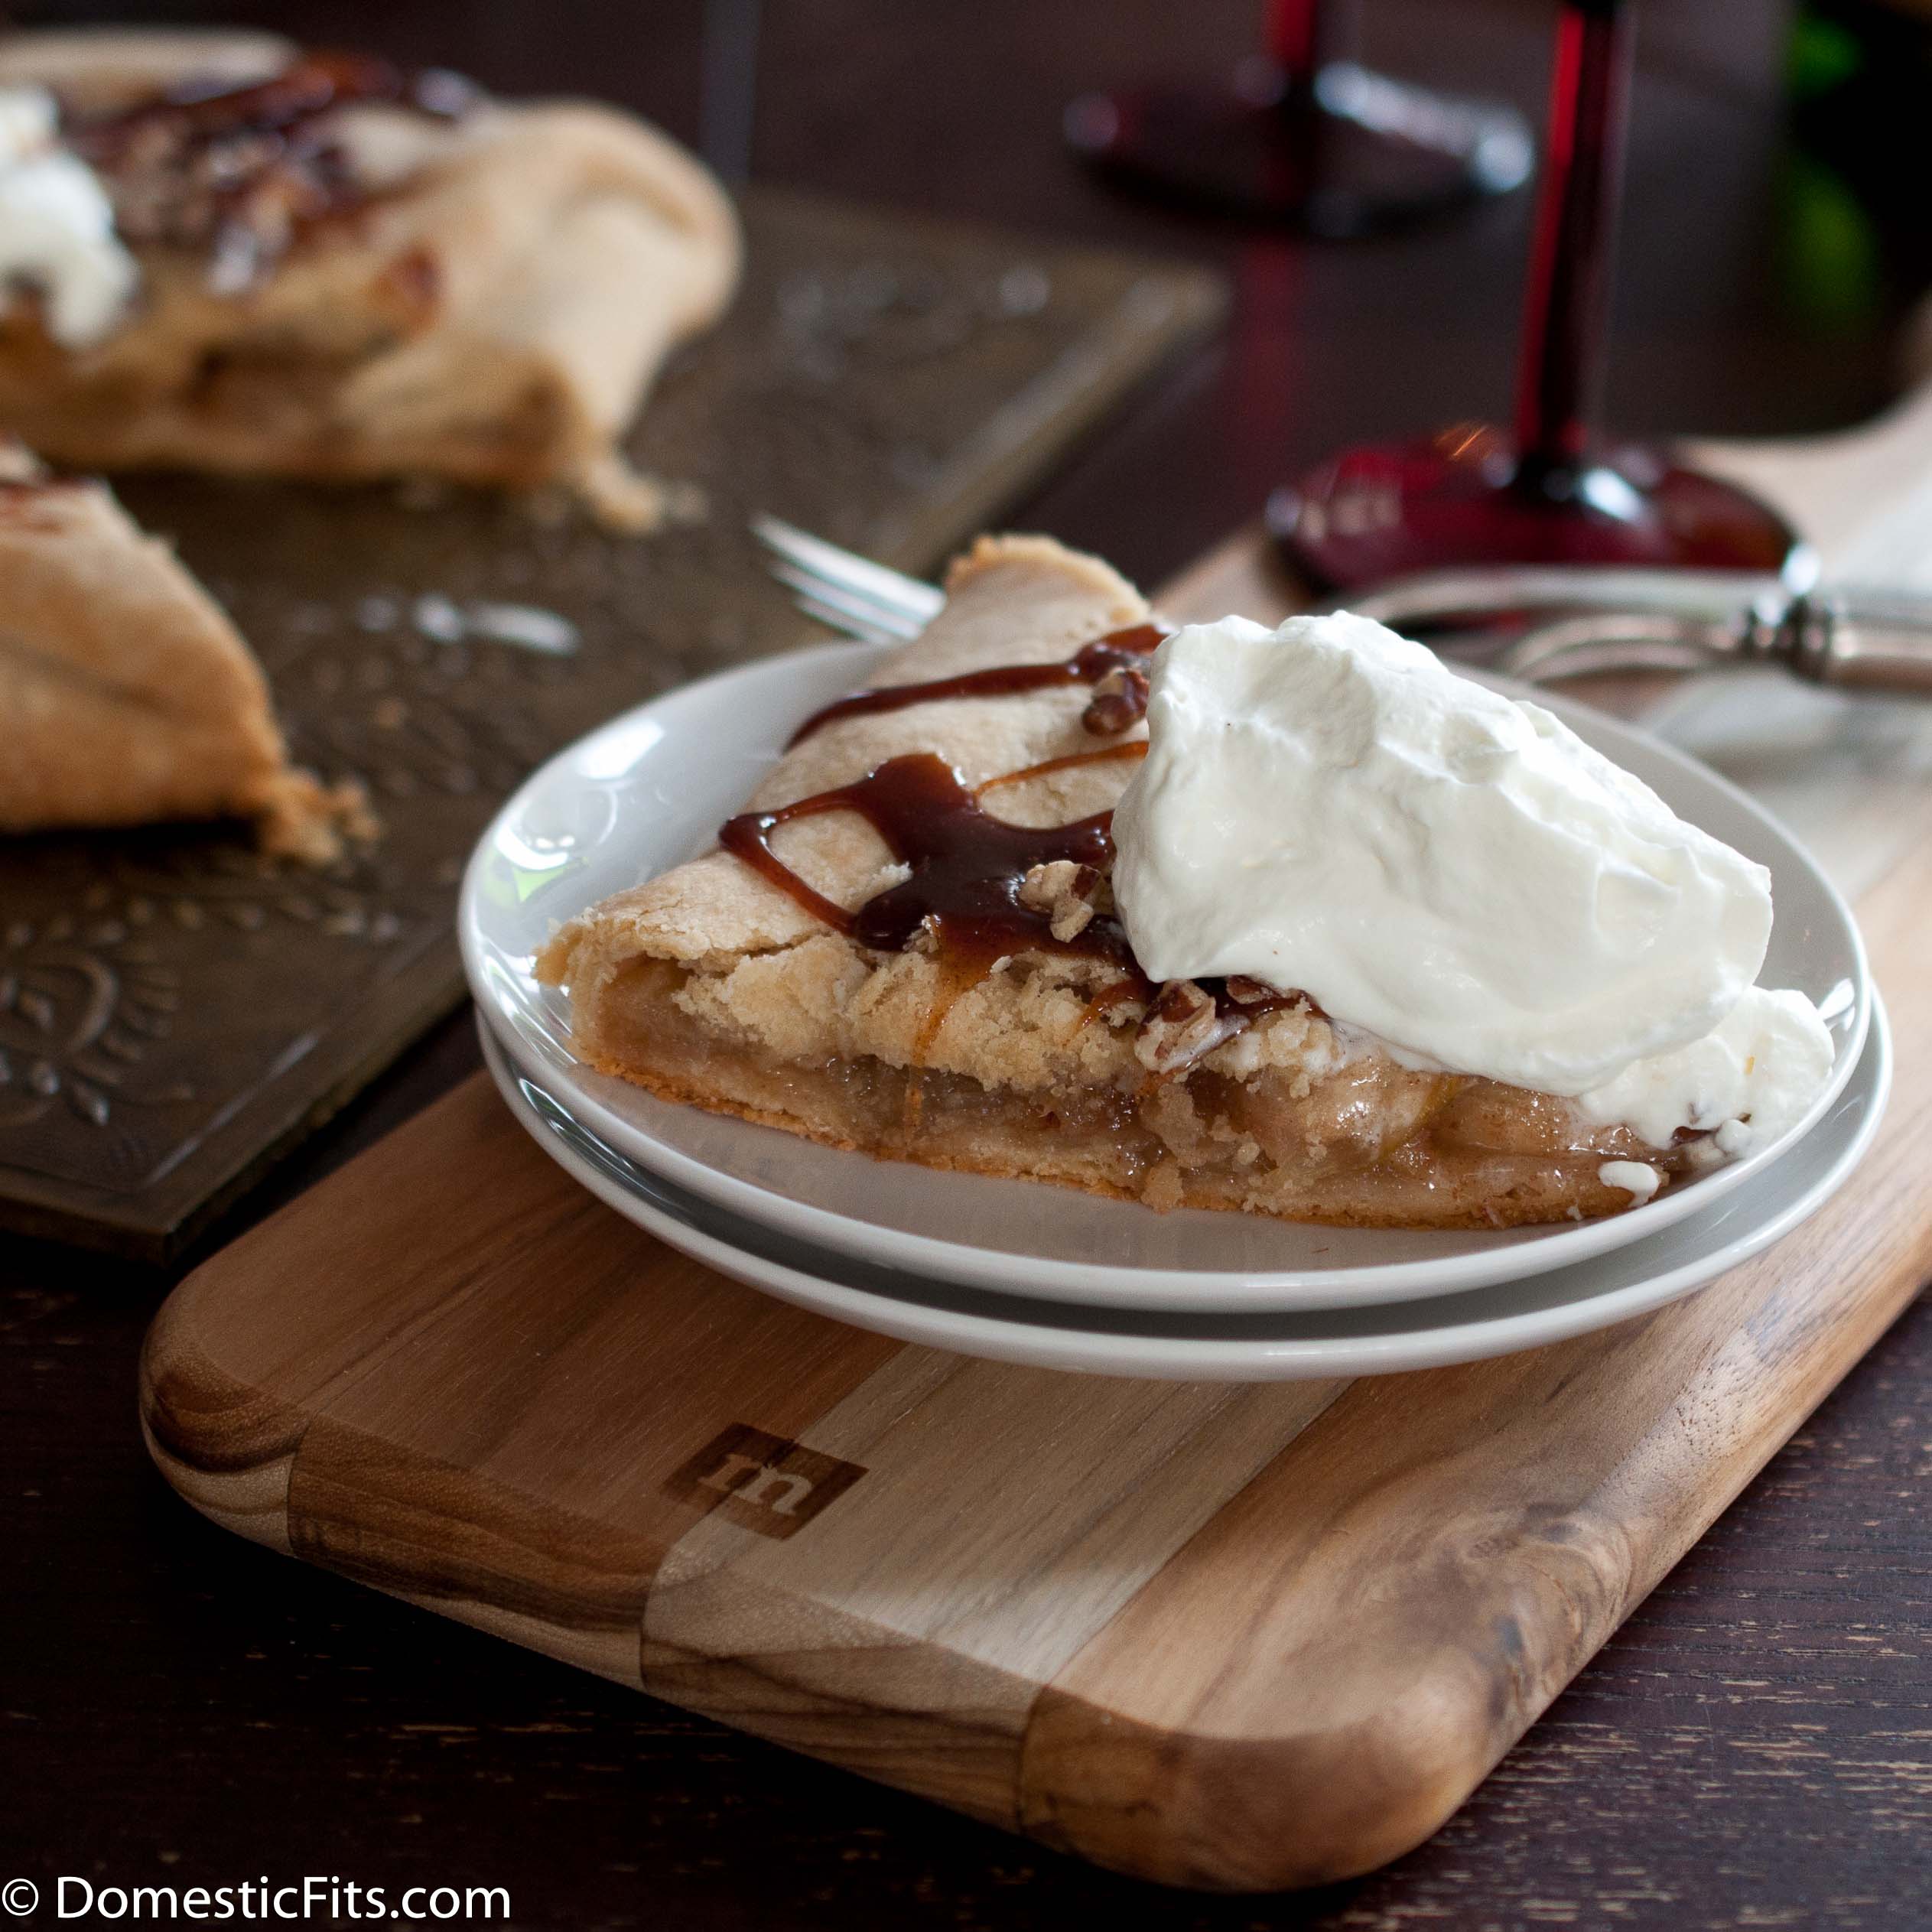
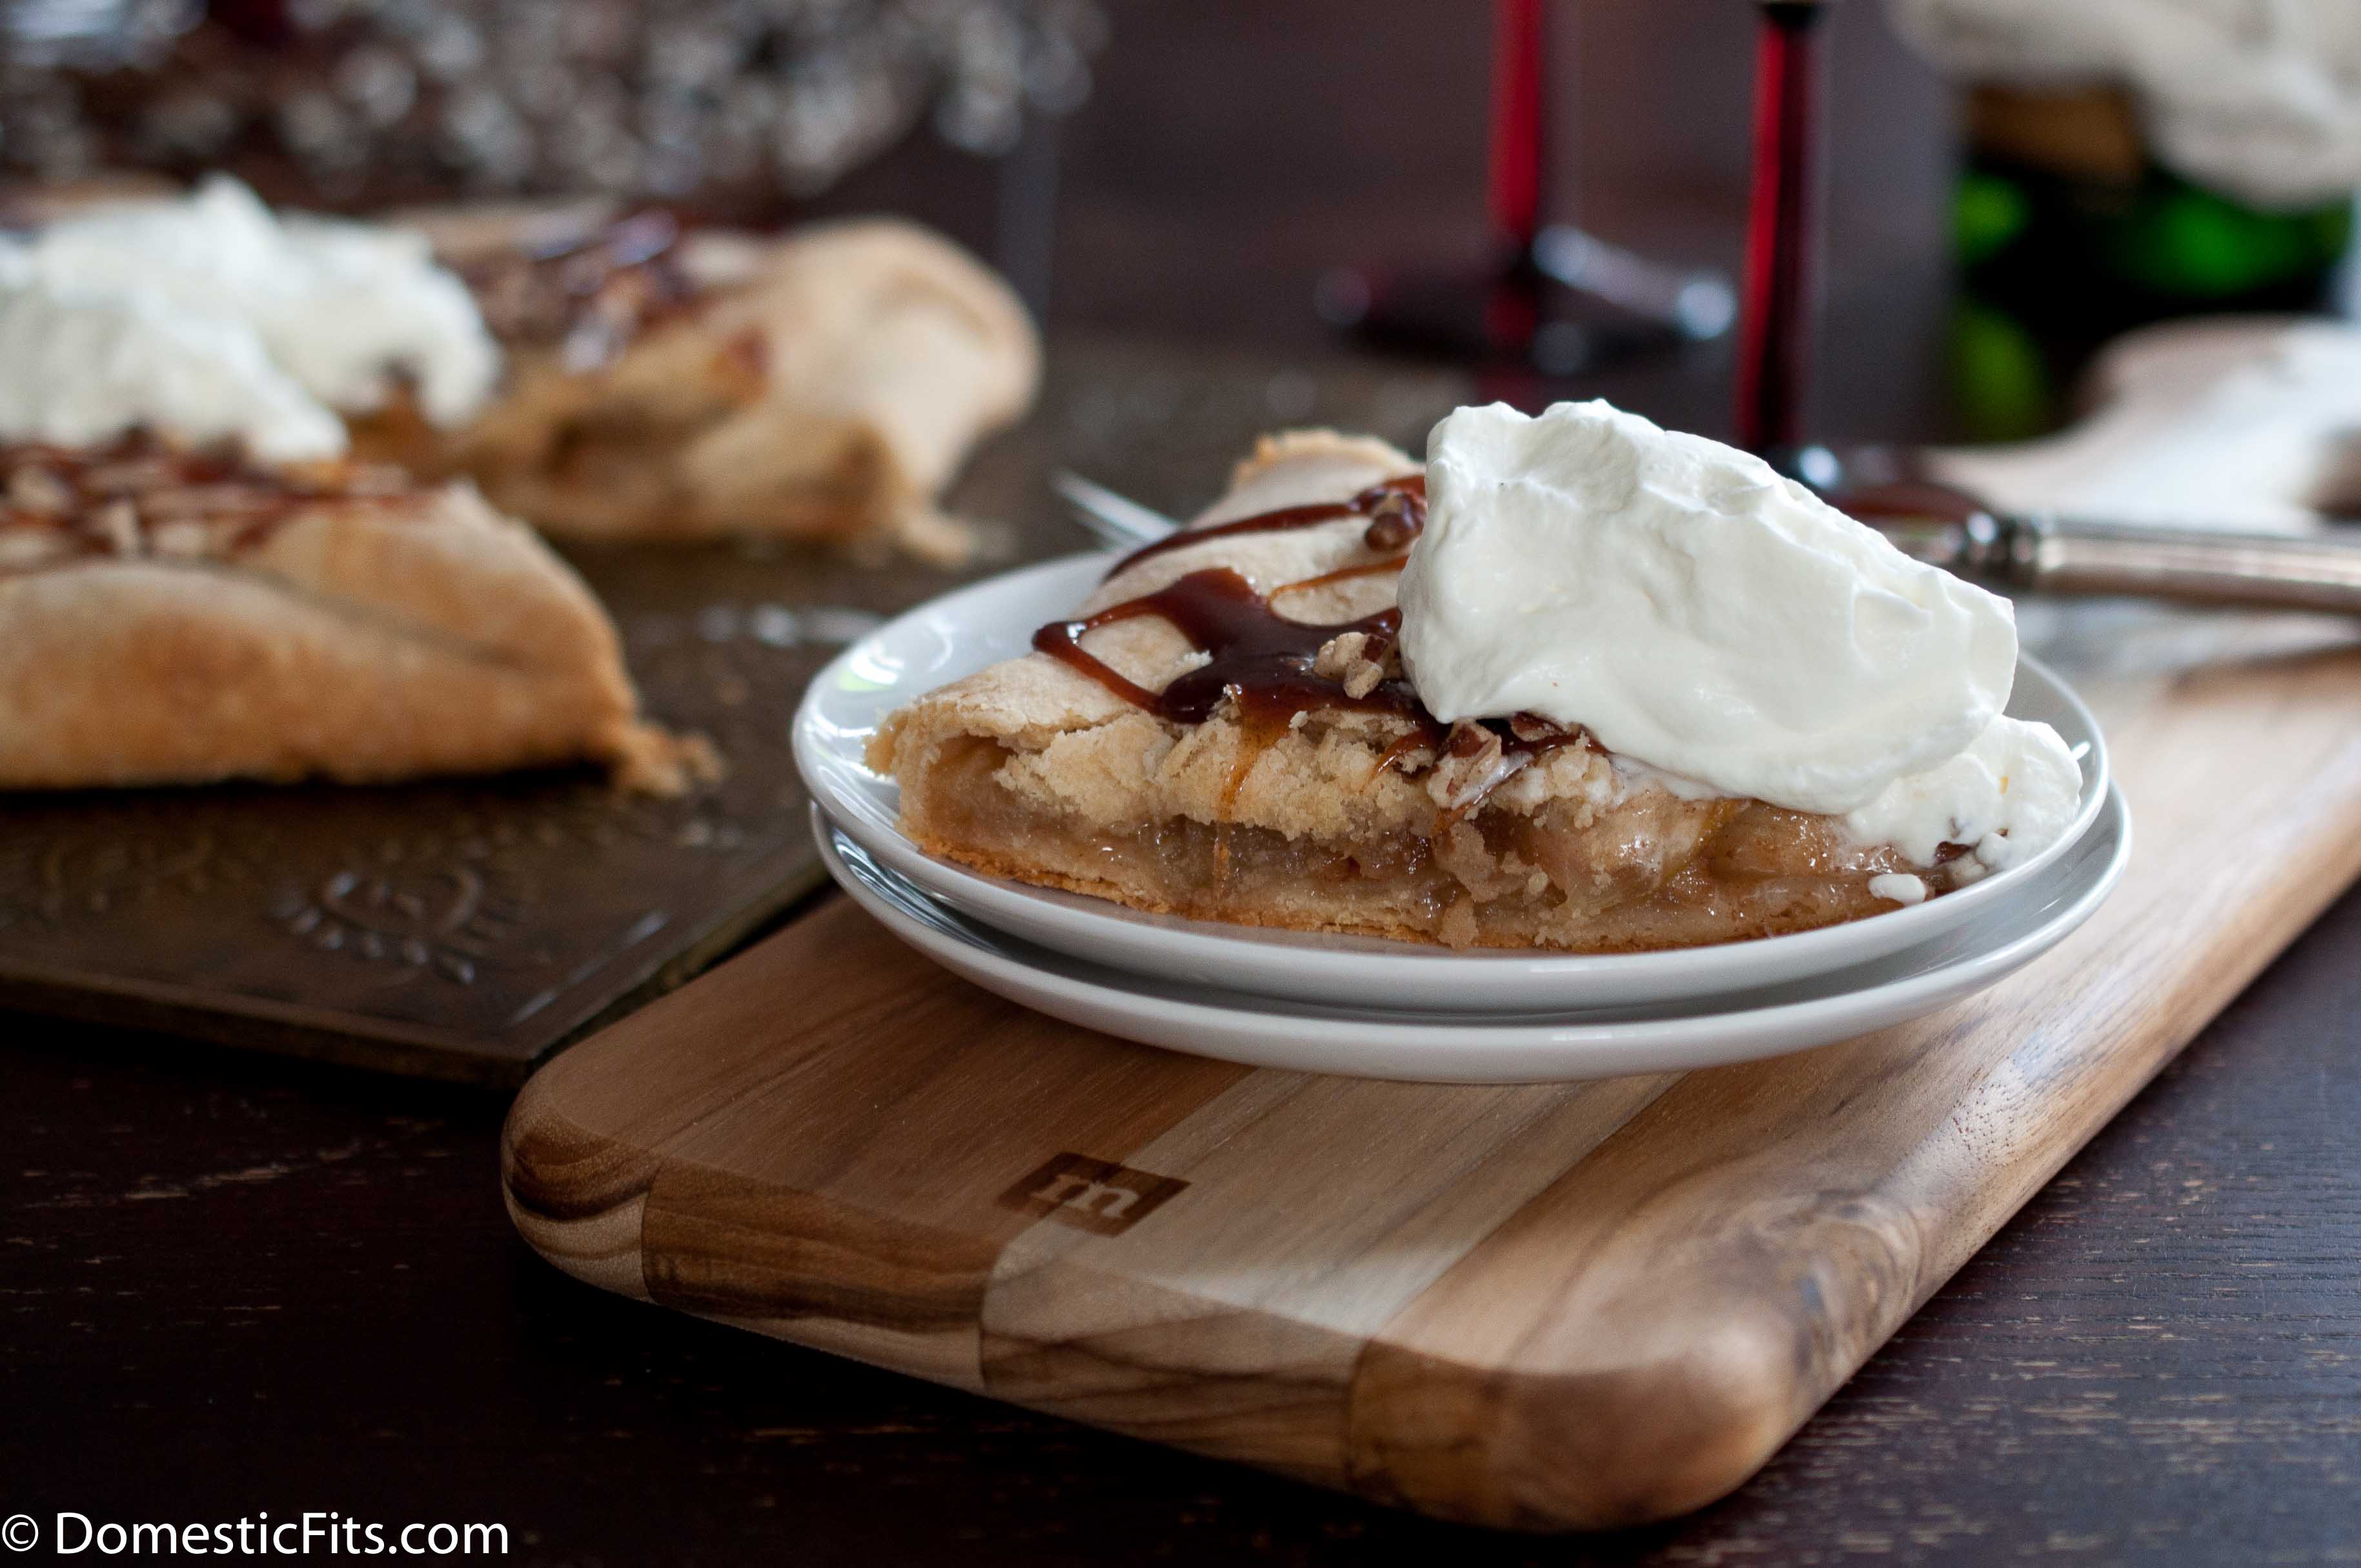
It’s rustic and it’s imperfections just make it that much more charming.
It has that perfect balance of foodie without fussy and casually elegant. Perfect.
And with Champagne Whipped cream (for real!!) it’s perfect for New Years.
Oh, and I found out last year how to pronounce Galette. I really wanted to say Guh-Lay, because it sounded more elegant to me. I was wrong, I’ll put my linguist aspirations on hold. It’s pronounced Gal-Let. Either way, it’s delicious.
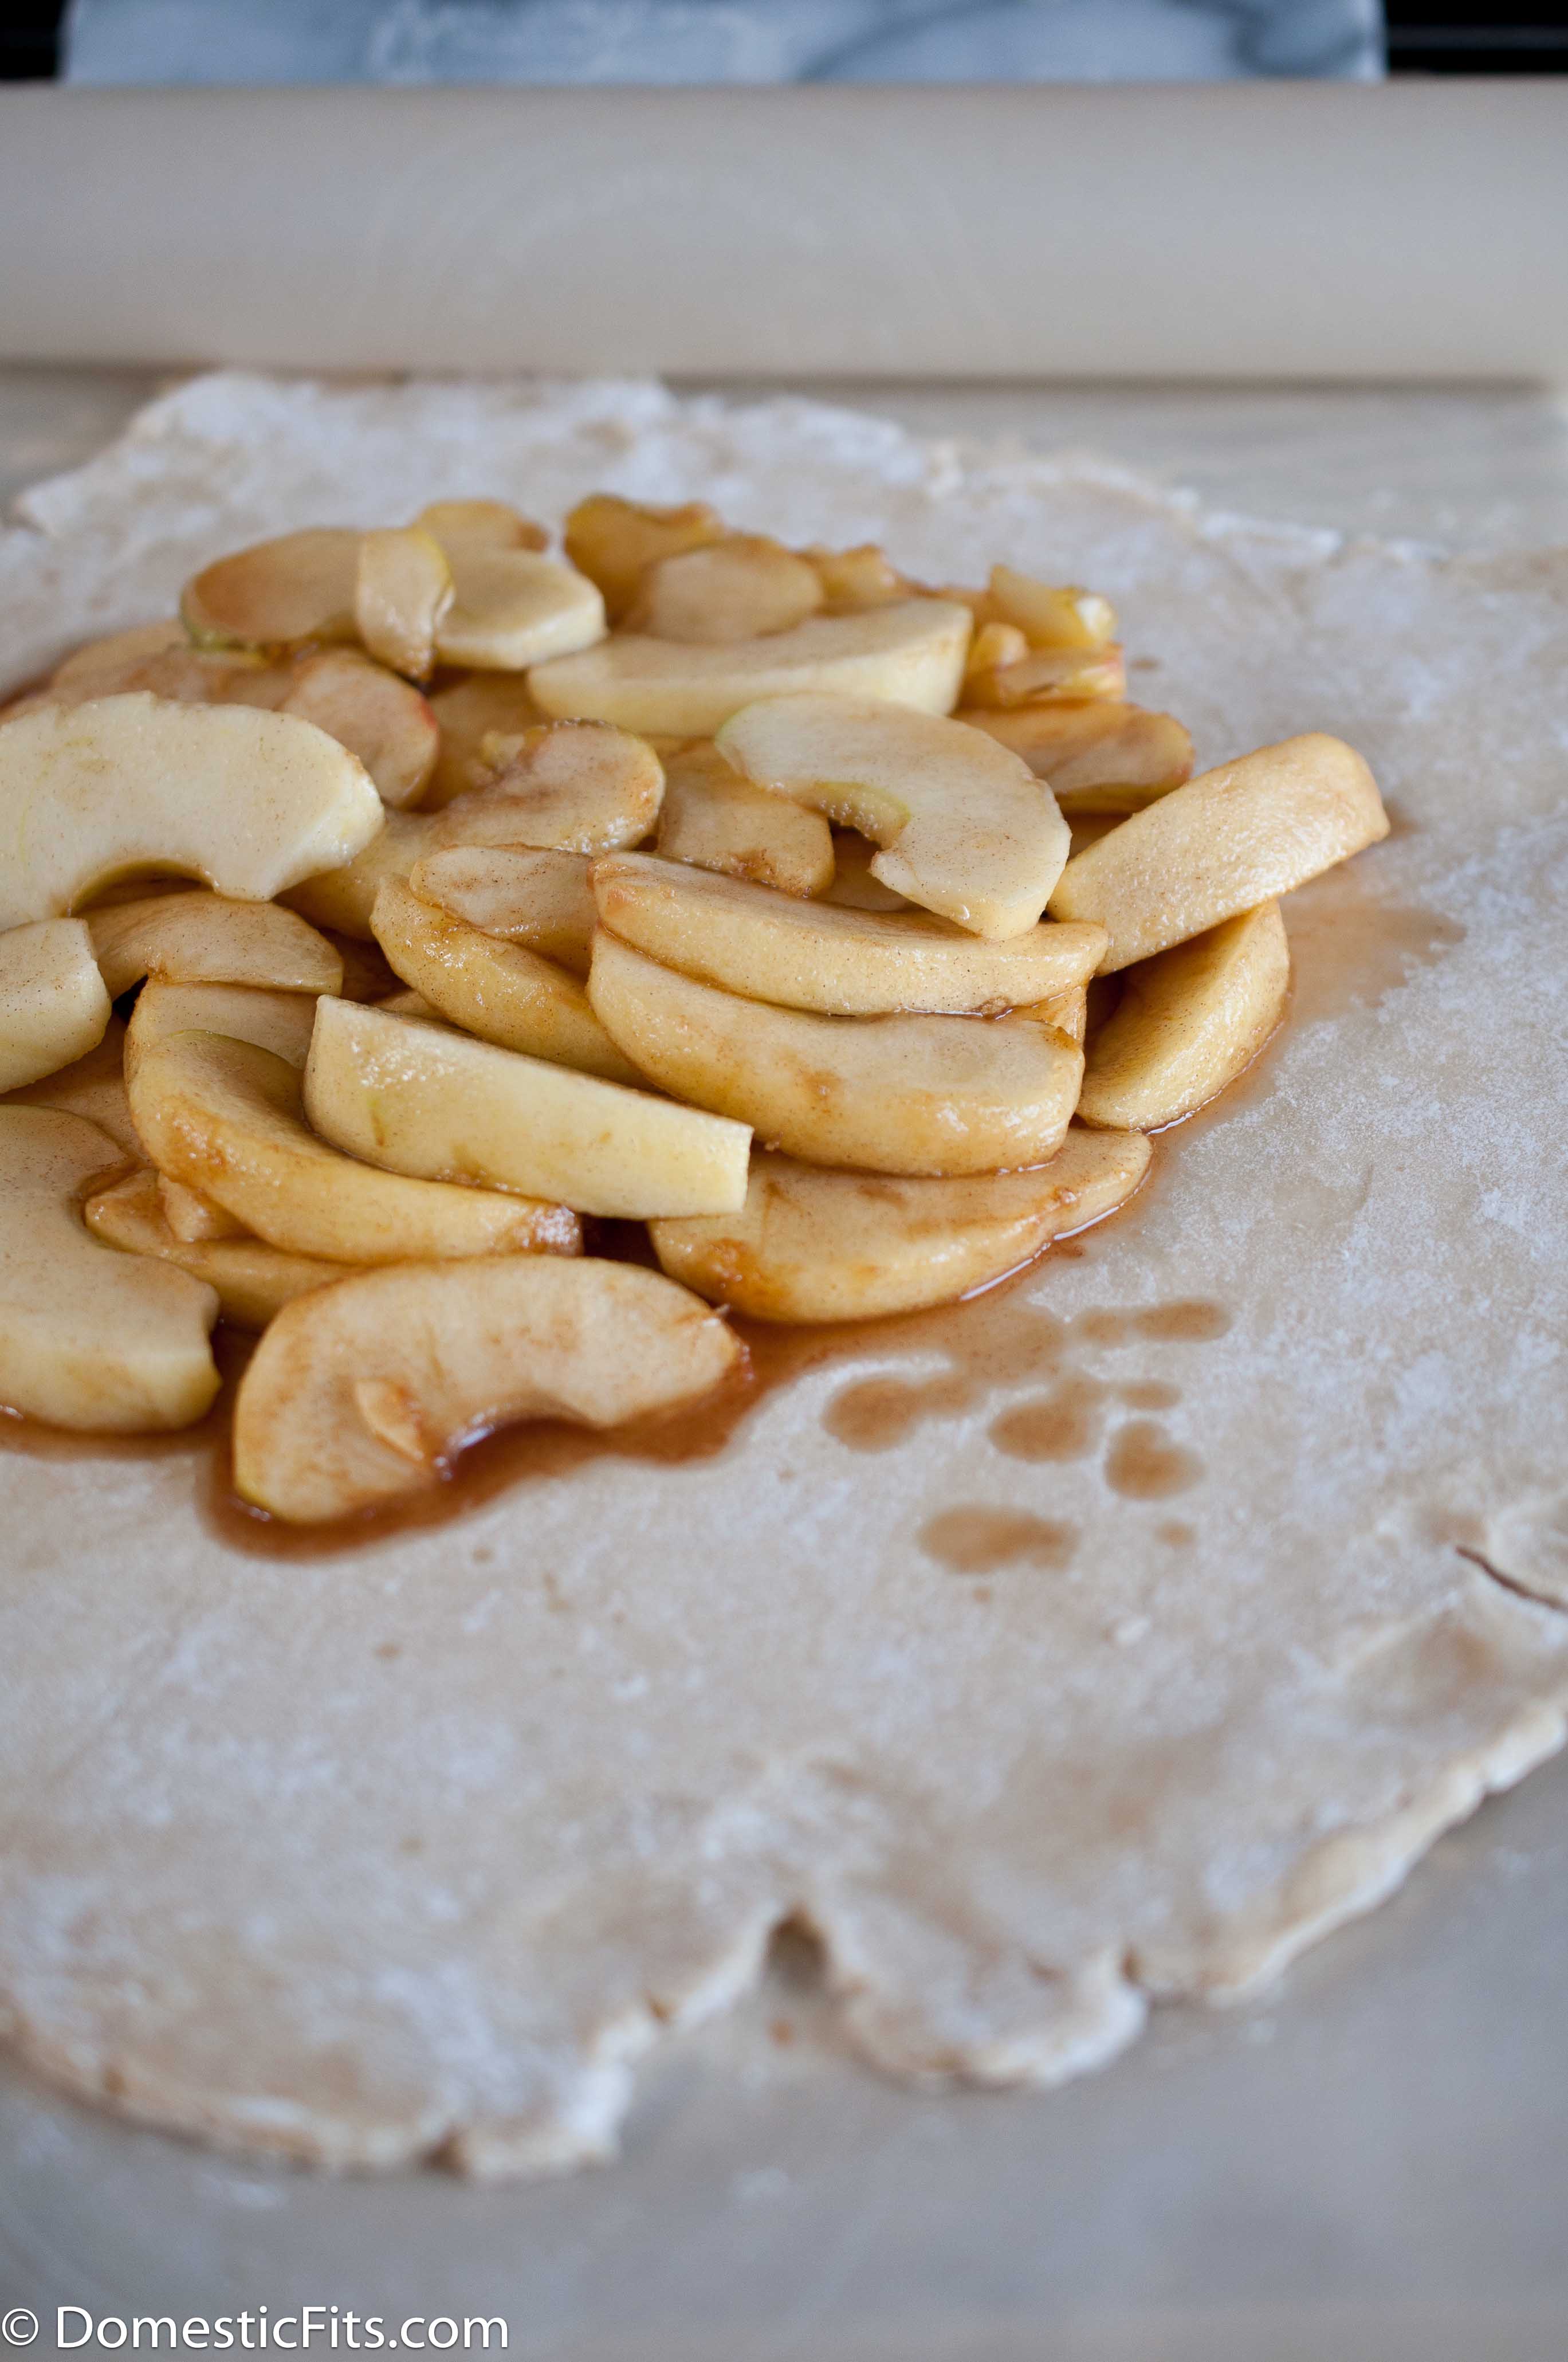
Caramel apple Galette with Champagne Whipped Cream
Ingredients
For The Crust:
2 cups flour
1 tsp salt
1 tsp sugar
1 1/2 sticks (3/4 cup) of butter
1/3 cup ice cold water
For The Filling:
4 large honeycrisp apples, peeled, cored and sliced (about 5 cups)
3 tbs lemon juice
1 tbs Vietnamese cinnamon
1 cup white sugar
½ cup brown sugar
¼ cup water
2 tbs butter
1 tsp bourbon vanilla
1 tbs melted butter
For The Whipped Cream
1 cup heavy cream
¼ cup powdered sugar
¼ cup champagne
Instructions
In a food processor add 1 1/3 cup flour, salt, sugar and butter, process until well combined. Add the remaining flour and process again until combined. Transfer to a bowl and mix in the water until just combined (don’t add the water while the dough is in the food processor or your dough will be brittle and cracker-like). The dough should be soft. Form dough into a disk, wrap with plastic wrap and chill in the refrigerator for 2 hours. Can be made three days ahead of time.
Preheat oven to 375.
Place sliced apples in a large bowl. Sprinkle with lemon juice, pinch of salt and cinnamon, toss to coat. Allow to sit at room temperature for 10 minutes.
In a pot add both kinds of sugar and water, stir until combined and all sugar has been moistened. Turn burner to high, allow to boil until sauce has turned amber. Remove from heat. Allow to cool for about 5 minutes. Drain apples and add to caramel sauce, toss to coat. (if your sauce seizes when you add the apples, return to heat and allow to cook until the sauce has softened) Allow Apples to marinate in caramel while you prepare the crust, about 10 minutes.
Once dough has chilled, place on a well floured flat surface. Dust the top with flour. Roll into a 16 inch rustic circle. Transfer dough to a sheet or parchment paper. Using tongs, remove apples from pot (reserve sauce) and add to the center of the dough, leaving a 3-4 inch boarder empty. Fold the empty dough up over the filling leaving a hole in the center of the Galette. Using the parchment paper, transfer the Galette and the parchment to a baking sheet. Brush crust with melted butter.
Bake at 375 for 30-35 minutes or until golden brown.
While the Galette is baking, finish the caramel sauce. Return reserved caramel sauce to the stove and allow to boil until it has reached 230. Turn off heat, and while stirring continuously, add the butter and the vanilla. Drizzle sauce over galette.
To make the whipped cream, add the cream and powdered sugar to a stand mixer and beat on high until peaks form, about 3 minutes. Reduce speed to medium and slowly add champagne. Briefly return speed to high to return peaks to whipped cream. Refrigerate whipped cream until ready to use, top Galette just prior to serving.
I like homebrewers. Mostly because they give me beer, but also because there is this fascination with flavors and a "What Would This Taste Like?!" attitude that is at the core of every food bloggers culinary soul. I feel like they get me. They have an understanding of why I write down crazy ideas, unexplored flavor combinations that may be doomed to fail, just to see if it can be done.
I’m not a homebrewer, its actually a little intimidating to me. Someday, when my life is a little less hectic, I want to take the Mash Tun Plunge. But for now, I’ll setting for drinking the concoctions of others. I did learn recently that the more recent rise in popularity of brown ales has been credited to the massive increase in homebrewing and the popularity of the style with the homebrewer. I’d never though of it, but it seems to be true. Most of the brown ale I’ve had in the past few months has come from someones closet. I do love a great brown ale, to drink with as well as to add to my cheese grits. I guess saving the Brown Ale from extinction is another reason I can love the homebrewer.
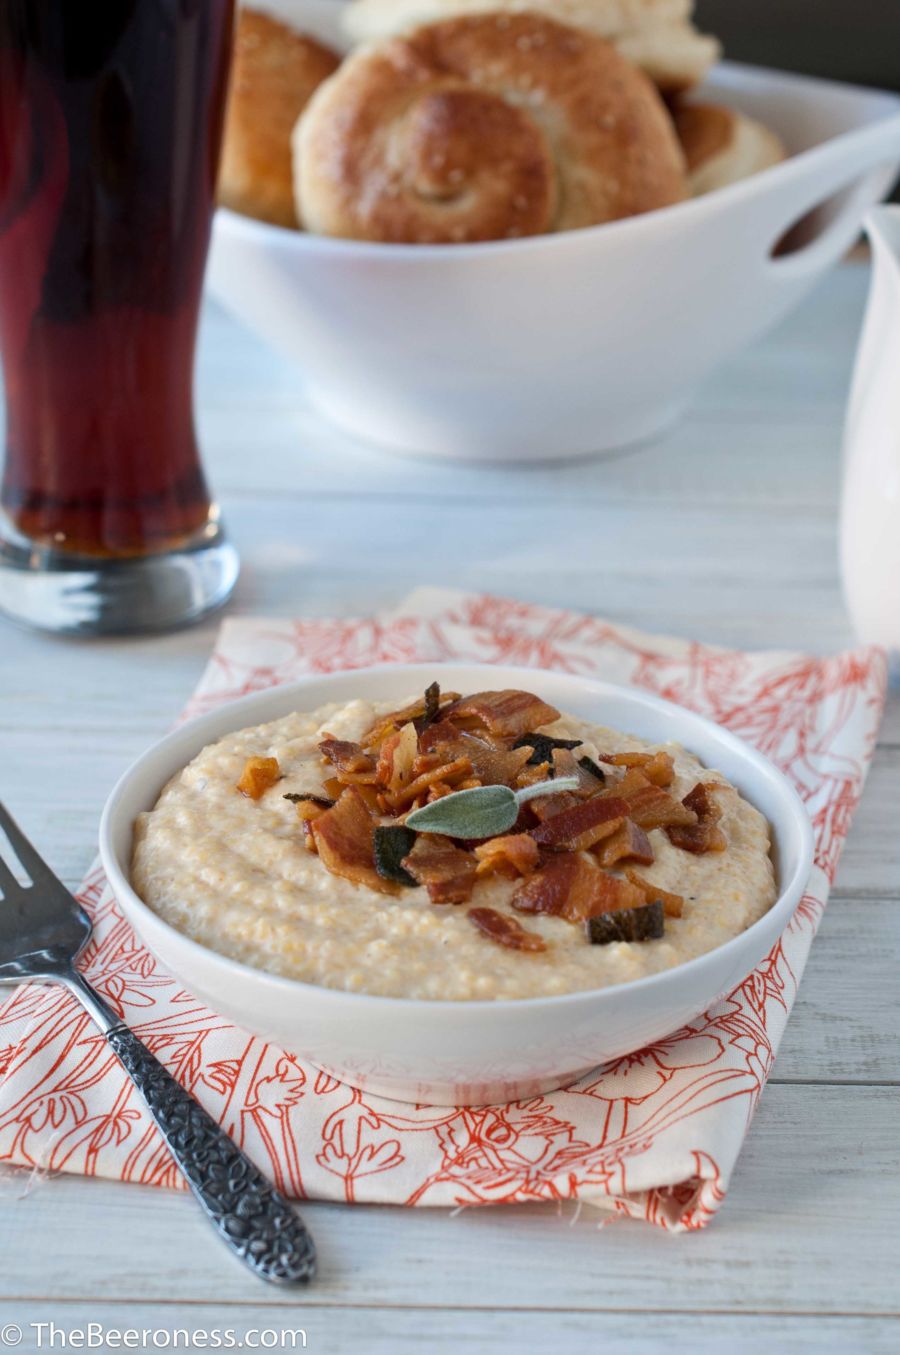
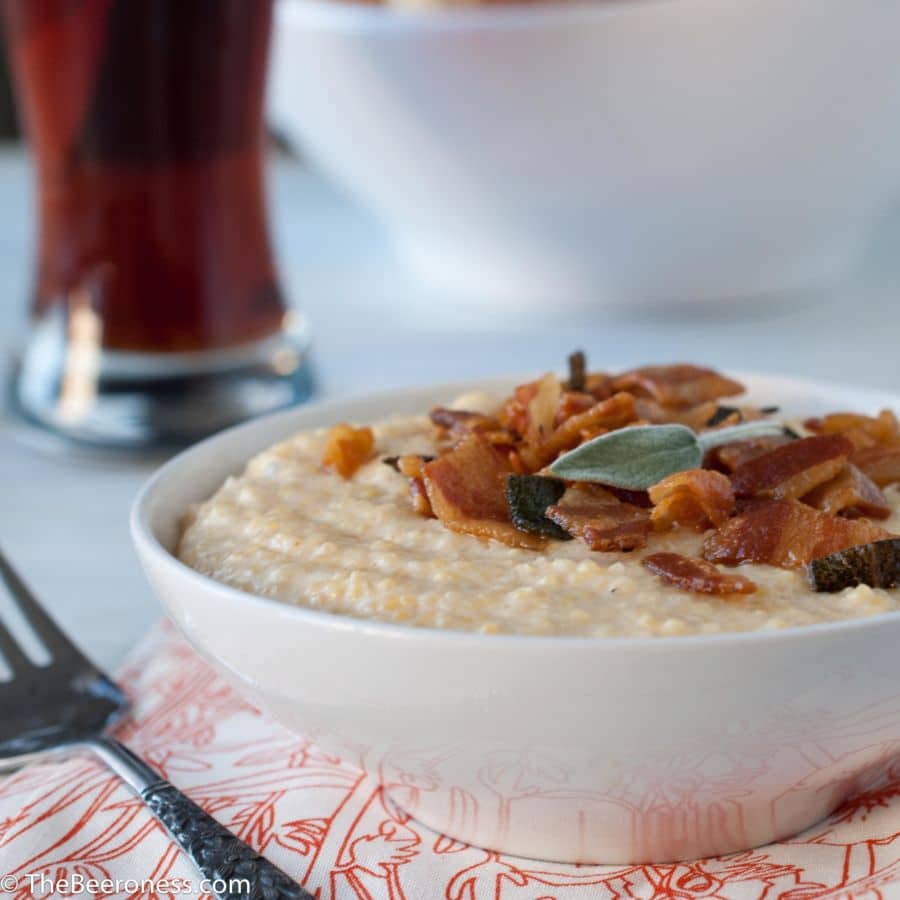
Brown Ale And Cheddar Grits With Pancetta And Crispy Sage
Add the milk and beer to a large pot, bring to a gently simmer, slowly whisk in the grits. Allow to simmer gently, stirring occasionally, until tender, about 20 minutes.
Slowly whisk in the cheese, milk, salt, pepper, onion powder and butter, stir until completely combined.
In a separate pan add the pancetta and cook until browned and most of the fat has been rendered, do not burn. Add the sage and cook for about 30 seconds or until crispy. Drain.
Let’s skip right to the photography tip, shall we? I’m pretty excited about it.
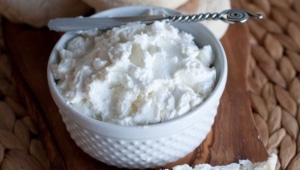
See this dish of homemade goat cheese, it’s a little less than full:
The best "filler" for a partially filled bowl is a potato. For several reasons.
First, they’re cheap and you probably already have them.
Second, they can be cut any shape you need. And re-cut if necessary. They also lift out of the bowl cleanly (unlike a paper towel I’ve seen recommended).
Third, they don’t float if you need to use them in a bowl of soup.
Just place your potato at the bottom of the bowl, fill and you are ready to shoot.
See, it looks full. You’d never guess it was chocked full of Idaho’s finest.
This is also a GREAT way to make sure that the soup garnishes "float" on top of the soup bowl. I tried an upside down ramekin for the below shot, but it kept floating, and it was too tall, and since I (obviously) wasn’t able to cut it to shape, I had to overfill the bowl.
Which I later spilled when I went to move it from photo land, to eating land.
But the idea was good. And the next time I went to shoot some soup, I decided to use a potato cut to shape, and fancied myself a genius. Look how the good stuff just "magically" floats on top. Patiently waiting for it’s photo to be taken.
So. You might not have a complete obsession with photographing food. You might just be here for the recipe. I guess we can talk about that, It turns out making your own goat cheese is really easy, and really good.
SO easy, in fact, that you should try it, it’s almost fail safe.
If you’ve made ricotta (you totally should), you pretty much have already made the cow version of goat cheese, the process is the same.
Hey, look how full that bowl is.
How To: Make Goat Cheese
Ingredients
1 qt goat milk (do not use ultra-pasteurized, it won’t work)
1/2 tsp salt
1 lemon, juiced, about 3 tbs
Yield: About 1 cup
Instructions
In a pot over medium high heat, add the goat milk and salt. Bring to a low simmer, stirring occasionally, and allow to cook until temperature reaches 180, about 8 minutes. Turn off heat, add lemon juice and stir once to redistribute lemon juice. Let sit for 5 minutes or until curds form.
Line a colander with two layers of cheese cloth. Pour goat milk into the collandar. Allow to drain for 15 to 30 minutes. The longer your cheese drains, the firmer it will be.
To be honest, this post is one hundred percent selfish.
Since the shooting Friday, I haven’t been able to stop watching the news or reading every bit of online news about the recent tragedy. Therefore, the tears are pretty much a mainstay in my life.
And in my emotionally fragile state, I can’t handle a beer cheese failure and we could all use even a small win.
Let’s be honest, beer cheese can be a bitch. It’s a pretty standard fondue, but it has about a 50% fail rate (*this is a completely made up statistic based solely on conjecture & observation) and I didn’t want to deal with a mess if the Beer Cheese Gods were otherwise occupied.
Look back on my blender epiphany that brought us the Roast Garlic and Parmesan Beer Cheese Dip and the epic win that it is, I wanted to see if it also extended it’s foolproof graces to beer cheese sauce.
It does. Blend the crap out of it and it won’t have a choice but to work. This takes the guesswork, and the fear of failure, out of making a lovely little cheese sauce for all to enjoy.
And don’t forget the cornstarch, it’s not yummy, I wouldn’t ask you to add it if it wasn’t important. Also, pre-shredded cheese has additives that hinder it’s ability to re-melt, so don’t use it.