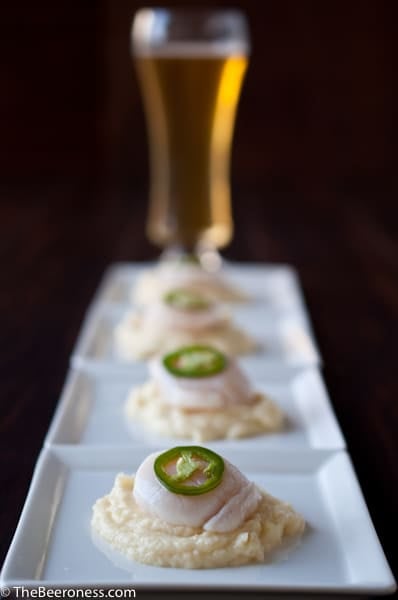
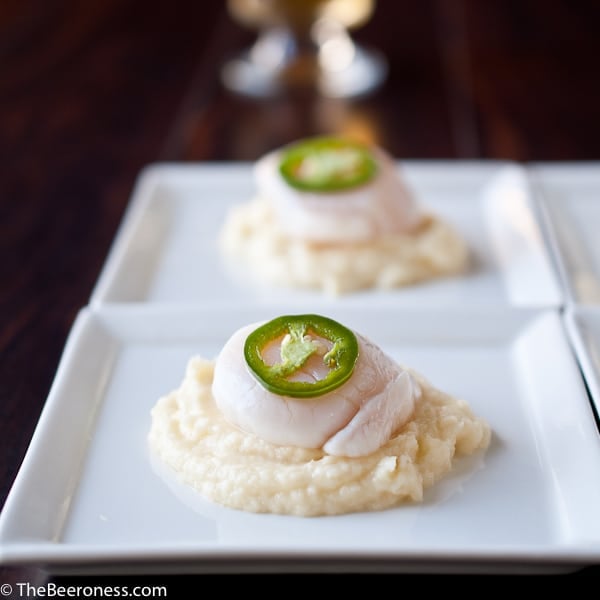
When I edit photos, I just pick the ones that I think are the stand outs (often only one or two) edit those, export and review what I’ve done.
It wasn’t until I pulled this set up in review that I saw that it seemed to tell the story of shrimp desperation. Maybe it’s just me, spending too much time behind this computer with limited human interaction, but this is what I see:
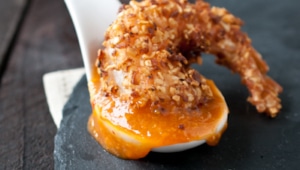
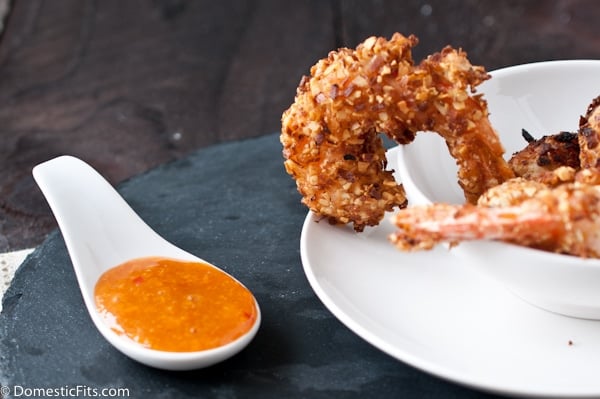
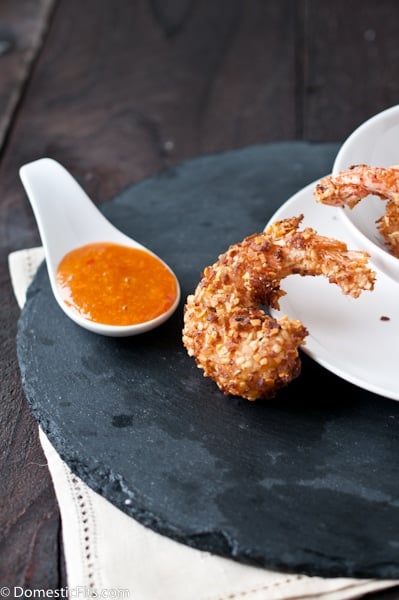
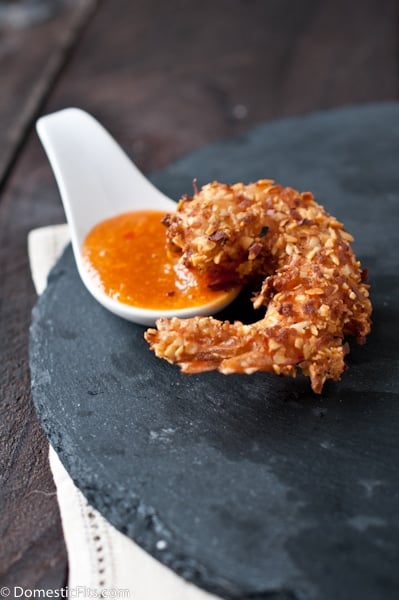
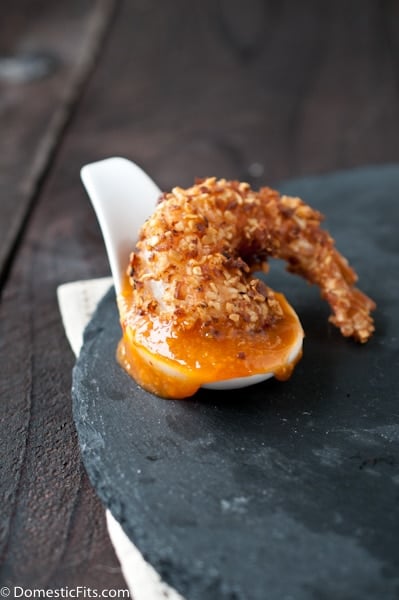
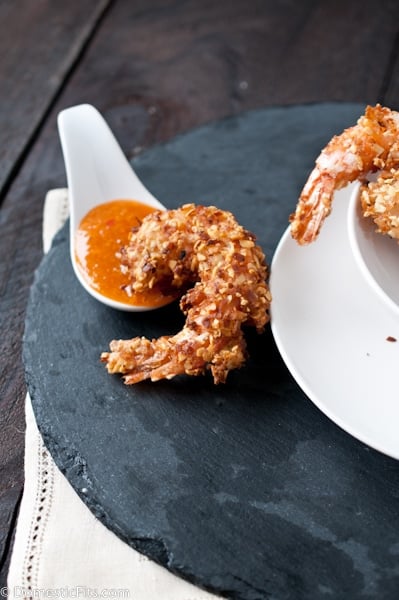
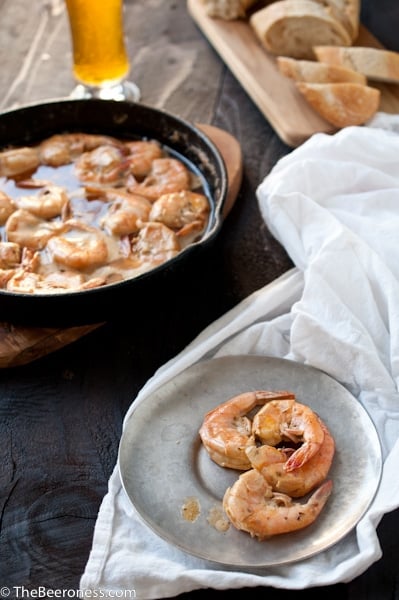
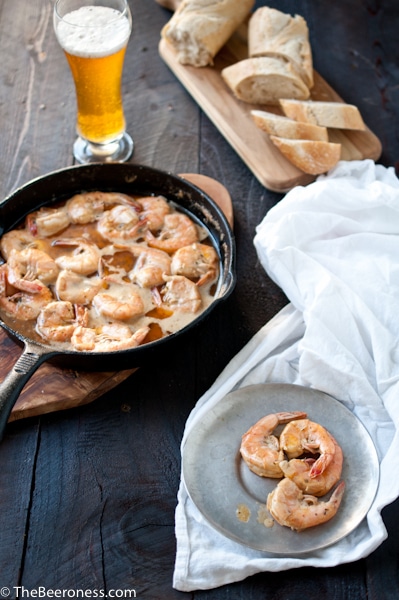
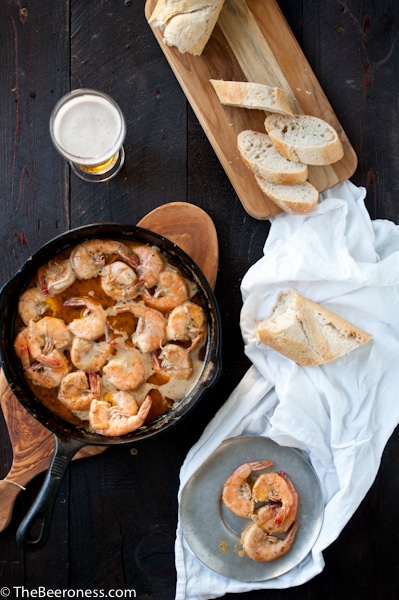
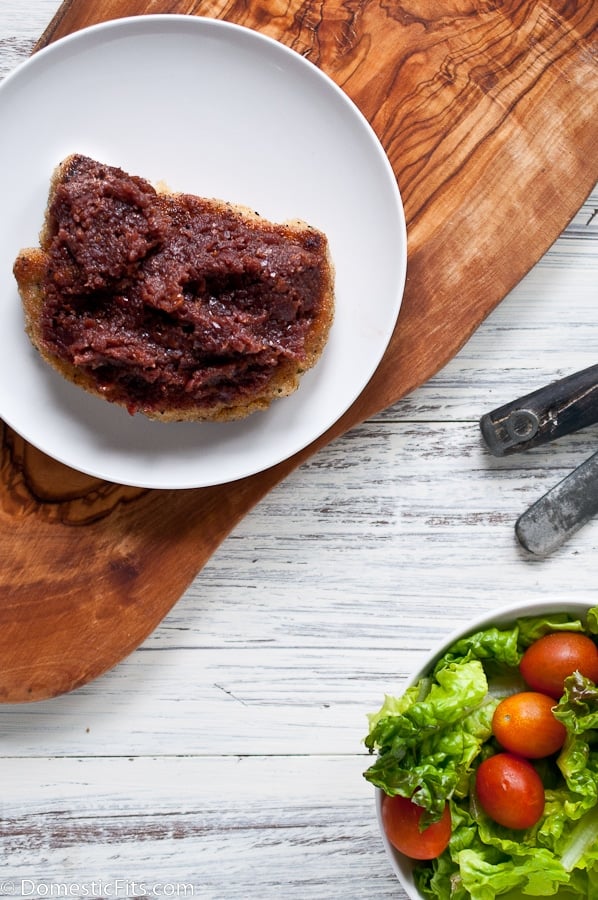
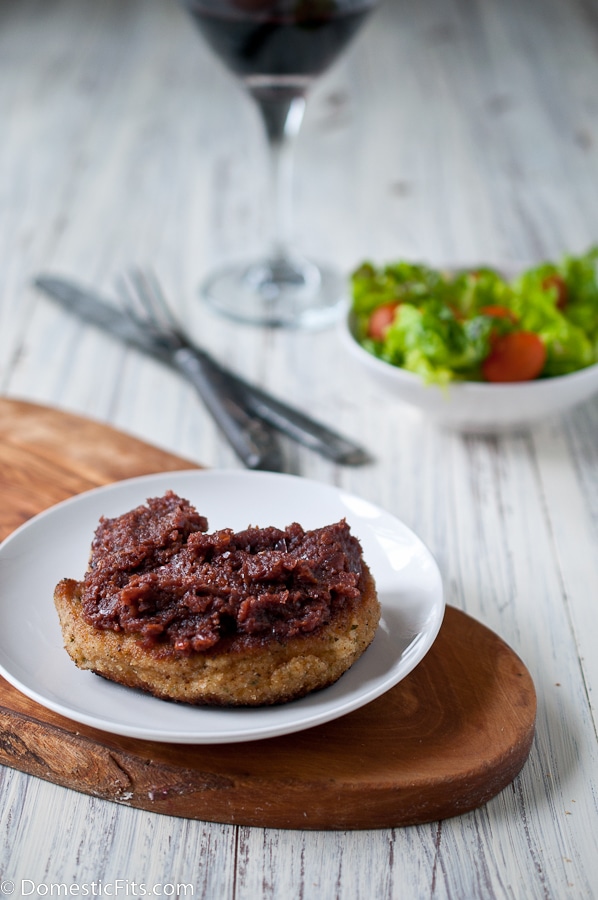
First, the recently transformed shrimp, fresh out of a scorching oil bath, sees potential solace in an a pool of amber liquid.
He makes his move, hesitant at first, he throws himself towards the cool pool of dipping sauce that will surely quench the scorching heat that radiates in his coconut crusted core. He’s close, but there’s still a ways to go before he can dip his heated middle in the apricot flavored oasis. He pushes on, hoping a few more flips will land him in his sticky sanctuary.
He pulls all the strength he can muster after his recent collision with the deep fryer and launches forward, landing cleanly in the middle of the delicious basin. It’s not enough, he wants more. He takes a moment to gather his strength.
One more explosive shove and he’s there, right in the middle of the refreshing wellspring. He lets out a deep sigh.
It’s ok to judge me for that. I’ve mostly spared you all from the incessant rambling of my haywired brain, but today has been a long day, you’ll have to forgive me. And my shrimp crazed ramblings.
But I do hope you come back tomorrow, I’ll have a lovely cocktail for you that will go well with this delicious shrimp.
Fried Coconut Almond Shrimp with Apricot Dipping Sauce
Ingredients
For the Shrimp:
Oil for frying
12 shrimp, raw, deveined, shell removed (tail still on OK)
½ cup all purpose flour
1 tsp salt
2/3 cup sweetened shaved coconut
¼ cup almond slices
2 egg whites
1 tbs water
For the Sauce:
¾ cup apricots, chopped (fresh but soft work best)
¼ cup thai sweet chili sauce
¼ tsp sriracha
1 tbs soy sauce
Instructions
Add 3 inches of canola oil to a pan, clip a deep fry thermometer onto the side. Bring the oil to 375 to 400 degrees, adjust heat to maintain that temperature range.
Add the coconut and almond slices, pulse until well combined, add to a small bowl.
In a separate bowl whisk the salt and flour.
In a third bowl whisk together the egg whites and water.
One at a time, dredge the shrimp in flour, then coat in egg whites, and finally roll in coconut mixture.
Drop into the hot oil, fry until golden brown, about 3 minutes. Drain on a stack of paper towels.
Add all of the sauce ingredients to a small food processor or blender, blend until smooth.
Nothing in life should be qualified by what is left out. You shouldn’t stand in the warm, golden, tropical, sun, toes digging into the sand, asking where the snow is.
You shouldn’t visit Machu Picchu and think, "It’s pretty good for a place that doesn’t have a mall."
Lazy Sunday afternoons spent reading Down and Out in Paris and London while gently swaying in a hammockaren’t known as That Day I Didn’t Go To A Rock Show.
Unfortunately for us all, we tend to filter everything though a check list of our own normality, fact checked by what we’re used to. Food shouldn’t be though of by what isn’t in it, but by what is. Vegan food shouldn’t be thought of meatless food, but food that celebrates produce.
Even though I am a meat-loving bacon-devotee, I love the challenge that produce- celebrating-food presents. Because I never want to serve food that’s described as "good for [vegan, parve, gluten free, healthy, etc.]" I want it to be damn awesome regardless of what’s put in or left out.
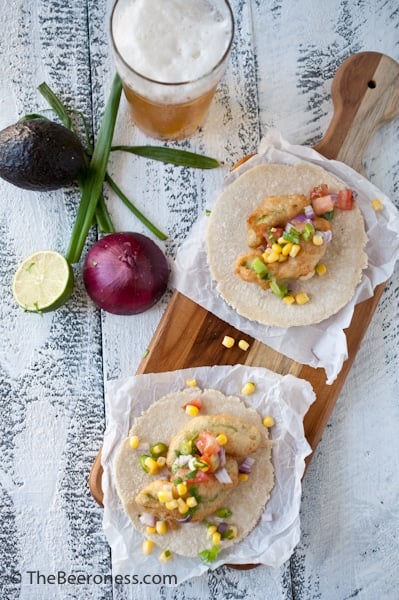
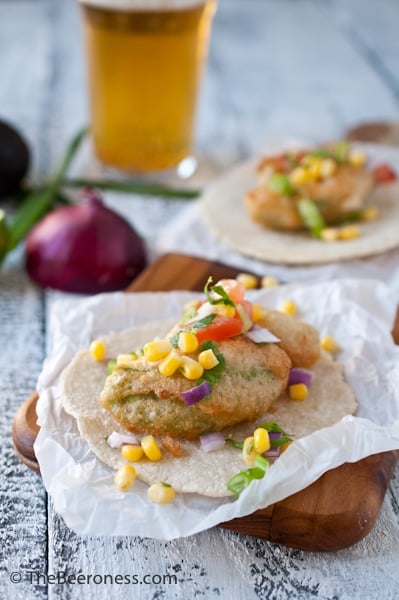
These tacos were every bit the shockingly fantastic bites that I wanted them to be. It just so happens that I didn’t need any meat or dairy to accomplish this feat.
I can’t take all the credit, you could beer batter anything and wrap it in a beer corn tortilla and you pretty much have a winner on your hands.
For the love of God, make your own tortillas. Once you realize that corn tortillas take about 5 minutes and three ingredients to make, not to mention taste a thousand times better than store-bought (plus cost only pennies), you’ll never go back.
Make the tortillas:In a large bowl, add the Masa and the salt, stir to combine. Add the beer and stir to combine. If the dough is too dry to hold together, add additional beer or water. If it is too wet, add more Masa. It should be the consistency of Play-Doh.
Form into balls a bit larger than golf balls. Prepare a tortillas press by wrapping in plastic wrap or covering with parchment paper (you can place tortilla ball between two sheets of parchment and use a rolling pin). Place one ball in the center. Press, rotate, press again.
Heat a griddle (or cast iron skillet) to a medium high heat (about 350 for electric griddles). Cook until slightly brown on the bottom (about 30 seconds to a minute) flip and cook on the other side. Don’t overcook.
Make the Avocados:Add about 4 inches of oil to a saucepan, clip a deep-fry thermometer onto the side (make sure the needle is not touching the bottom of the pot. Bring to 375-400 degrees (adjust heat to maintain that temperature).
In a large bowl stir together the flour, salt, garlic powder, and pepper. Add the beer and stir until combined (should have the consistency of pancake batter).
Cut the avocados into thick slices (about 4-5 per half) making sure the skin and seed is removed.
Dip the avocado slices into the batter and fry for about 1 minutes, flip and fry until golden brown, about an additional 2 minutes. Remove from fryer and allow to drain on a stack of paper towels. (only fry 2-3 slices at a time or the oil temp will drop and batter will become overly oily).
Make the salsa: Combine all ingredients in a bowl, stir to combine.
I’ve always enjoyed lower alcohol beers. Due in no small part to the fact that I can drink more and still be functional, for me, the goal is never to get hammered.
After what seems like an eternity of ABV one-upmanship, brewers are also starting to offer fantastically well-crafted beers on the lower end of the alcohol scale.
Maybe for people who don’t want to have to call a cab after just one pint, maybe as a way to focus on more delicate flavors that might be overwhelmed by the alcohol or maybe because some of us want to try several beers while avoiding becoming a cautionary tale.
As summer creeps up on us, and worries of beer-snobbery-judgment over the selection in our Beer Party Tub offerings start to invade our weekends, here are some craft beers that can keep you up to your witty ways while still enjoying a few pints:
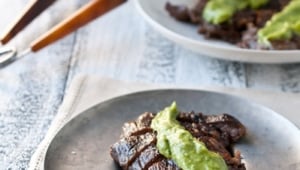
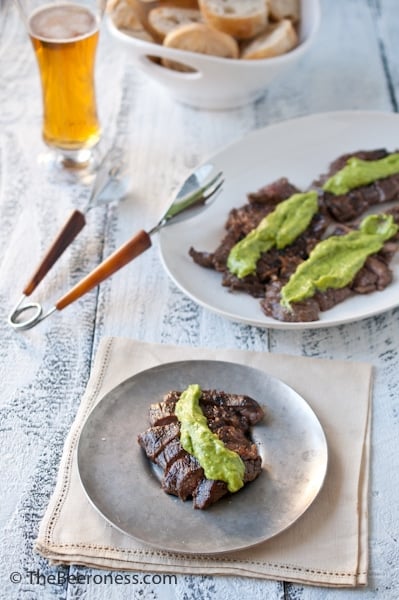
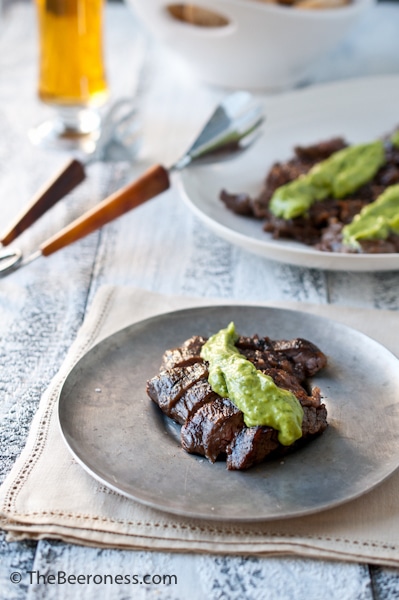
Salt and pepper the steak on all sides, place in a resealable plastic bag. Whisk together the lemon juice, garlic, beer, cummin, chili powder, brown sugar, soy and Worcestershire sauce, pour over the steak, seal the bag well.
Refrigerate for 4-6 hours. Remove from marinade and pat dry.
Grill on a preheated grill until medium rare, about 6-8 minutes per side. Remove from grill, allow to rest for 5 minutes before slicing.
To make the sauce add the remaining ingredients to a blender or food processor, process on high until smooth. Serve steak topped with avocado sauce.
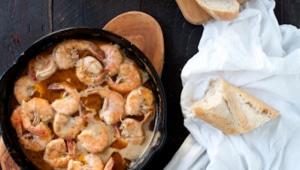
There is a magic to sharing a dish of food with a group of people, it’s unifying. We can all have our separate plates, and play nice, but placing a big pot of food in the middle of a table seems to breaks down walls. For this same reason, I love those big sharable 22 ounce beers that require that beer glassware I love so much.
At the moment, my grill is broken so I need other options for, fun, get-your-hands-messy, food that can feed the Sunday Supper guests I keep begging to come over and eat my food at the end of the week. This was great, it only took about 15 minutes, really delicious and it has an unholy amount of butter.
If you can handle it, get the head-on prawns for some added flavor. And don’t forget that bread to mop up that fantastic sauce.
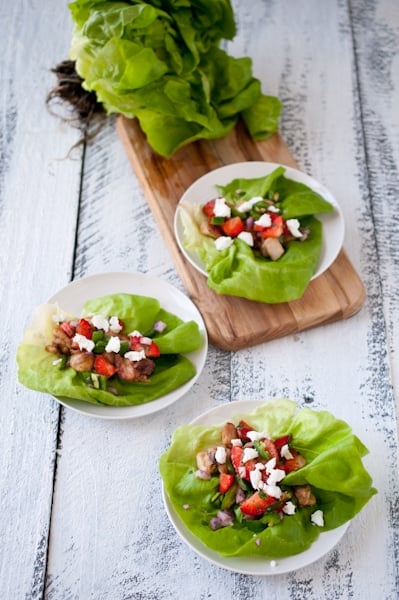
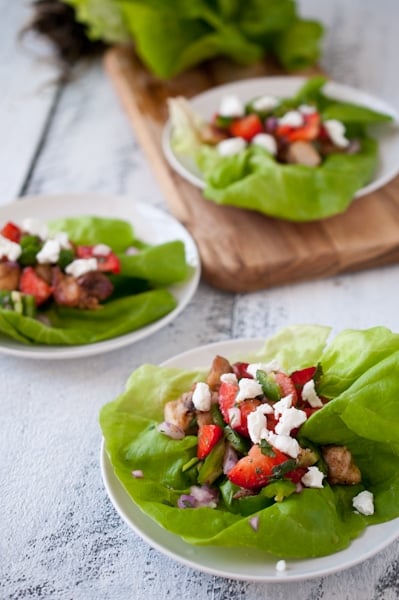
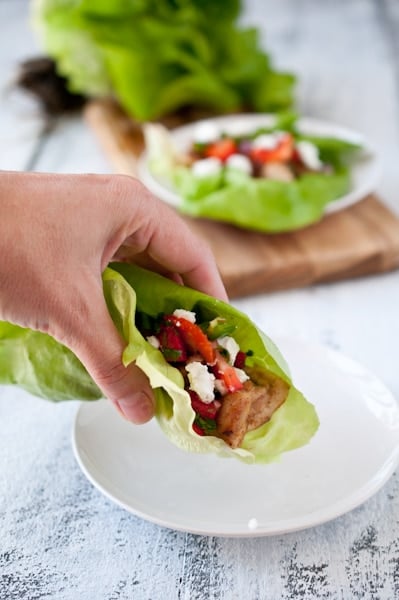
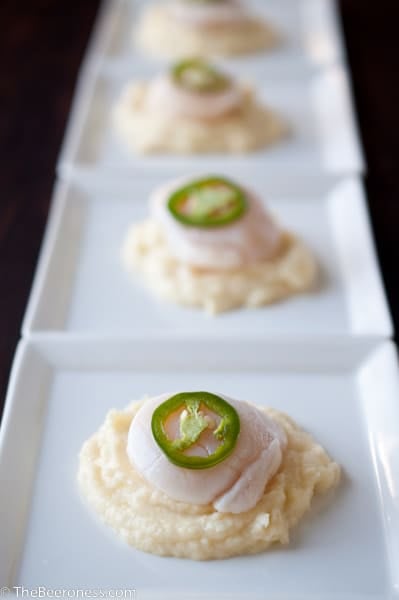
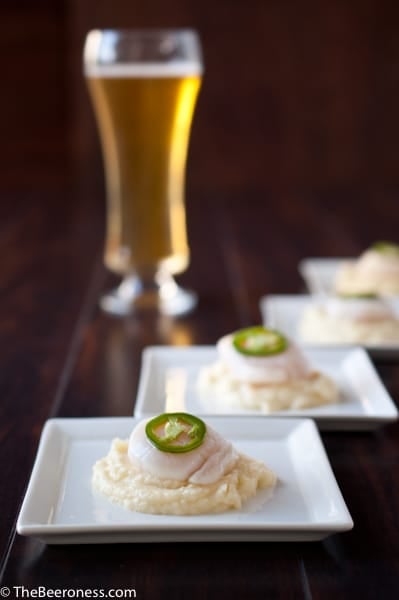
Lettuce wraps are Asian, right? Those PF Change guys make one that people seem to like. I love Asian flavors, but giving you a new take on an Asian dish isn’t at the top of my current skill set. So I went a new route, and put in some of my favorite flavors that also happen to be (mostly) healthy.
Let’s talk about that PF Chang wrap. It’s listed as an appetizer that has 4 “servings,” but if you eat it as an entrée, it’ll feed one. As a entrée it has close to 600 calories, 2600 milligrams sodium (!!!), and 47 grams of carbs (I don’t even get bread!). Just as a comparison, an In-N-Out cheeseburger with ketchup has 400 calories, 1080 milligrams sodium and 41 grams carbs.
I’m not trying to dissuade you from eating them, they look delicious, and if you want to order it, you should do that. More or less, I’m trying to get you excited about these lettuce wrap because it’s just as delicious and the numbers are amazing. It actually qualifies as diet food, even with the goat cheese and chicken thighs. It has only 255 calories for a generous serving, 650 milligrams sodium, and only 6 grams of carbs! Plus 24 grams protein and some fabulous vitamin C from those strawberries. And it only takes 20 minutes!
If you want to make them ahead for lunch (you should!) just store the chicken, strawberry salsa, cheese and lettuce all separate and assemble at lunch time. Because interactive lunch is more fun.
Strawberry, Chicken and Goat Cheese Lettuce Wraps
Prep Time: 12 minutes
Cook Time: 8 minutes
Yield: Serves 4
Ingredients
½ tsp black pepper
3 tbs corn starch
½ tsp chili powder
1 tsp salt
½ tsp brown sugar
½ tsp garlic powder
5 chicken boneless skinless chicken thigh fillets
1 tbs olive oil
1 cup strawberries, chopped
¼ cup red onions, small dice
¼ cup cilantro, chopped
1 jalapenos, chopped (stem and seeds removed)
2 tbs lemon juice
1 head butter lettuce
3 ounces chevre goat cheese
Instructions
In small bowl combine the pepper, cornstarch, chili powder, salt, brown sugar and garlic powder. Chop the chicken thighs, removing any large pieces of fat. Toss the chicken in the spice mixture until well coated.
Heat the olive oil over medium high heat until hot but not smoking. Add the chicken, sauté until cooked through, about 5-8 minutes.
In a small bowl add the strawberries, red onions, cilantro, jalapeno, and lemon juice, toss to combine.
Fill butter lettuce leaves with chicken, strawberry mixture and top with goat cheese.
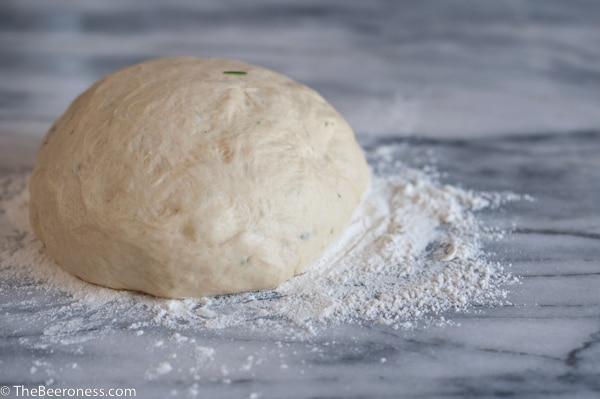
I’m a firm believer that the best pizza dough takes at least 24 hours.
I’m also a firm believer that most of us don’t usually have that type of forethought. At least it’s a rare occurrence for me.
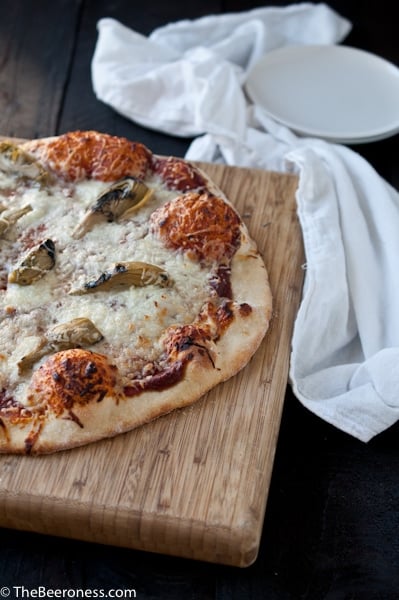
I started making this pita bread dough when I wanted to make a day-of pizza, which morphed into this recipe for one hour pizza dough. Which these days gets cooked on the grill as often as in the oven. Grilled pizza is my new first love of outdoor cooking, especially when topped with grilled vegetables and carne asada. So far I haven’t found the restraint to stop eating long enough to photograph such a pizza creation, so no blog posts have been created for that tasty little guy.
But I did manage to get a few hasty pictures of this oven cooked pizza, just look at those glorious bubbles.Pretty damn good for one hour, grilled or oven cooked, it’s my new go-to for pizza nights.
In the bowl of a stand mixer fitted with a dough hook attachment, add the flour, yeast, garlic powder and rosemary.
Mix until combined. In a microwave safe bowl add the beer. Microwave on high for 20 seconds, test temperature with a cooking thermometer and repeat until temperature reaches between 120 and 125 degrees Fahrenheit.
Add the beer to the stand mixer and mix on medium speed. Once most of the flour has been moistened, slowly add the salt and oil while the mixer is still running.
Turn speed to high and beat until dough is smooth and elastic, about 8 minutes. Transfer dough to a lightly oiled bowl, tightly wrap with plastic wrap. Allow to sit in a warm room until doubled in size, about 45 to 60 minutes.
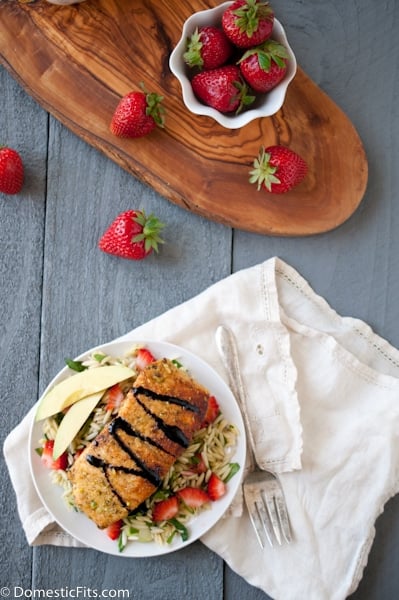
This is that savory strawberry recipe that I was telling you about. I made this three times, and loved it more and more each time. This is how I love to eat on a regular basis: fresh produce, healthy fats, no dairy (I love dairy and I eat it, but I try to eat as little as I can, which is a challenge), and so much flavor that I’m proud to serve it to dinner guests, which I did.
I made it once with quinoa, and of course that’s healthier for us, but the orzo just tasted special. I love the brightness and slight sweetness that strawberries add to savory dishes, so even if hadn’t taken on a strawberry ambassadorship with California Strawberry Commission, I’d still be in love with the idea of coming up with strawberries on the savory end of the scale.
Speaking of salmon, I’ve recently started to learn about sustainable seafood and what that means. Did you know that Target is known for a commitment to sustainable seafood? I have to say that was a little surprising to me, I thought I had to shop only at high end fish markets and expensive grocers to stay commited to the cause.
We can blame irresponsible fishing all we want, but the only place we can take action is in the store. It sounds like a giant undertaking, but really, just knowing where to buy fish and what types to avoid and you can jump on board. I love fish and eat it often, and it’s not very difficult to avoid the types of fish that are in danger and buy the fish that caught responsibly, like Alaskan salmon.
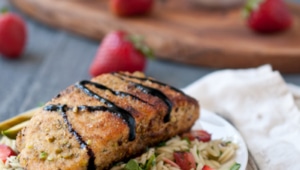
Pistachio Crusted Salmon with Strawberry Balsamic Glaze over Orzo Summer Salad
Prep Time: 10 minutes
Cook Time: 20 minutes
Ingredients
For the Salad:
1 cup dry orzo
1 cup chopped strawberries
1 English cucumber, peeled and chopped
2 cups chopped fresh spinach
¼ cup chopped cilantro
¼ cup diced red onions
1 avocado, peeled and diced
¼ tsp sea salt
For The Salmon
¾ cup strawberries, chopped
1 cup balsamic
1 tbs honey
½ cup shelled pistachios
¼ cup bread crumbs
3 tbs olive oil
4 salmon fillets
Instructions
Cook the orzo in lightly salted boiling water until al dente, drain and allow to cool to room temperature, toss with remaining salad ingredients.
Add the strawberries and balsamic to a food processor or blender, process until smooth. Add to a saucepan with the honey. Bring mixture to a boil, reduce heat to medium and simmer, stirring frequently, until reduced and thickened, about 15 minutes (can be made up to five days ahead of time).
Add the pistachios to a food processor, process until they resemble bread crumbs, about 3 minutes. Add the breadcrumbs, pulse a few times to combine. Add to a small bowl.
Heat the olive oil in a skillet over medium-high heat (too hot and the salmon will burn before it cooks through).
Place the salmon into the pistachio mixture (non-skin side down), pressing the pistachio mixture into the salmon. Place the salmon into the pan, pistachio side down, allowing to cook until golden brown, flip and cook on the skin side until cooked through.
Divide the salad between four plates, add the salmon on top of the salad, drizzle with balsamic glaze.
Notes
Taking the salmon out of the fridge 10 minutes before cooking will allow it come to room temperature and cook more evenly, allowing you to avoid burnt crust and undercooked middle.
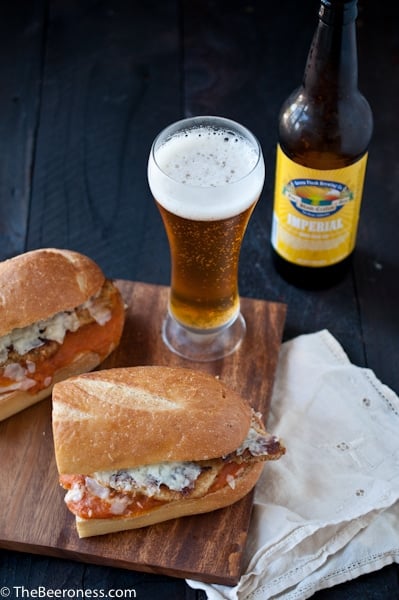
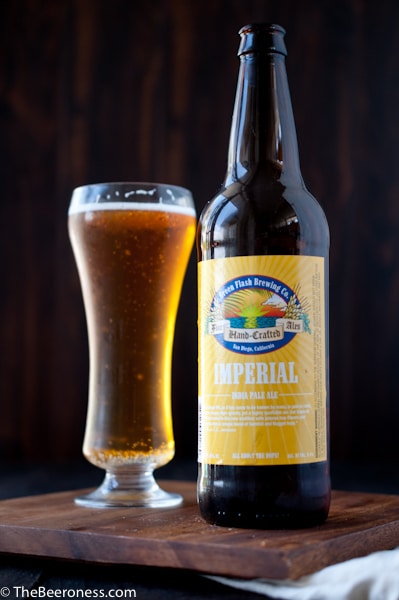
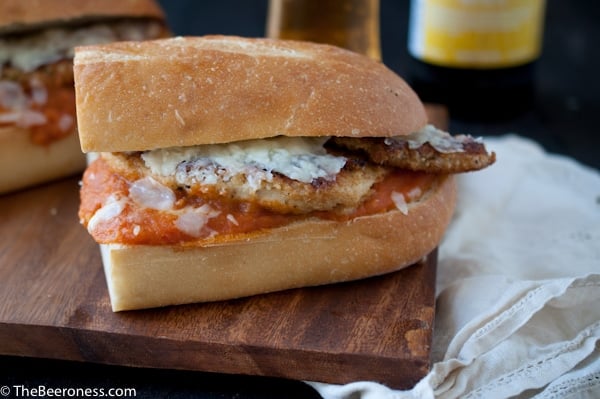
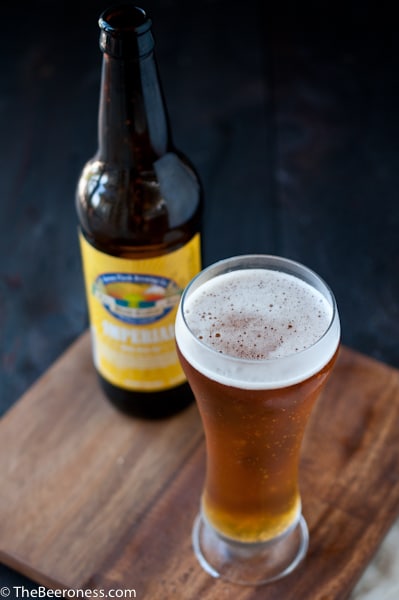
I don’t make a lot of sandwiches that I want to post about. But this is a sandwich I could eat every day. One that I would even serve at a party, especially one revolving around sports viewing or card playing. It’s spicy, beery, cheesy, and totally necessitates several napkins.
I used a beer that seems to be in regular rotation in my "beer cellar" (which is currently the bottom shelf of my fridge). If you live outside the Southern California area, you might not be familiar with the San Diego brewery Greenflash, but it’s hard to ignore this well distributed craft beer in these parts of the world.
Greenflash has an unapologetic love of the hops, wielding the bitterness with brute force. Which suits the hop frenzied California craft beer crowd. I’m a little choosier about my IPA’s than the average Los Angeles beer girl, and Greenflash gets it right when it comes to hopping the hell out of a beer. The Imperial IPA is really solid example of a West Coast IPA, well bittered, notes of pine, citrus, grapefruit, pineapple and a mild malty finish.
All of those flavor notes balance well with the spicy sauce I covered this giant sandwich with. A sandwich that also pairs very well with a nice cold IPA. But be careful, alcohol intensifies heat so that spicy sandwich may end up hotter than you wanted because of that same beer. And, please, get the good bread, none of that hot dog bun nonsense.
¼cupfresh shredded or fresh grated parmesan cheeseplus additional if desired
1cupflour
3tbsolive oil
4crust Italian sandwich rollssplit
1ball whole milk mozzarellasliced into 4 slices
Instructions
In a sauce pan cook the onions in the olive oil over medium high heat until softened. Add the tomatoes, cook until the skins starts to peel, about 5 minutes.
Ad the garlic, cook for 30 seconds.
Add the beer and tomato paste. Allow to simmer until most of the tomatoes have broken down, about 10 minutes.
Transfer to a large food processor or blender along with the chipotle pepper, basil, salt, smoked paprika and oregano, process until smooth. Taste the sauce at this point, add additional chipotle peppers for a higher heat level, if desired. Sauce can be made up to three days in advance (If the sauce is too watery, return to the stove and simmer until it has reduced and thickened).
Preheat oven to 400.
Filet the chicken breasts in half, creating two thin slices per each chicken breast for a total of four, pound to an even thickness using a meat mallet, heavy rolling pin or heavy skillet.
Pat the chicken dry. Place eggs in a bowl, beat well. Place the flour in a separate bowl. Mix the bread crumbs with the parmesan in a third bowl.
Heat olive oil in a skillet over medium high heat until shimmery but not smoking.
Sprinkle chicken with salt on all sides.
Dredge in the flour shaking off excess.
Dip in the egg bowl, turning to coat, then dredge in the breadcrumbs until fully coated.
Fry chicken in hot oil until golden brown on the underside, about 3 minutes, turn and cook until cooked through (try not to turn the chicken more than once).
Place rolls on a baking sheet, spoon generous amounts of sauce into the rolls. Cut the chicken fillets in half lengthwise so they better fit into the rolls.
Fill each roll with chicken, top with mozzarella. Sprinkle with parmesan if desired.
Cook in a 400 oven until cheese has melted, serve immediately.
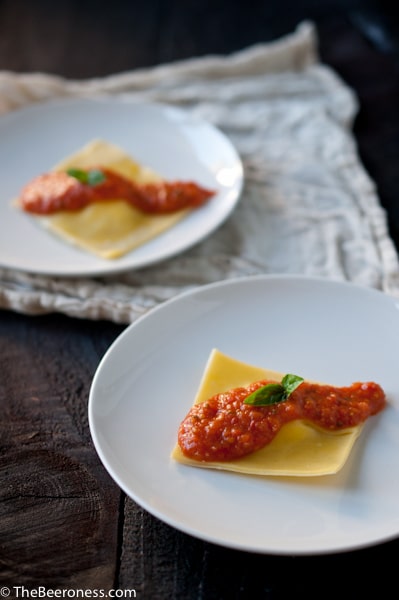
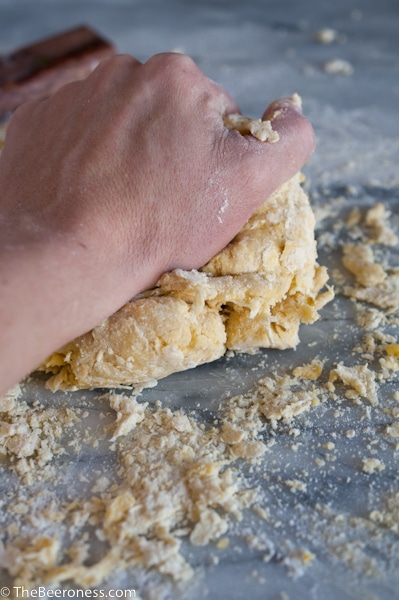
Homemade raviolis are a food lovers endeavor. It’s time consuming, physically trying, and a bit tedious. There are plenty of places that can sell you beautiful hand made raviolis, but you do it because you want to be there. In the kitchen, shoulders aching from kneading, hands covered with yolk and flour, feeling a connection to the Sicilian grandmothers who stood barefoot on unfinished wooden floors teaching the art to their eager but bored grandchildren.
It’s as much about the journey as it is about the cheese filled destination. I love homemade pasta, there is something meditative about the repetition of the process. I’m always glad for the time I spent, pushing myself closer to mastering the craft of pasta making. And the end product is a handsome reward for the labor.
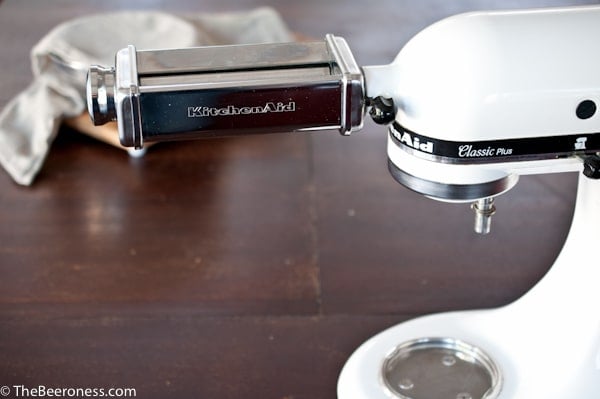
I used the KitchenAid pasta rollers. I love these, and even though they are more than most people want to spend on what will probably be an occasional use item, it’s a worth while investment. I don’t use these often, but when I do, I’m so glad I have them. The set comes with three rollers: a pasta dough roller (to make sheets), a fettuccine cutter and a spaghetti cutter. Because they’re automatic (meaning you don’t have to use one hand to crank the roller) it makes feeding the pasta into the roller fantastically easy. The KitchenAid pasta roller and cutters are also very well made and should last a life time, long enough for you to pass down to your future eager but bored grandchildren.
How To Make Raviolis
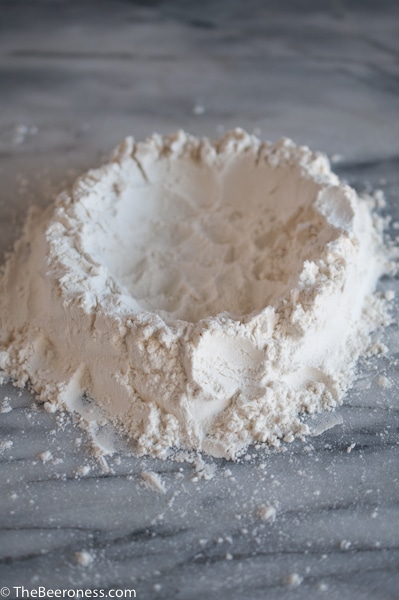
On a flat surface add the flour. Make a well with walls that are about 1 inch thick, make sure the well is large enough to hold the eggs, milk and oil.
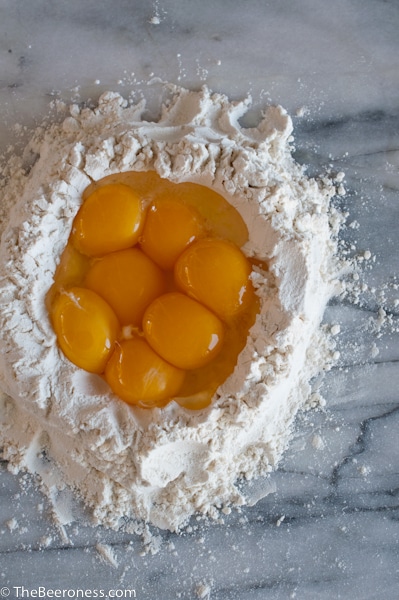
Add the yolks, egg, milk and oil. Break the yolks.
Using your fingers, or a fork, stir quickly. The motion will allow the liquid to pick up flour from the walls and will gradually become thicker. This will take about 10 minutes.
As the liquid becomes thicker, close to a paste consistency, start to push the flour walls up over and into the liquid pool. Continue to stir until the flour and liquid is mostly incorporated.
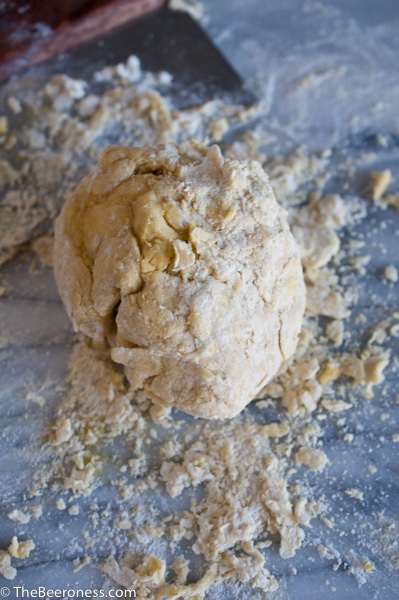
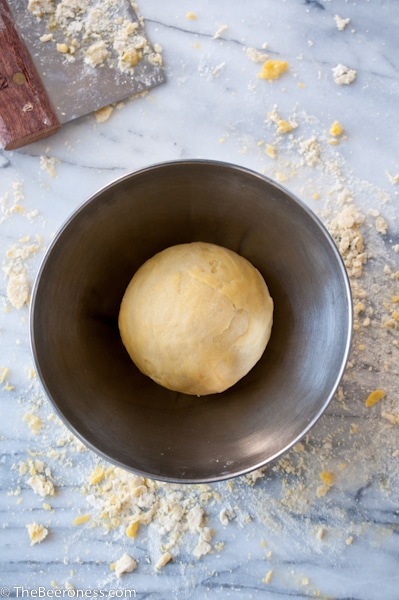
Pull the dough into a ball, it will be shaggy and seem a bit dry.
Knead on a flat surface with the heel of your hand, this will take a ten to fifteen minutes. Knead until the dough is smooth and slightly elastic. If you aren’t sure if the dough is done, keep kneading. This isn’t a dough that can be over worked, but too little kneading is a problem.
Put dough into a small bowl and cover tightly and allow to rest for 30 minutes at room temperature.
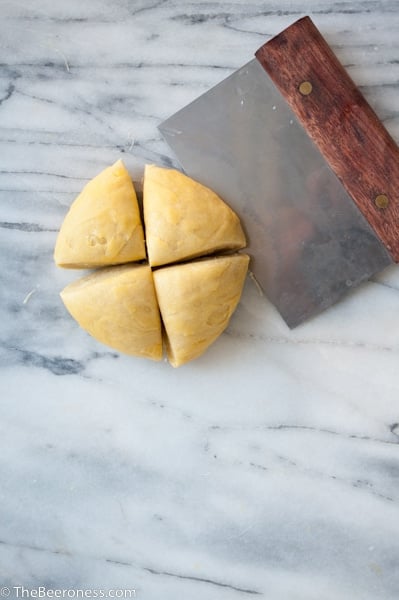
Cut into 4 sections. Place any dough sections you are not working with back in the bowl and cover.
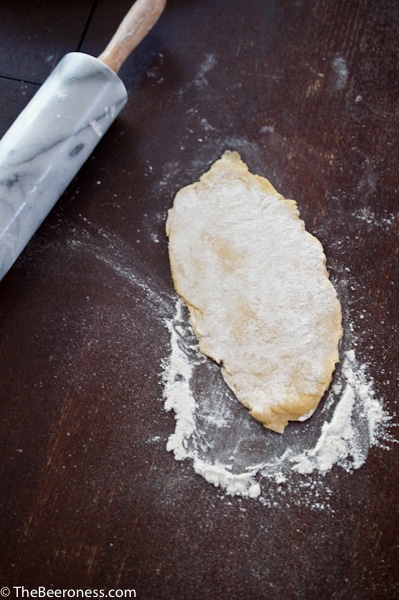
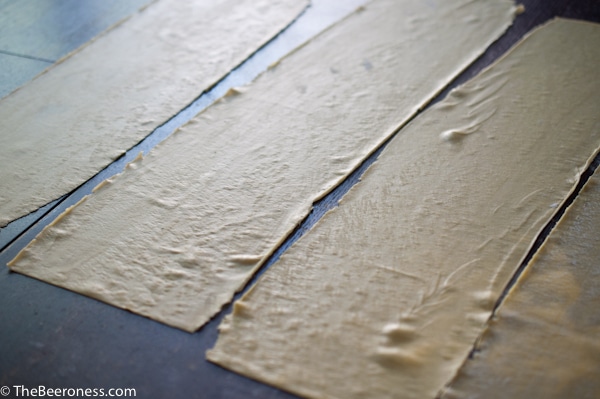
One at a time, roll out the dough sections to about ¼ to ½ inch rectangle.
Attach the KitchenAid Pasta Roller attachment to your stand mixer.
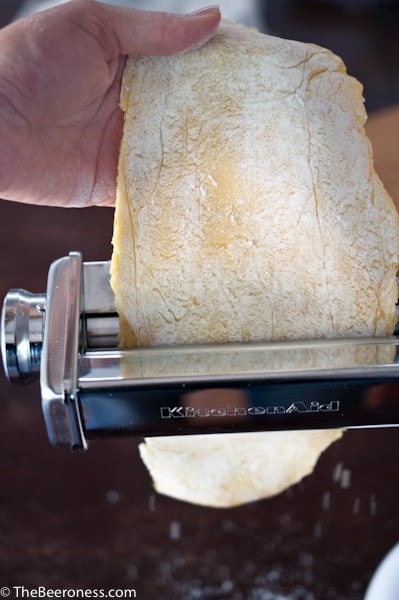
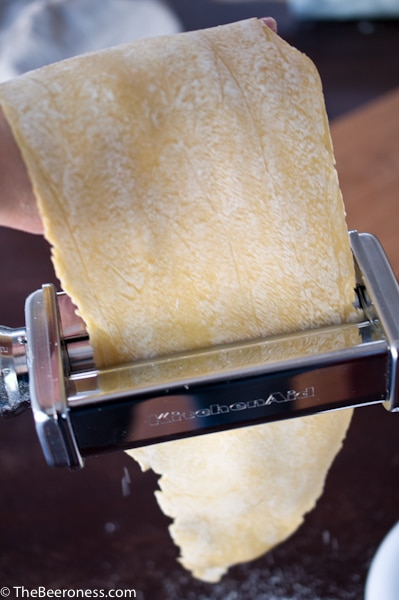
Set the thickness to 1 (the thickest setting). Turn the KitchenAid stand mixer to a speed of 2.Feed the dough rectangle into the pasta roller narrowest side first.
Pass through two or three times. Narrow the thickness to a 3. Pass the dough sheet through two or three times, this should get easier and easier with each pass.
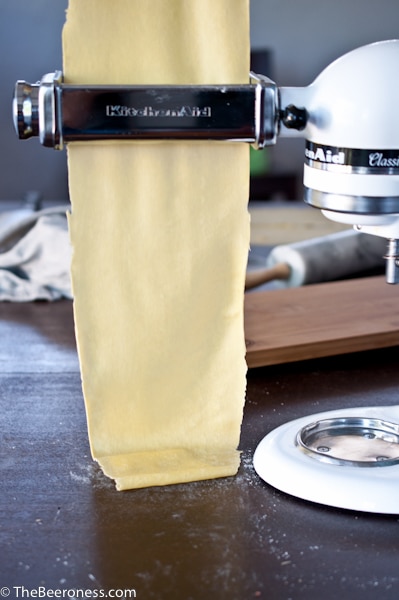
Narrow the thickness to a 5. Pass the dough sheet through two or three times, this should get easier and easier with each pass. You want the dough sheets to be so thin you can see through them.
Lay the sheets on a flat surface. It’s best to do this one at a time, moving through the steps as not to let the dough dry out, but for the purposes of photography and natural light, I broke that rule.
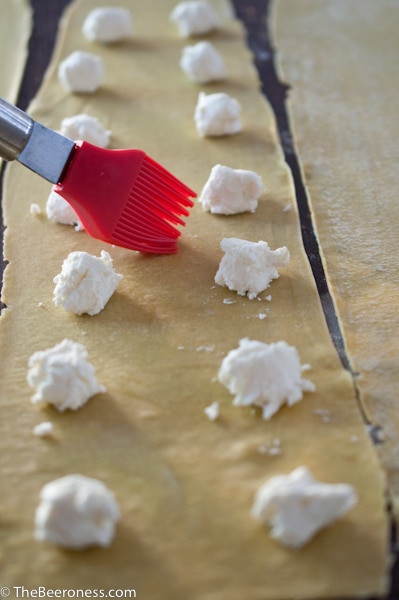
Place about 2-3 tsp of filling on the dough sheets about 1 ½ inches apart, in to rows.
Brush the dough with water around the balls of filling. Top with second sheet of pasta.
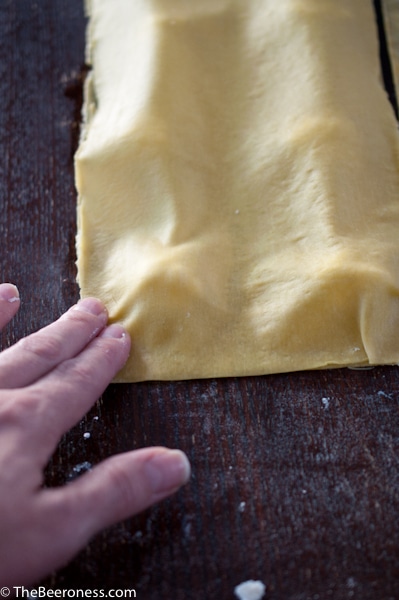
Press the pasta around the filling, sealing well.
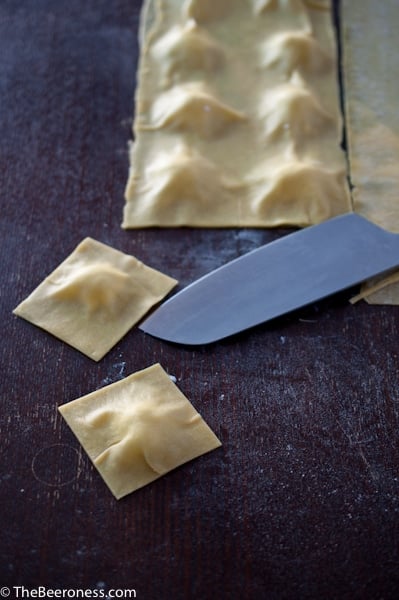
Use a sharp knife or a pastry wheel to cut into squares.
Place on a plate, allow to sit for about 10 minutes.
Cook in a pot of lightly salted boiling water until raviolis float and are cooked through.
Drain, plate and top with sauce.
Goat Cheese Raviolis with Blistered Sugar Plum Tomatoes and Hefeweizen Marinara
On a flat surface add the flour. Make a well with walls that are about 1 inch thick, make sure the well is large enough to hold the eggs, milk and oil.
Add the yolks, egg, milk and oil. Break the yolks.
Using your fingers, stir quickly. The motion will allow the liquid to pick up flour from the walls and will gradually become thicker. This will take about 10 minutes.
As the liquid becomes thicker, close to a paste consistency, start to push the flour walls up over and into the liquid pool. Continue to stir until the flour and liquid is mostly incorporated.
Pull the dough into a ball, it will be shaggy and seem a bit dry.
Knead on a flat surface with the heel of your hand, this will take a ten to fifteen minutes. Knead until the dough is smooth and slightly elastic. If you aren’t sure if the dough is done, keep kneading. This isn’t a dough that can be over worked, but too little kneading is a problem.
Put dough into a small bowl and cover tightly and allow to rest for 30 minutes at room temperature.
Cut into 4 sections. Place any dough sections you are not working with back in the bowl and cover.
One at a time, roll out the dough sections to about ¼ to ½ inch rectangle.
Attach the KitchenAid Pasta Roller attachment to your stand mixer.
Set the thickness to 1 (the thickest setting).
Turn the KitchenAid stand mixer to a speed of 2.
Feed the dough rectangle into the pasta roller narrowest side first.
Pass through two or three times.
Narrow the thickness to a 3. Pass the dough sheet through two or three times, this should get easier and easier with each pass.
Narrow the thickness to a 5. Pass the dough sheet through two or three times, this should get easier and easier with each pass. You want the dough sheets to be so thin you can see through them.
Lay the sheets on a flat surface.
Place about 2-3 tsp of goat cheese on the dough sheets about 1 ½ inches apart, in to rows.
Brush the dough with water around the balls of goat cheese (sprinkle with fresh herbs, if desired). Top with second sheet of pasta.
Press the pasta around the filling, sealing well. Use a sharp knife or a pastry wheel to cut into squares.
Place on a plate, allow to sit for about 10 minutes.
Cook in a pot of lightly salted boiling water until raviolis float and are cooked through.
Drain, plate and top with sauce.
Make the sauce:
Heat the oil in a cast iron skillet over medium high heat, cook the onions until soft about five minutes.
Add the tomatoes, cook until soft and the skin has blistered. Add the garlic, cook for about 30 seconds.
Add the beer and cook until the beer has mostly evaporated, about ten minutes.
Add the remaining basil, oregano, salt and pepper, stir, remove from heat.
Add to a food processor along with the tomato paste, process until smooth.
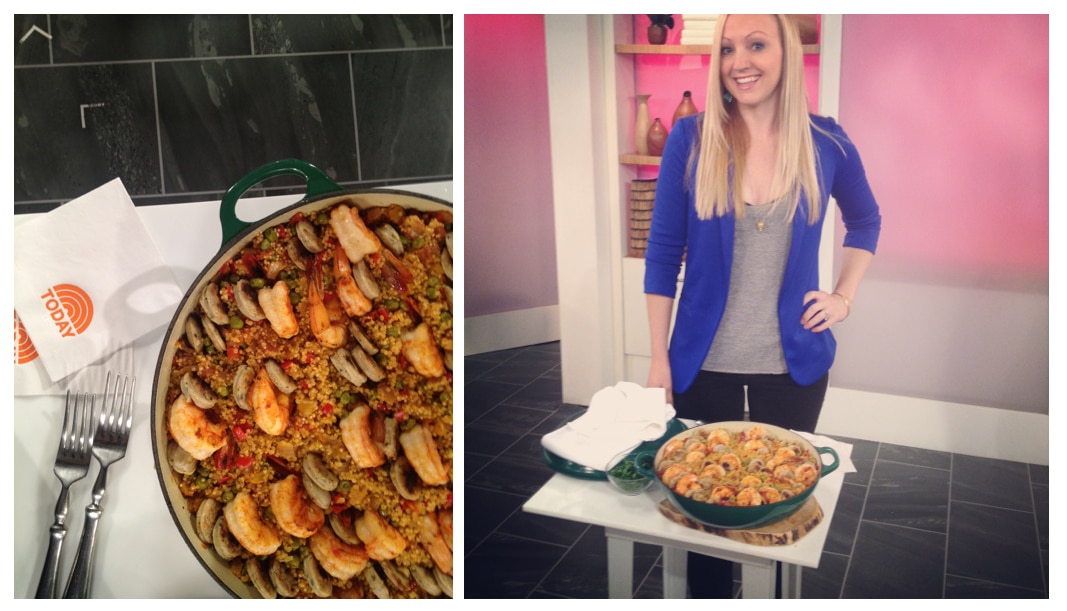
Life’s funny, isn’t it? One minute you’re sitting there enjoying a nice Mother’s Day breakfast that your husband made you, and the next minute you’re talking to The Today Show and agreeing to take a last minute flight to JFK so that you can stand behind a podium for 3 minutes and pretty much say zero words on National Television. Something like that.
The real prize in this competition was the journey. I flew to New York on Tuesday, was able to have dinner with my new friend Ashely, and drinks with my old friend David. You could pretty much preface any request with, "wanna a free trip to New York and have dinner and drinks with some friends?" and I’d pretty much say yes to whatever followed.
Wednesday morning I was taken to NBC Studios at 30 Rockefeller Plaza, through the celebrity filled green room, and into hair and make up. Then up to a tiny studio that they referred to as The Spa, which included no studio audience, just lots of producers, cameras and a beautiful camera friendly kitchen. This was all for Joy Bauers Joy-full Cook Off. She wanted healthy one pot meals that where easy and family friendly. She choose my dish, along with two other amazing dishes to be taste tested on live TV by Kathie Lee and Hoda, who would choose the winner.
The other dishes were amazing, and to be honest, I didn’t really care who won. I’d already collected my prize of flight to New York, hotel room, and dinner and drinks with friends, I was all set. But it turns out, Kathie Lee and Hoda are huge fans of skinny shrimp dishes and choose mine. I won!
Here’s clip of me saying pretty much nothing on the Today Show and winning a basket of NBC related swag:
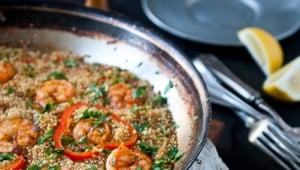
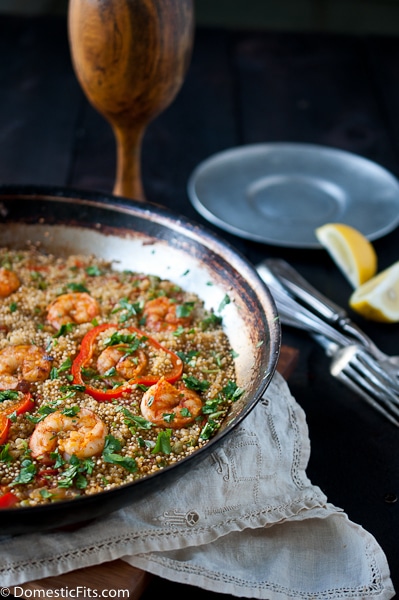
Place shrimp in a small bowl, sprinkle with ¼ tsp sweet paprika, ¼ tsp smoked paprika and ¼ tsp onion powder, toss to coat.
Heat olive oil in a 12-inch skillet (with a lid) over medium high heat, cook shrimp until seared, about 3 minutes per side (don’t over cook). Remove from pan, set aside.
Add chicken sausage, cook until browned, remove from pan, set aside.
Add the onion and bell peppers, cook, stirring frequently, until onions and peppers have softened, about 6-8 minutes.
Add garlic, tomatoes and tomato paste, stir until combined.
Add saffron, salt, pepper, remaining smoked paprika, and onion powder, chicken broth and peas, bring to a simmer. Add quinoa stir and evenly distribute quinoa. Add the lid to the pan at a vent, adjust heat to maintain a simmer. Cook without stirring for 16-18 minutes or until the quinoa is cooked through and the liquid has absorbed.
Place the shrimp and sausage on top, replace lid and cook for 1 minute or until shrimp and sausage is warmed.
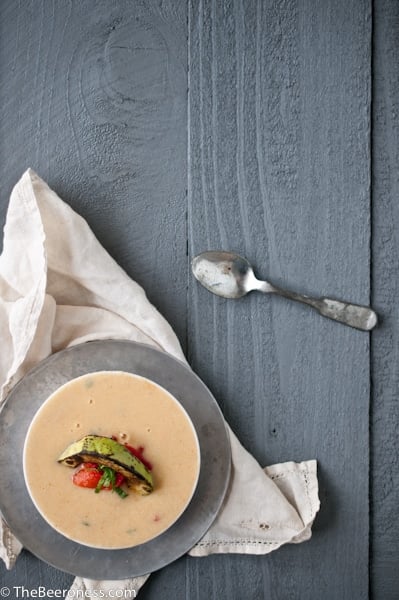
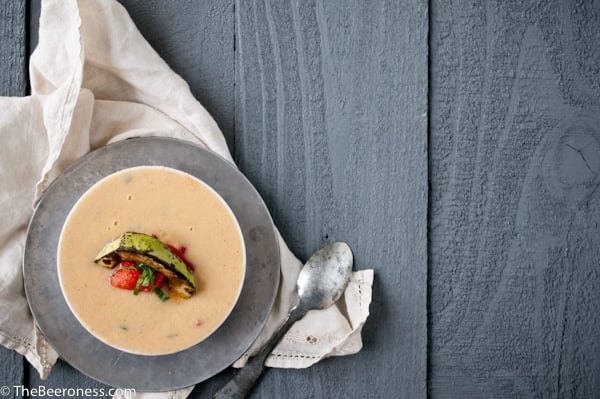
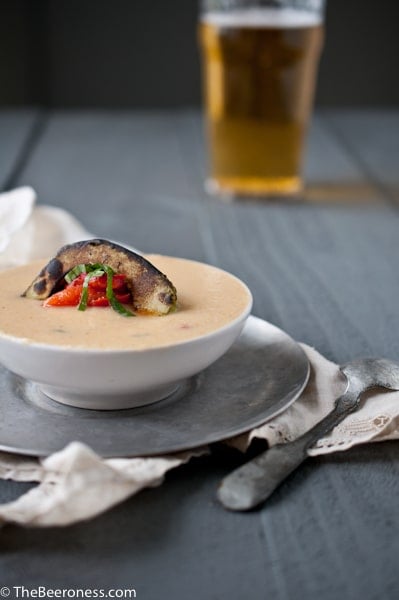
I brûléed some avocados, which, let me be honest, is sort of strange. But it gave this soup a campfirey, smoky flavor that I loved so I’m standing behind the decisions. A decision that was largely based on the fact that I’ve had this brulee torch for over two months and haven’t used it yet.
Now I’m sort of hooked on the idea of wielding a kitchen torch this powerful, it completely smokes (pun intended) the one I previously owned that I now see as fairly pathetic. The new one is beast, I think it might belong in the tool shed out back (I don’t actually have a tool shed, so I guess it’ll stay in the kitchen).
But you really don’t HAVE to brulee avocados, just cutting them up and adding them to the soup like a normal person is just fine.
About this soup, it’s vegan, which clearly I am not. But I love vegan food because it puts the emphasis on produce, which I adore. Corn is just coming into the season, and so are the avocados I abused, but the weather in most parts of the country is still soup worthy. But you have to remember that I’m also the girl that likes to drink stout and eat soup in August.
I also prefer to eat ice cream in December. Which all may add up to my rampant non-normalness that forced me to take a kitchen torch to those perfectly lovely avocados.
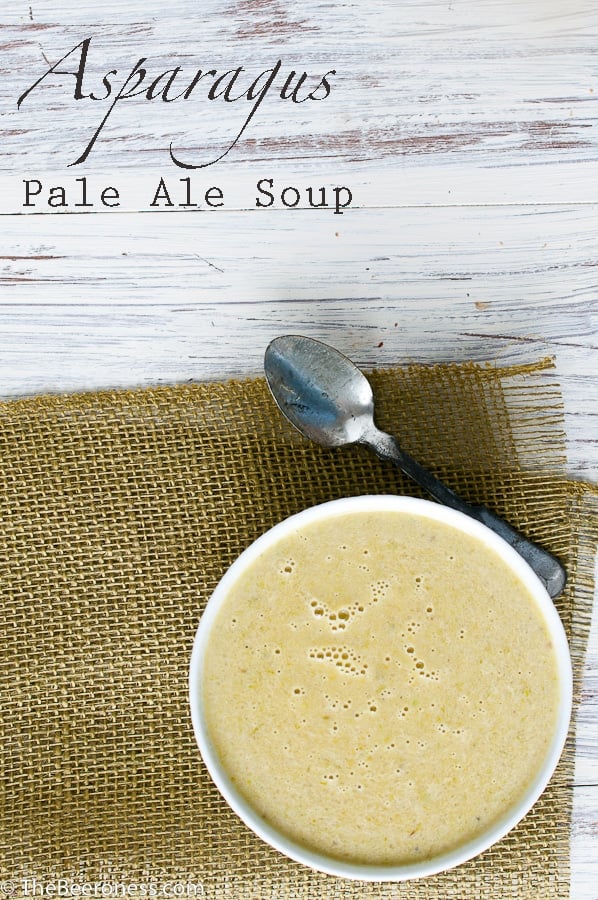
Roasted Corn, Pale Ale and Coconut Curry Chowder with Brûléed Avocados
1large avocadoripe but firm, too soft will not work
1lemon
Instructions
Preheat oven to 400.
Trim off any silk that is sticking out of the husk of the corn ears.
Place on a baking sheet, roast for 20 minutes. Remove from oven and allow to cool enough to handle. Cut the kernels off the corn, set aside.
In a sauce pan over medium high heat, sauté the onions in olive oil until soft, about 5 minutes. Add the garlic, cook for 30 seconds. Add the beer, salt, pepper, and vegetable broth, coconut milk, curry paste, corn kernels, and cayenne. Bring to a simmer. Cook for 5 minutes.
Using an immersion blender, puree until smooth.
Stir in the basil and the red pepper.
To brûlée the avocados, slice into ¼ inch slices, sprinkle with lemon juice. Place on a heat proof surface like a baking sheet. brûlée with a kitchen torch until browned, use tongs to flip over and brûlée the other side.
It’s been a strange few weeks for me, cooking wise. I’ve been getting back to the food I love, remembering why I ever picked up a whisk in the first place, challenging myself as a cook and remembering the food I fell in love with. If you follow my other blog, you are aware of this shift I’ve taken.
I’m happy, and relived in a way, chasing the Traffic Dragon is exhausting and cooking what I love makes me happy, and for the first time in a while I’m excited to share a dish.
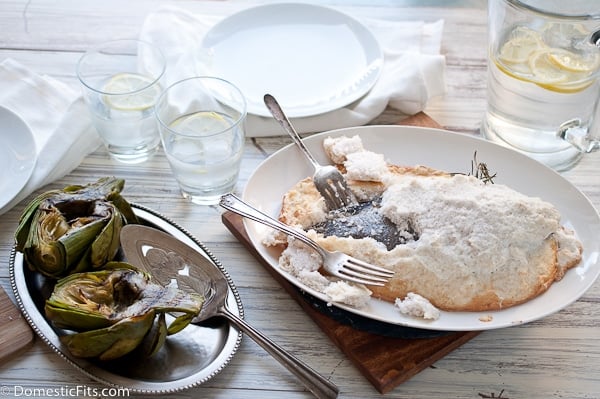
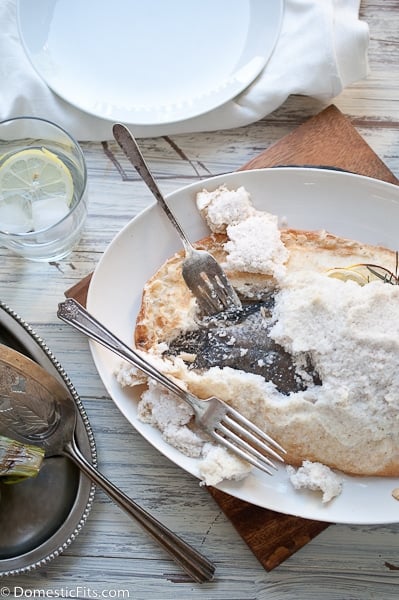
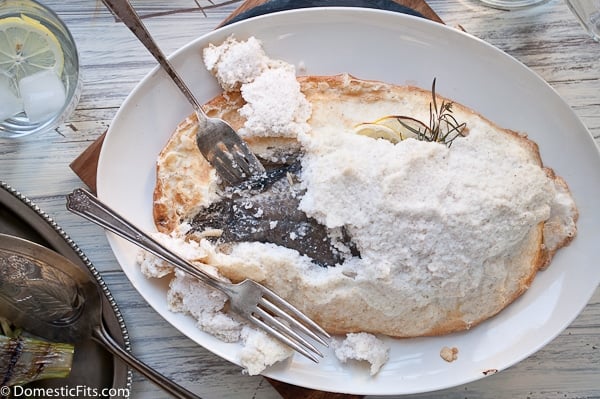
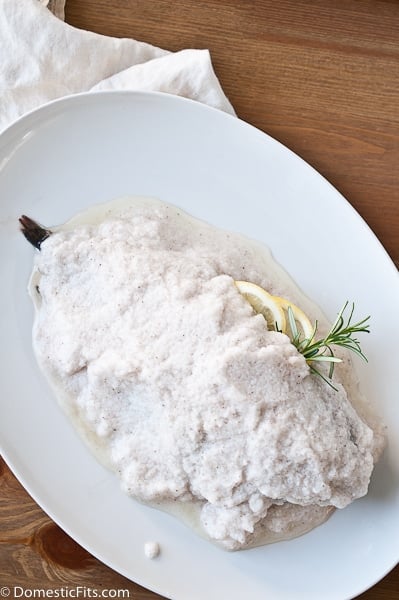
The first time I ever had a salt packed roasted anything was while traveling through Italy as a broke college student. I’d worked three jobs and saved for six months to send myself over seas and had ended up in the small city of Trieste. I’d wandered into a restaurant that was far too fancy for my tiny budget. I saw pesci listed on the menu and just pointed to it. There weren’t any prices on the menu and I just hoped that the fish I order wasn’t too expensive.
What came to my table was a salt packed whole fish on a cart. I panicked for a second and then decided to order a glass of wine and enjoy it. It ended up costing $60, a small travelers fortune, but it was worth it. I lived off bread and cheese for a week, but I’ll never forget that fish.
Lately I’ve been trying to remember food I’ve fallen in love with and that fish came to mind. It’s a classic, old world, technique that isn’t used much in the US, but it’s brilliant at locking in flavor with zero added cooking fat.
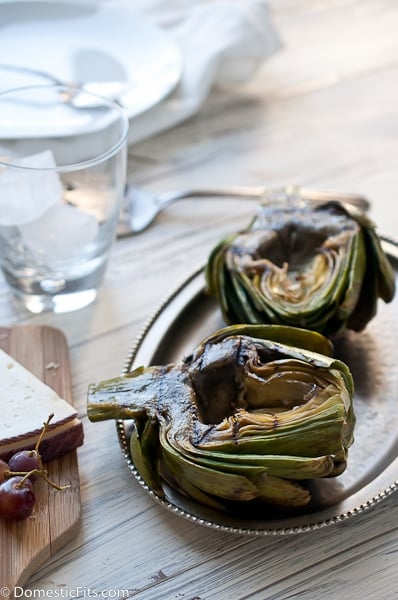
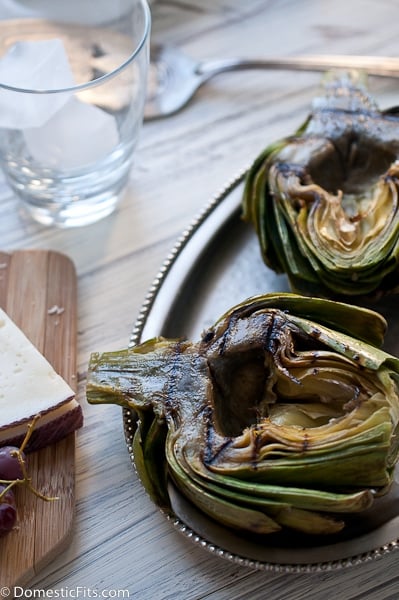
I found a video online by Tom Colicchio about salt roasted fish, just like the one I had in Italy. It paired well with the artichokes, and grilling is my absolute favorite way to make artichokes now, something you need to try this summer if you get a chance.
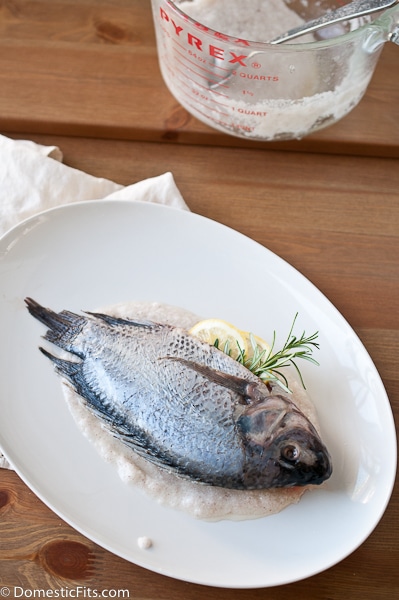
The fish is simple. Just start with a whole fish that’s been gutted. Most markets sell these cheaper than large fillets because there is less labor involved.
Mix the salt and the egg white, make a bed of salt on an oven safe serving platter (or rimmed baking sheet)
Put lemon and herbs in the cavity, then pack the remaining salt around the fish before roasting.
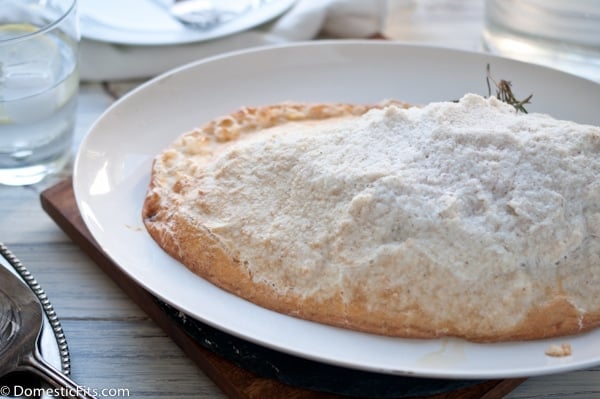
It comes out of the oven a light golden brown and steamed to perfection. Very impressive, and pretty easy.
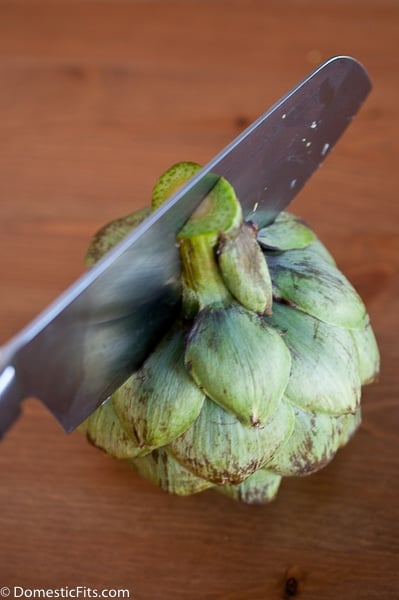
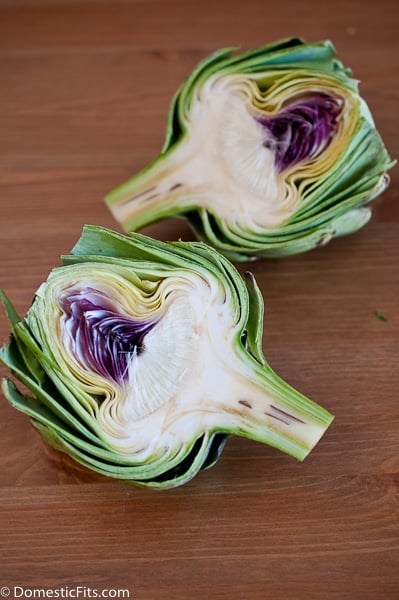
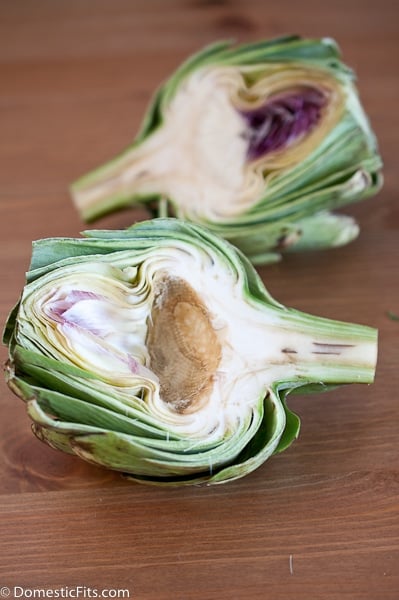
For the artichokes, just cut them in half down the center
Use a melon baller and a sharp paring knife to remove the hair and the purple leaves, then boil for 25 minutes,
baste with melted butter and grill until you get those beautiful grill marks.
Salt Roasted Whole Fish
Yield: Serves 4
Ingredients
2 lb whole fish, gutted and cleaned (sturdy fatty fish like: salmon, arctic char, whitefish, sablefish, bass)
3 thin slices of lemon
1 sprig rosemary
4 egg whites
2 cups coarse Kosher salt
Instructions
Pre heat oven to 400.
Whip the egg whites with a fork for about 1 minute. Add the salt, mix until it resembles wet sand.
Lay about ¾ cup of salt mixture on an oven safe serving platter (you can also use a baking sheet with sides) add the fish to the top of the salt bed. Stuff the cavity of the fish with lemon slices and rosemary.
Add the remaining salt to the top of the fish. Pack the salt around the fish (it’s fine if the head and tail are sticking out).
Roast at 400 for 25-30 minutes or until the internal temperature reaches 125F and the salt pack is light brown.
Remove from oven, the salt pack should break away cleanly.
Grilled artichokes
Ingredients
2 large globe artichokes
1 lemon, juiced
4 tbs unsalted butter, melted
½ tsp salt
½ tsp pepper
vegetable oil for grill
Dipping sauce, if desired
Instructions
Prepare a pot of lightly salted boiling water.
Slice the artichokes down the center, lengthwise. Using a melon baller and a paring knife remove the hair from the choke as well as the inner purple leaves, leaving a cavity in the center of the each artichoke half.
Boil in the pot of lightly salted boiling water until the outer leaves tear away easily, about 20 minutes.
Mix the lemon juice, melted butter, salt and pepper in a small bowl.
Brush a preheated grill (or a grill pan) with vegetable oil. Brush artichokes lemon butter mixture, grill cut side down, until nice grill marks appear, about 8 minutes. Baste artichokes with melted butter while grilling.
Serve warm with dipping sauce, if desired (pesto butter, garlic aioli, herbed mayonnaise, lemon butter).
Both of these feelings, that I figured were separate, came into sharp focus this past weekend as originating from the same issue.
A very dynamic woman, a catalyst of inspiration, stood in front of me saying, "But what do you want? But what do YOU want?"
What do I want? Looking around at people who inspire me, who make incredible, insightful, layered and important food, thoughts began to form. I want to write things that matter. I want to make food that feels compelling and substantial. And in the midst of this realization, someone mentioned my Cheesecake Fudgesicles, and I cringed.
I want to stop making stupid food.
The issue is that stupid food gets shared, pinned, and trafficked. Smart food is scary, intimidating and gets ignored.
But what do I want? I want to be taken seriously, I want to be respected and I want to grow as a cook.
I have to stop making stupid food.
The conflict is that I need to pay my bills, and stupid gets noticed. This is just how the world works, in almost every area. InBev makes billions more than Russian River, Carly Rae Jepsen sells more records than Delta Spirit and Oreo Funfeti Cake Batter Fudge will get more traffic than homemade Duck Confit Raviolis with Stout Cherry Sauce.
Although I can eat nachos like a champ, and I’ll never pass up a good brownie, when it comes to building a food resume I need to ask myself: what do I want?
I want to make smart food, I want write things that matter.
Taking a step back from the trenches of Google Analytics and the Traffic Trap of caring more about numbers than content, I thought about what I love when it comes to writing and food.
Writing: The piece I wrote on Homeboy Industries for Honest Cooking iPad magazine is the best thing I’ve ever written and possibly the only thing I’ve ever written that is truly important.
Food: Even though a food blog may never really matter in any real way, I used to cook food that a friend once described as “with food.” He said I could never just make a cake, it had to be a Chocolate Stout Cake with Orange Mascarpone Filling and Smoky Chocolate Ganache, everything I made had a “with” somewhere in the middle of the tittle. Layers, flavors, thought, and time spent on the food I really love somehow got replaced with Chocolate Bacon Cupcakes and Green Beer Cheese Soup.
Everything I’ve made for the blog is delicious; the issue isn’t really with the recipes, but with me. Cupcakes are fine, so are Beer Cheese Nachos and Oreo Funfetti Slutty Nutella Red Velvet Brownie Cake Pops, especially if that is what you want to make, then do that. It’s not about “right” food and “wrong” food, it’s about finding what I want, and figuring out how to get there.
There is a magnetism to the S’mOreo Cake Pop posts, because it brings in readers, and seems to make people happy, things that I care more about than I should when it comes to what do I want?.
I’ll lose traffic, I can guarantee that. I can promise that my numbers will go down.
But I can also promise that nothing that I post will be difficult. Maybe you want to come on this journey with me and make layered “with” food, even if it doesn’t sounds as sparkly as those Red Velvet M&M S’mores Krispy Treats.
I just need to have faith in what I want, faith that the Universe will conspire in my favor, faith that this will lead to path in which traffic won’t matter, faith that seeking the answer to what do I want? will lead me down the right rabbit hole.
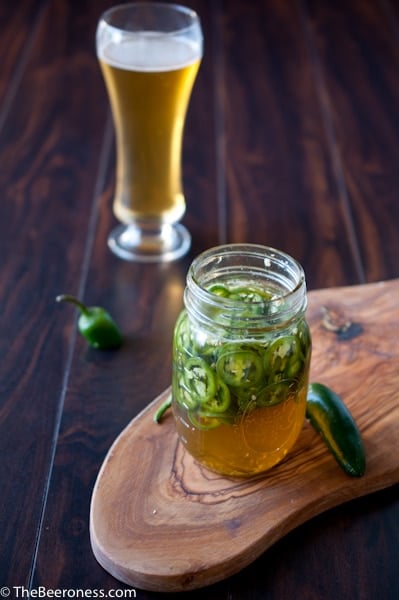
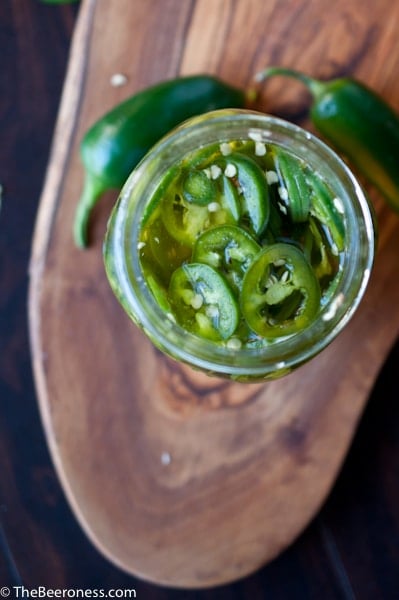
In a saucepan over medium high heat, add the sugar, salt, vinegar and water. Stir just until the salt and sugar have dissolved, remove from heat. Stir in the beer, pour into a jar.
Refrigerate until cold, about 20 minutes.
Add the jalapenos to the jar, replace the lid and refrigerate for at least 24 hours.
When I first got into food blogging I had this idea that I would just take pictures of my dinner and post the recipe online. Somewhere between installing Google Analytics and starting an LLC, I realized that I was cooking in order to develop content rather than just posting what I was eating.
I guess that’s inevitable when I started to earn an income and see my website as a small business. I also realized that although I often stray from who I am as a cook in order to cultivate blog hits, I love cooking, I love food and I got in this business because of those things. When the recipes you love get ignored and the ones you don’t have strong feelings about go viral, it’s hard not to just continue to post those Pandering to the Masses recipes that go viral, but I know that I am the most happy when I cook the food I want to cook and hope that you love it, too.
I loved the way this came out, even though I know it wont go viral. It’s how I like to eat, and how I like to spend my time in the kitchen, hope you don’t mind too much.
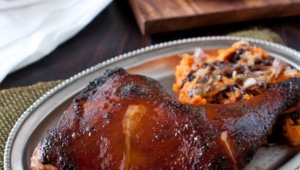
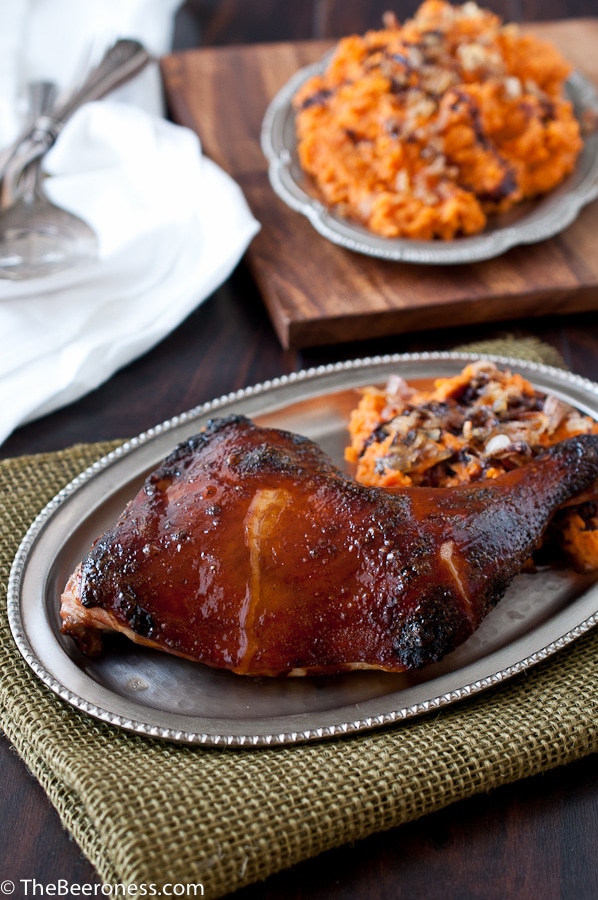
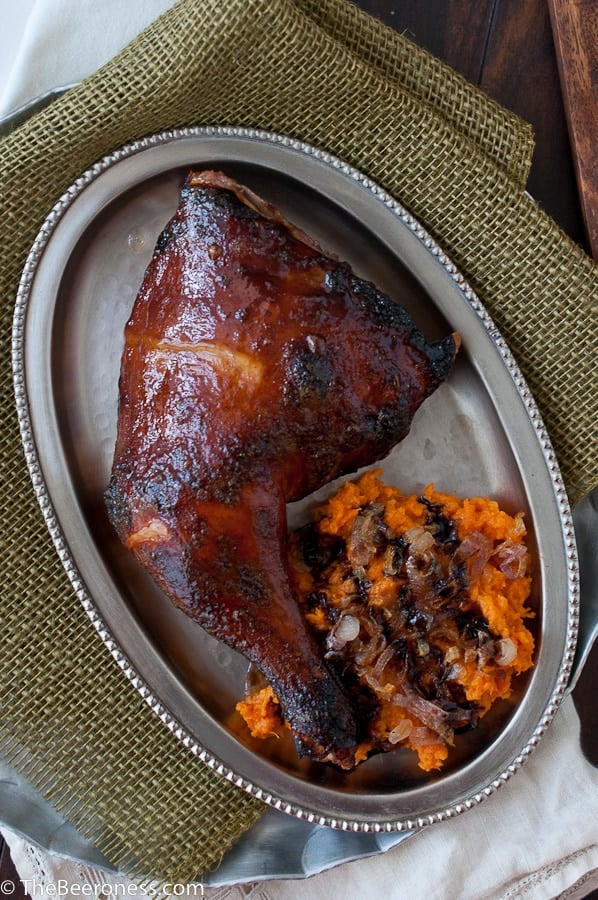
Mirin Stout Glazed Roast Chicken with Maple Sweet Potatoes topped with Caramelized Shallots and Balsamic Glaze
4chicken leg quartersor 1 whole roasting chicken, cut into quarters
For the Glaze:
1cupstout
2/3cupmirin
¼cupsoy sauce
½tspchili powder
1tbscornstarch
3tbshoney
For the Sweet Potatoes:
2large shallotssliced (2/3 cup)
2tbsbutterplus 4 tbs divided
1tbsoil
3large sweet potatoespeeled and sliced
2tbsreal maple syrup
2tbsheavy cream
¼tspnutmeg
¼salt
1/4cupchopped pecans
3tbsbalsamic gaze
Instructions
In a pot over medium high heat, add the water and the salt. Stir until salt has dissolved, remove from heat, add the beer and ice. Stir until ice has dissolved and brine is at room temperature or below.
Add the chicken quarters to a large bowl. Pour the brine over the chicken, cover loosely with plastic wrap, refrigerate for 3 hours and up to 24 hours.
Preheat oven to 425F.
Add the stout, mirin, soy, chili powder, cornstarch and honey, whisk to combine. Add sauce pan to high heat, allow to boil until slightly reduced and thickened, about 5 minutes.
Cover a baking sheet with aluminum foil, place a wire rack over the foil lined baking sheet.
Remove chicken from brine, discard the brine. Rinse the chicken well and pat dry. Place chicken on the wire rack.
Brush liberally with the glaze.
Roast at 425F for 45 to 55 minutes, brush with glaze every 10-15 minutes. Remove from oven when the internal temperature reaches 175F.
While the chicken is cooking make the sweet potatoes. In a saucepan, melt the butter with the oil over medium heat. Add the shallots and cook over medium-low heat until caramelized, about 20 minutes.
Boil the potatoes in a pot of lightly salted water until fork tender, about 12-15 minutes. Drain, return sweet potatoes to the dry pot. Add 4 tbs butter, cream, maple syrup, salt, and nutmeg, mash with a potato masher until well combined and potatoes are well mashed, transfer to a serving dish. Top with caramelized shallots, chopped pecans and drizzle with balsamic glaze.
Notes
Balsamic glaze can be bought at the store, often by the balsamic vinegar, or you can make it by reducing 1 cup balsamic and 1 tbs white sugar or honey in a saucepan until reduced and thickened.
I’m going to be honest with you, I’m not a huge fan of pork chops. That being said, if I’m going to eat a pork chop, it better be a damn good pork chop or I’d rather just have take out. Over the years I’ve figured it out, mostly after receiving an unsolicited shipment of a gigantic box of high quality pork chops that I needed to figure out how to use.
The elements of the Perfect Pork Chop include: breading that stays on, juicy not dry, and a perfect golden brown on the outside, with a perfectly cooked inside. It took me a while, a few dry chops, and several hours spend google educating myself, but I figured it out, and it’s not that difficult.
First, temperature is key. Not just cooking temperature, but pre-cooking temperature. Most people, rightfully freaked out by raw meat, start cooking meat right out of the fridge. Cold, just out of the fridge, meat is probably about 35 degrees. Throw that in a pan and the outside gets up to temperature considerably faster than the center, forcing you to either serve meat with a raw center or a burnt outside.
Second, is that stupid breading that always slips off. It took me a while (I can be stubborn), but both of these issues are solved with the same step. Bread the pork chops (this also seals in the juices) and let them sit for about 20 minutes at room temperature. This brings the temperature of the center of the meat up helping the entire chop to cook evenly, and it helps the breading to set, allowing it to stay on. Don’t freak out about raw meat sitting on the counter for 20 minutes. Think about the day you bought those chops, picking them up at the meat counter, putting them in your cart, checking out, driving home, and then finally putting them in your fridge, I bet that took longer than 20 minutes. I grew up on a farm, that "drive into town," used to take us about an hour. It’s fine. I also highly recommend this for steaks, and I even read a vintage fried chicken recipe that called for two hours of room temperature counter sittin'. I was too chicken to try it (pun fully intended).
Also, buy a meat thermometer. Seriously. Right now, buy one. You can pick one up at the grocery store for about $10, and if that saves you one overcooked dinner, it just payed for itself. The recommendation for whole pork (not ground) was just lowered to 145 by the USDA, I usually cook it until just before this (about 140) because it will rise about 5 degrees once you remove it from the pan. Knowing the exact right moment to take the chops off the heat will be the difference between dry, average tasting pork chops and amazing, juicy pork chops.
Ok, and lets talk about this merlot cherry onion jam situation. I love homemade savory jams right now, and clearly I like to add booze to my food. I want to make this jam again for burgers, or maybe to stuff in a pork loin. or maybe I’ll just make these pork chops again.
This turned out amazing! I hope you love it as much as I do.
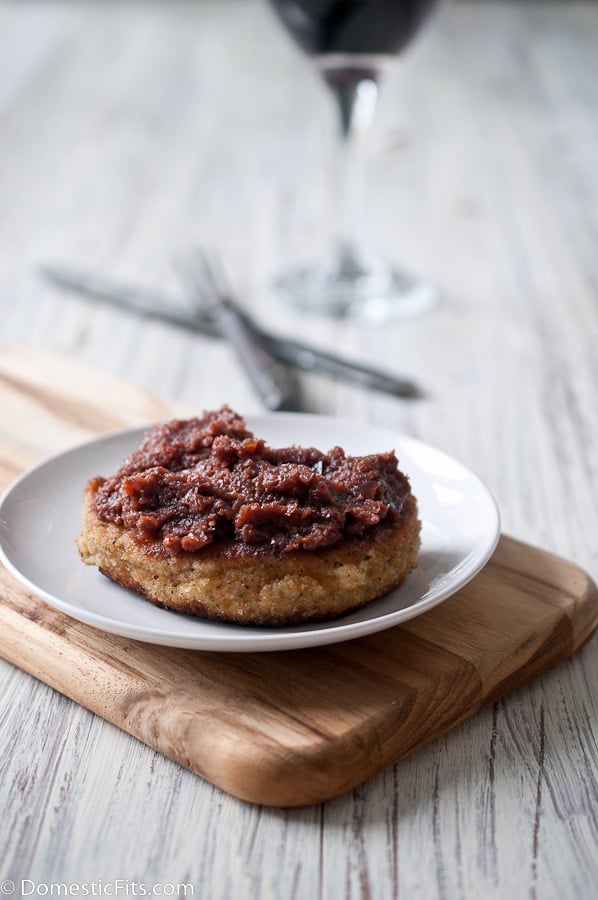
The Perfect Breaded Pork Chops with Merlot Onion Cherry Jam
Ingredients
For the Jam:
2 tbs butter
1 tbs olive oil
1 white onion, sliced
2/3 cup merlot
½ cup died cherries
¼ cup vinegar
1 tbs brown sugar
¼ tsp salt
½ tsp pepper
For the Pork Chops
1 egg
¼ cup milk
2 cups Italian bread crumbs
4 boneless pork loin chops, 1 inch thick
salt and pepper
3 tbs vegetable oil
Instructions
In a saucepan over medium heat, melt the butter with the olive oil. Add the onions and cook, stirring occasionally until just starting to caramelize, about 10 minutes (make sure the heat isn’t too high or the onions will burn). Add the wine, cherries, vinegar and brown sugar, salt and pepper bring to a strong simmer and cook until the wine has mostly cooked off, about 15 minutes. Transfer to a food processor, puree until mostly smooth, leaving some texture (can be made up to one week ahead of time, heat prior to serving).
In a small bowl, beat the egg with the milk.
In a separate bowl, add the breadcrumbs.
Salt and pepper the pork chops on all sides. On at a time dip into the egg mixture, allow to drain slightly before transfering to the breadcrumbs. Turn and press until the pork chop is well coated.
Set on a sheet of wax paper, or on a plate, and allow to come to room temperature, about 20 minutes.
Heat the olive oil in a pan over medium high heat until hot but not smoking.
Working in batches of two (don’t crowd the pan or the pork chops won’t cook evenly) add the pork chops and cook until the underside is browned, about 4 minutes. Turn and cook until the internal temperature is just 145F.
Plate the pork chops, top with the onion cherry merlot jam.
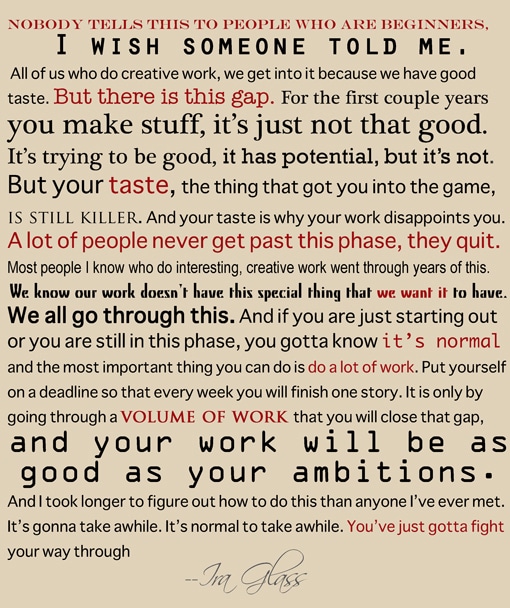
Lately, I’ve been struggling with a creative plateau I can’t seem to push myself past. A dissatisfaction with everything I make. The recipes that just don’t seem creative enough, the photos that I can only see as average, and the sub-par writing. I’ve been trudging through this phase, trying to push myself, and the things I create, closer the level I want to be on.
A few days ago I came across this quote from Ira Glass that reminded me that although I’m not where I want to be, I just might be on the right path.
Because maybe discontentment is the only common thread of successful people. Maybe it’s dissatisfaction that pushes anyone towards the best self they can ever achieve, and maybe complacency is an anchor into mediocrity.
Maybe.
I don’t know if I have more talent to unearth in myself, or if I’ve squeeze every bit out of an average ability, but Ira Glass did give me hope that the struggle is part of the journey. And it’s a normal part.
I see this struggle in brewers, too. The ones that make the jump from homebrewer to successful brewery owner share that same dissatisfaction, the push to be better, learn more, create great beer, and master the simplicity of classic styles. The biggest leaps in potential comes from feeling self-dissapointment in the middle of your own celebrations. When everyone else is cheering your accomplishments, you are taking inventory of your short falls.
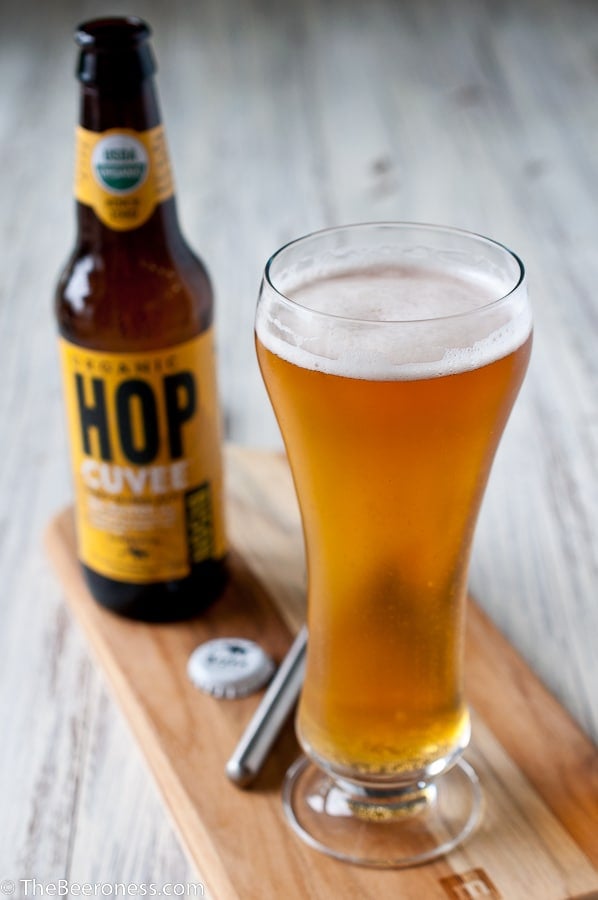
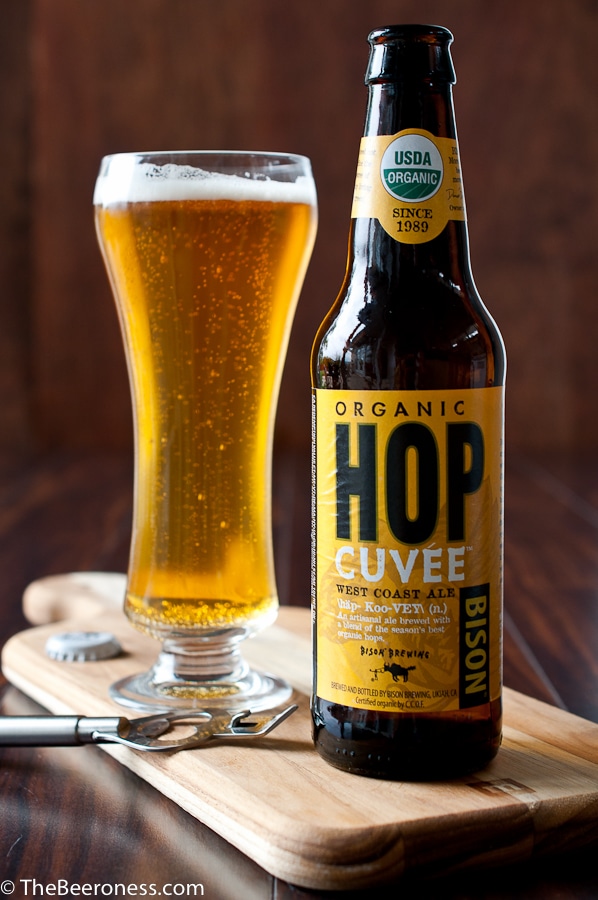
Seasonal and special release beers are brewers pushing the levels of their own creativity. A way for the rest of us to thoroughly enjoy the fight these talented, creative, souls are engaged in to push themselves higher in their own climb.
Hop Cuvee is a newly released pale ale from Bison Brewing. It’s a beer that has an accessible, balanced, hoppiness that uses three different types of hop as a celebration of the best hop crops of the years. It’s crisp and citrusy with notes of pine, it’s a great choice for summer. Dan Del Grande, Bison’s fearless leader says, “My hop blend in Hop Cuvée will change every year, like a vintage, to reflect the best crops that our organic hop farmers have to offer.” Bison is a great brewery to get to know, they have a love of great beer, and have figured out how to give it to us in a way that’s organic, eco-friendly, and aims for a lower carbon footprint every year.
This is a beer that celebrates seasonal crops, making it perfect for the asparagus that just came into season. It finishes the soup to give it a bit of an earthier taste. I prefer this soup warm, but it can also be served as a chilled soup when the weather jumps into the triple digits.
In a large pot or Dutch oven heat the butter over medium high heat. Add the onions and cook until softened, about 5 minutes. Add the asparagus and cook until slightly darkened, about 3 minutes.
Add the broth and cook until asparagus has softened, about 10 minutes, remove from heat.
Using a blender, food processor or immersion blender, puree until very smooth. Season with salt and pepper. Stir in cream and return to heat, brining to a gentle simmer. Remove from heat, stir in beer.
I started a Cheap Eats section of my blog because I wanted dishes that were good enough for a dinner party, but didn’t cost a lot. It was a challenge to myself to create dishes that I’m so proud of I want to serve to company, but that will serve 4 people for less than $10. I don’t want to dump a bunch of pre-packaged food in a slow cooker, I want real food. These dishes aren’t necessarily quick, but they are low cost, easy and taste great. Hope you love them as much as I do.
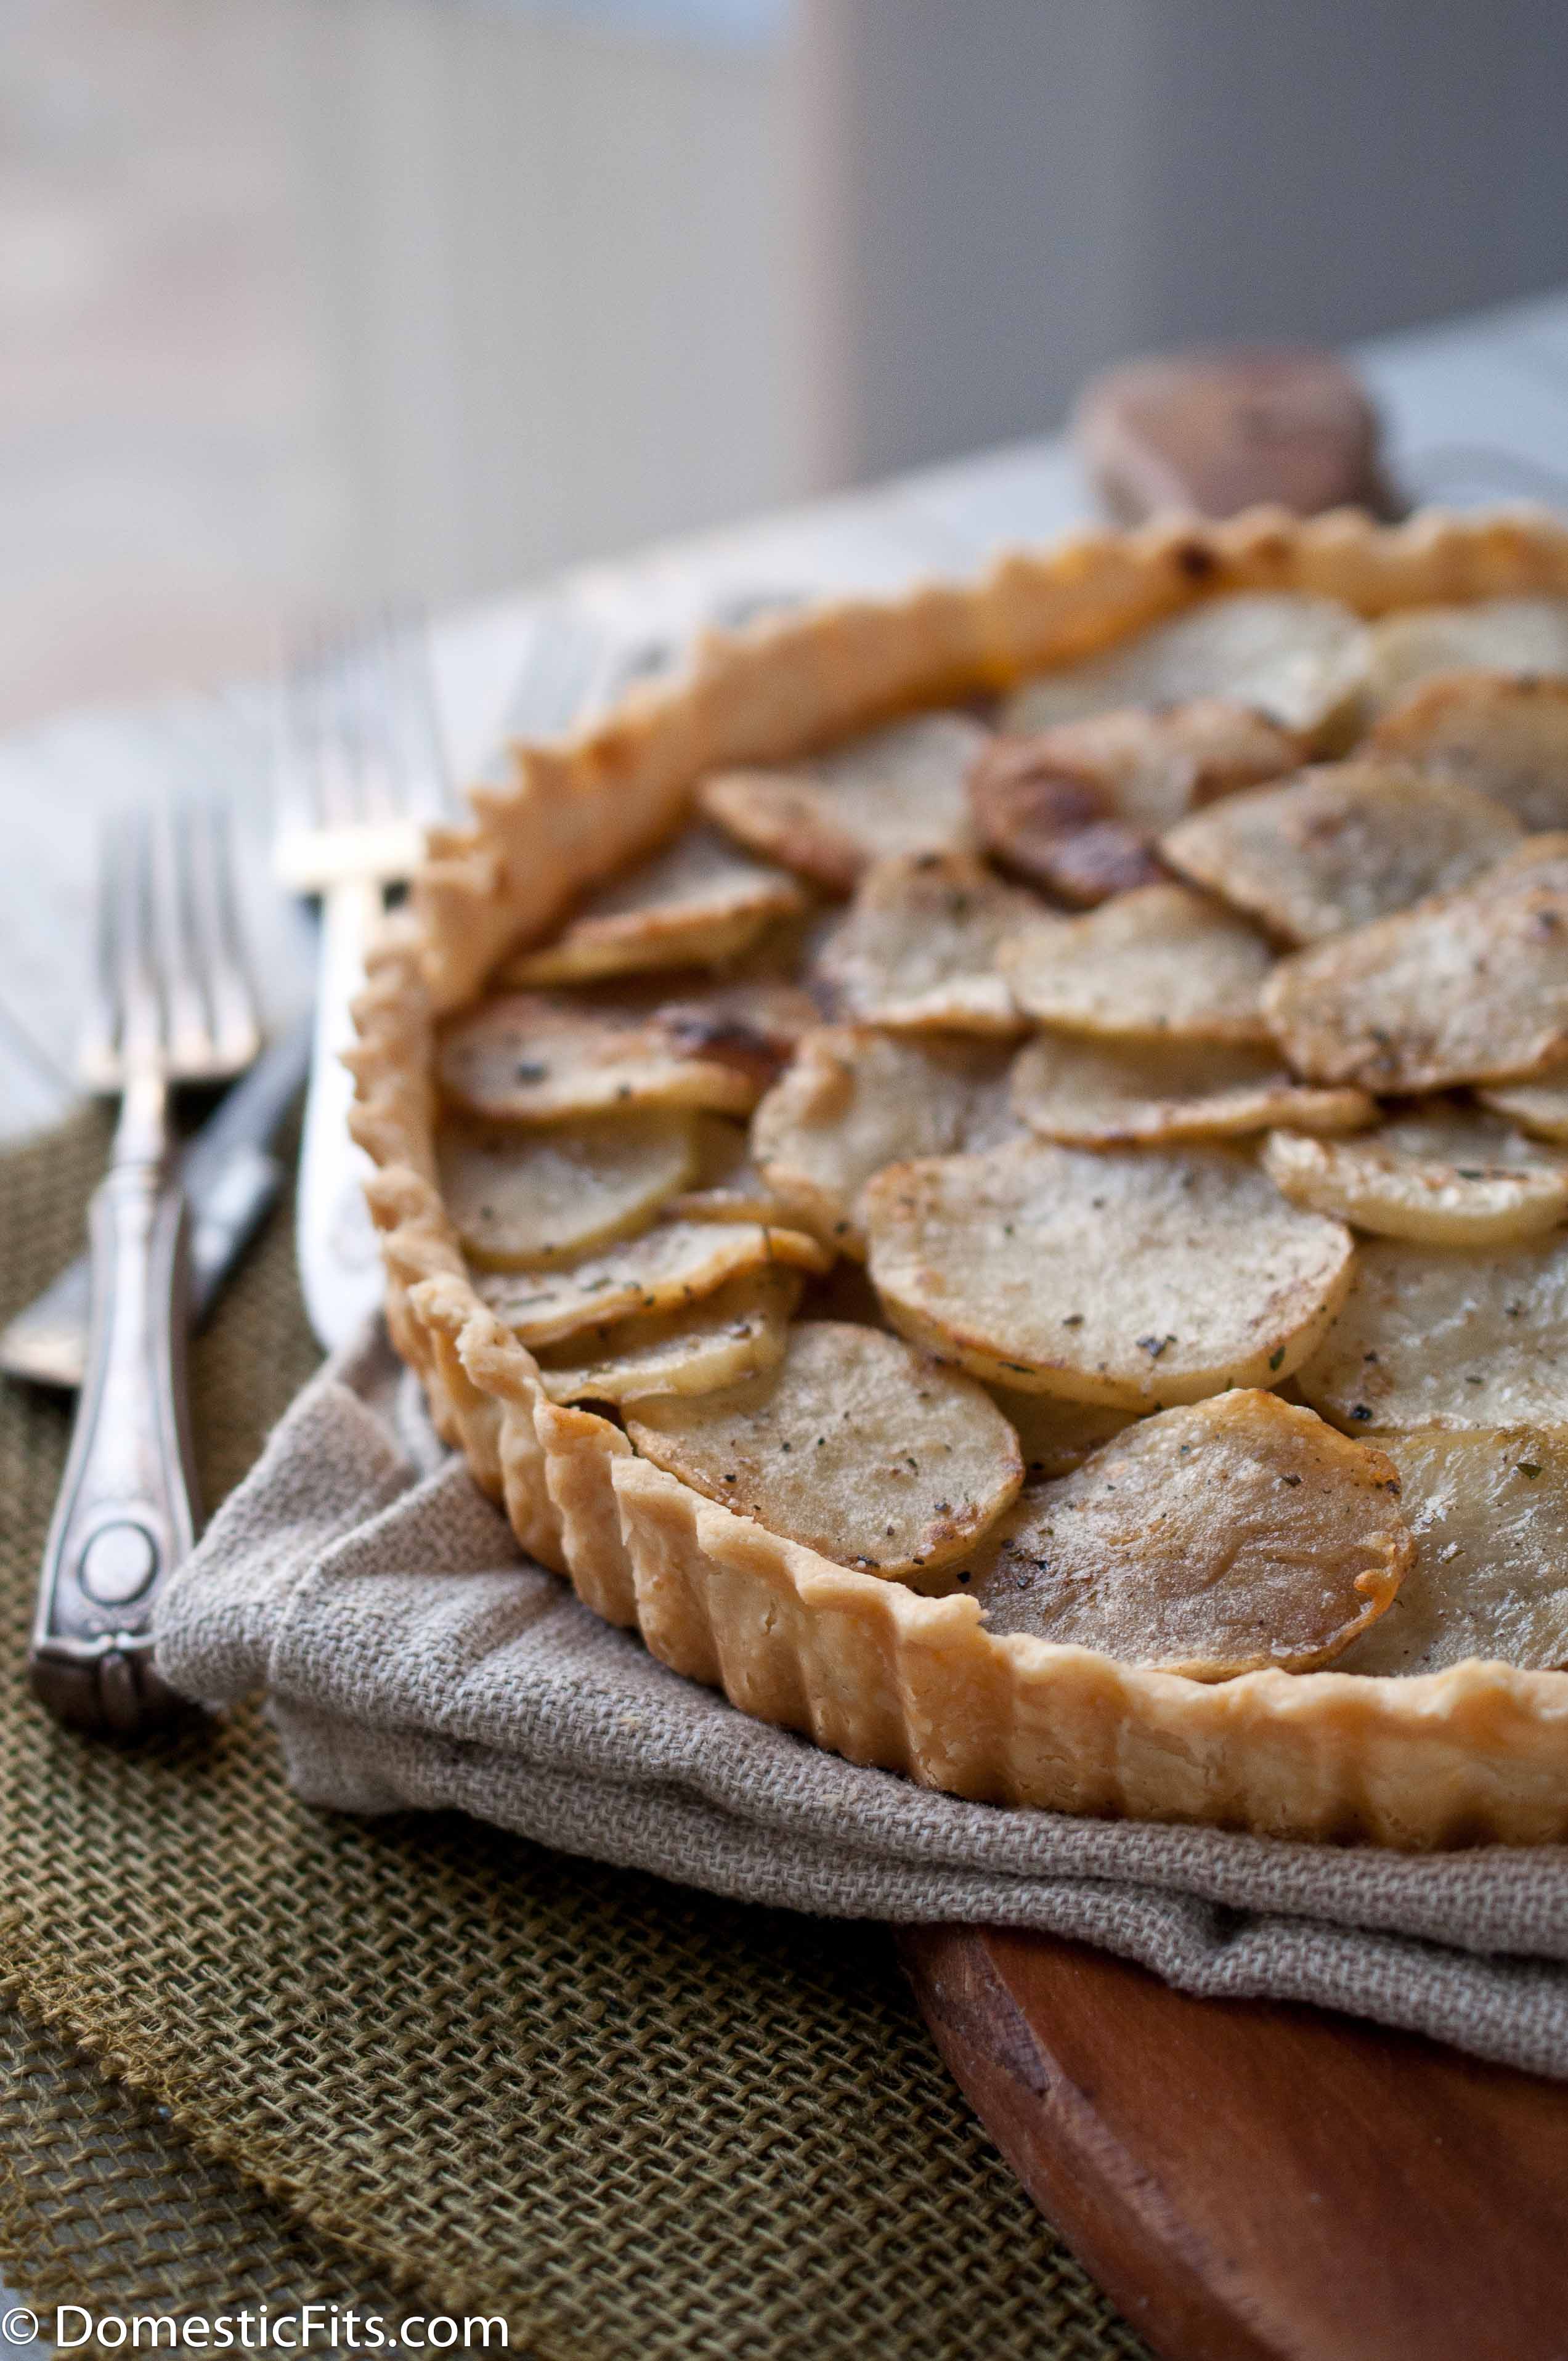
I’m going through a hostess phase right now. I’m also going through a phase where I’m trying to spend less on groceries (my grocery store impulse buying was getting out of control) and these two phases are battling it out right now. I love having people over for dinner, and although I want to spend crazy amounts of money to "play" in the kitchen, that just doesn’t make sense for a freelancer. By the way, if you see me in the cheese aisle of Whole Foods, remind me that it is not a good idea to spend $45 on cheese when I don’t really have any cheese cookin' plans. Homemade tarts are a great way to bridge the gap between these two phases, they just feel special but can be really affordable (less than $5!).
If you haven’t made a tart crust from scratch, I promise that this is so easy you’ll be thrilled at your new found kitchen talent. You can even make it 3 days ahead of time, this dough stores really well (you can even freeze it in a zip lock bag for up to a month) and for just about $1 and 10 minutes of active time you just can’t go wrong.
I served this with a salad made of what I already had, similar to this one. If you want to add a little protein, serve this with grilled chicken or pan seared red snapper and you’ll probably still be under that $10 mark!
Rosemary Potato Tart (Serves 4 for $4.87)
Ingredients
Crust:
1 ½ cups all purpose flour ($.25)
½ tsp salt ($0.01)
8 tbs of butter (for vegan use vegetable shortening), cold, cut into cubes ($0.80)
1/4 cup cold water ($0.00)
Filling:
¼ cup vegetable oil, divided ($0.22)
1 ½ cups cherry or grape tomatoes ($2.10)
1 tsp salt ($0.02)
1 tsp pepper ($0.02)
2 tsp fresh rosemary, minced ($0.20)
3 large Russet Potatoes, peeled and sliced into ¼ inch slices ($1.25)
Instructions
In a food processor, add 1 cup of flour (reserving the other ½ cup), salt and pulse to combine. Add the butter cubes (or shortening), process until combined. Add the remaining ½ cup of flour, process until well incorporated.
Transfer to a bowl, add the water and mix until combined. Dough will be very soft.
Form into a wide flat disk, wrap in plastic wrap and chill for at least 2 hours and up to 3 days.
Preheat the oven to 350.
Once the dough has chilled, roll out on a lightly floured surface, transfer to a 9-inch tart pan (or pie pan) press into shape. Remove the excess. Chill until ready to use.
Add 2 tbs of vegetable oil to a pan over high heat. Once the pan is very hot but not smoking, add the tomatoes, toss until softened and blistered, about 5 minutes. Smash slightly with a wooden spoon or spatula, pour into the bottom of the tart in an even layer (this will act like a sauce).
Combine the salt, pepper and rosemary in a small bowl.
In a skillet over medium high heat, add the remaining oil. Working in batches, add potato slices to the pan, sprinkle with seasoning mixture and allow to cook until slightly browned, flip and sprinkle with more seasoning. Once the potatoes have browned lightly on both sides, add to the tart crust (over the tomatoes) in overlapping concentric circles. Repeat until all of the potato slices have been browned and added to the tart. This will give you two or three layers of potatoes depending on how tightly the potatoes are overlapped.
Bake at 350 until the crust is a light golden brown, 22-25 minutes.
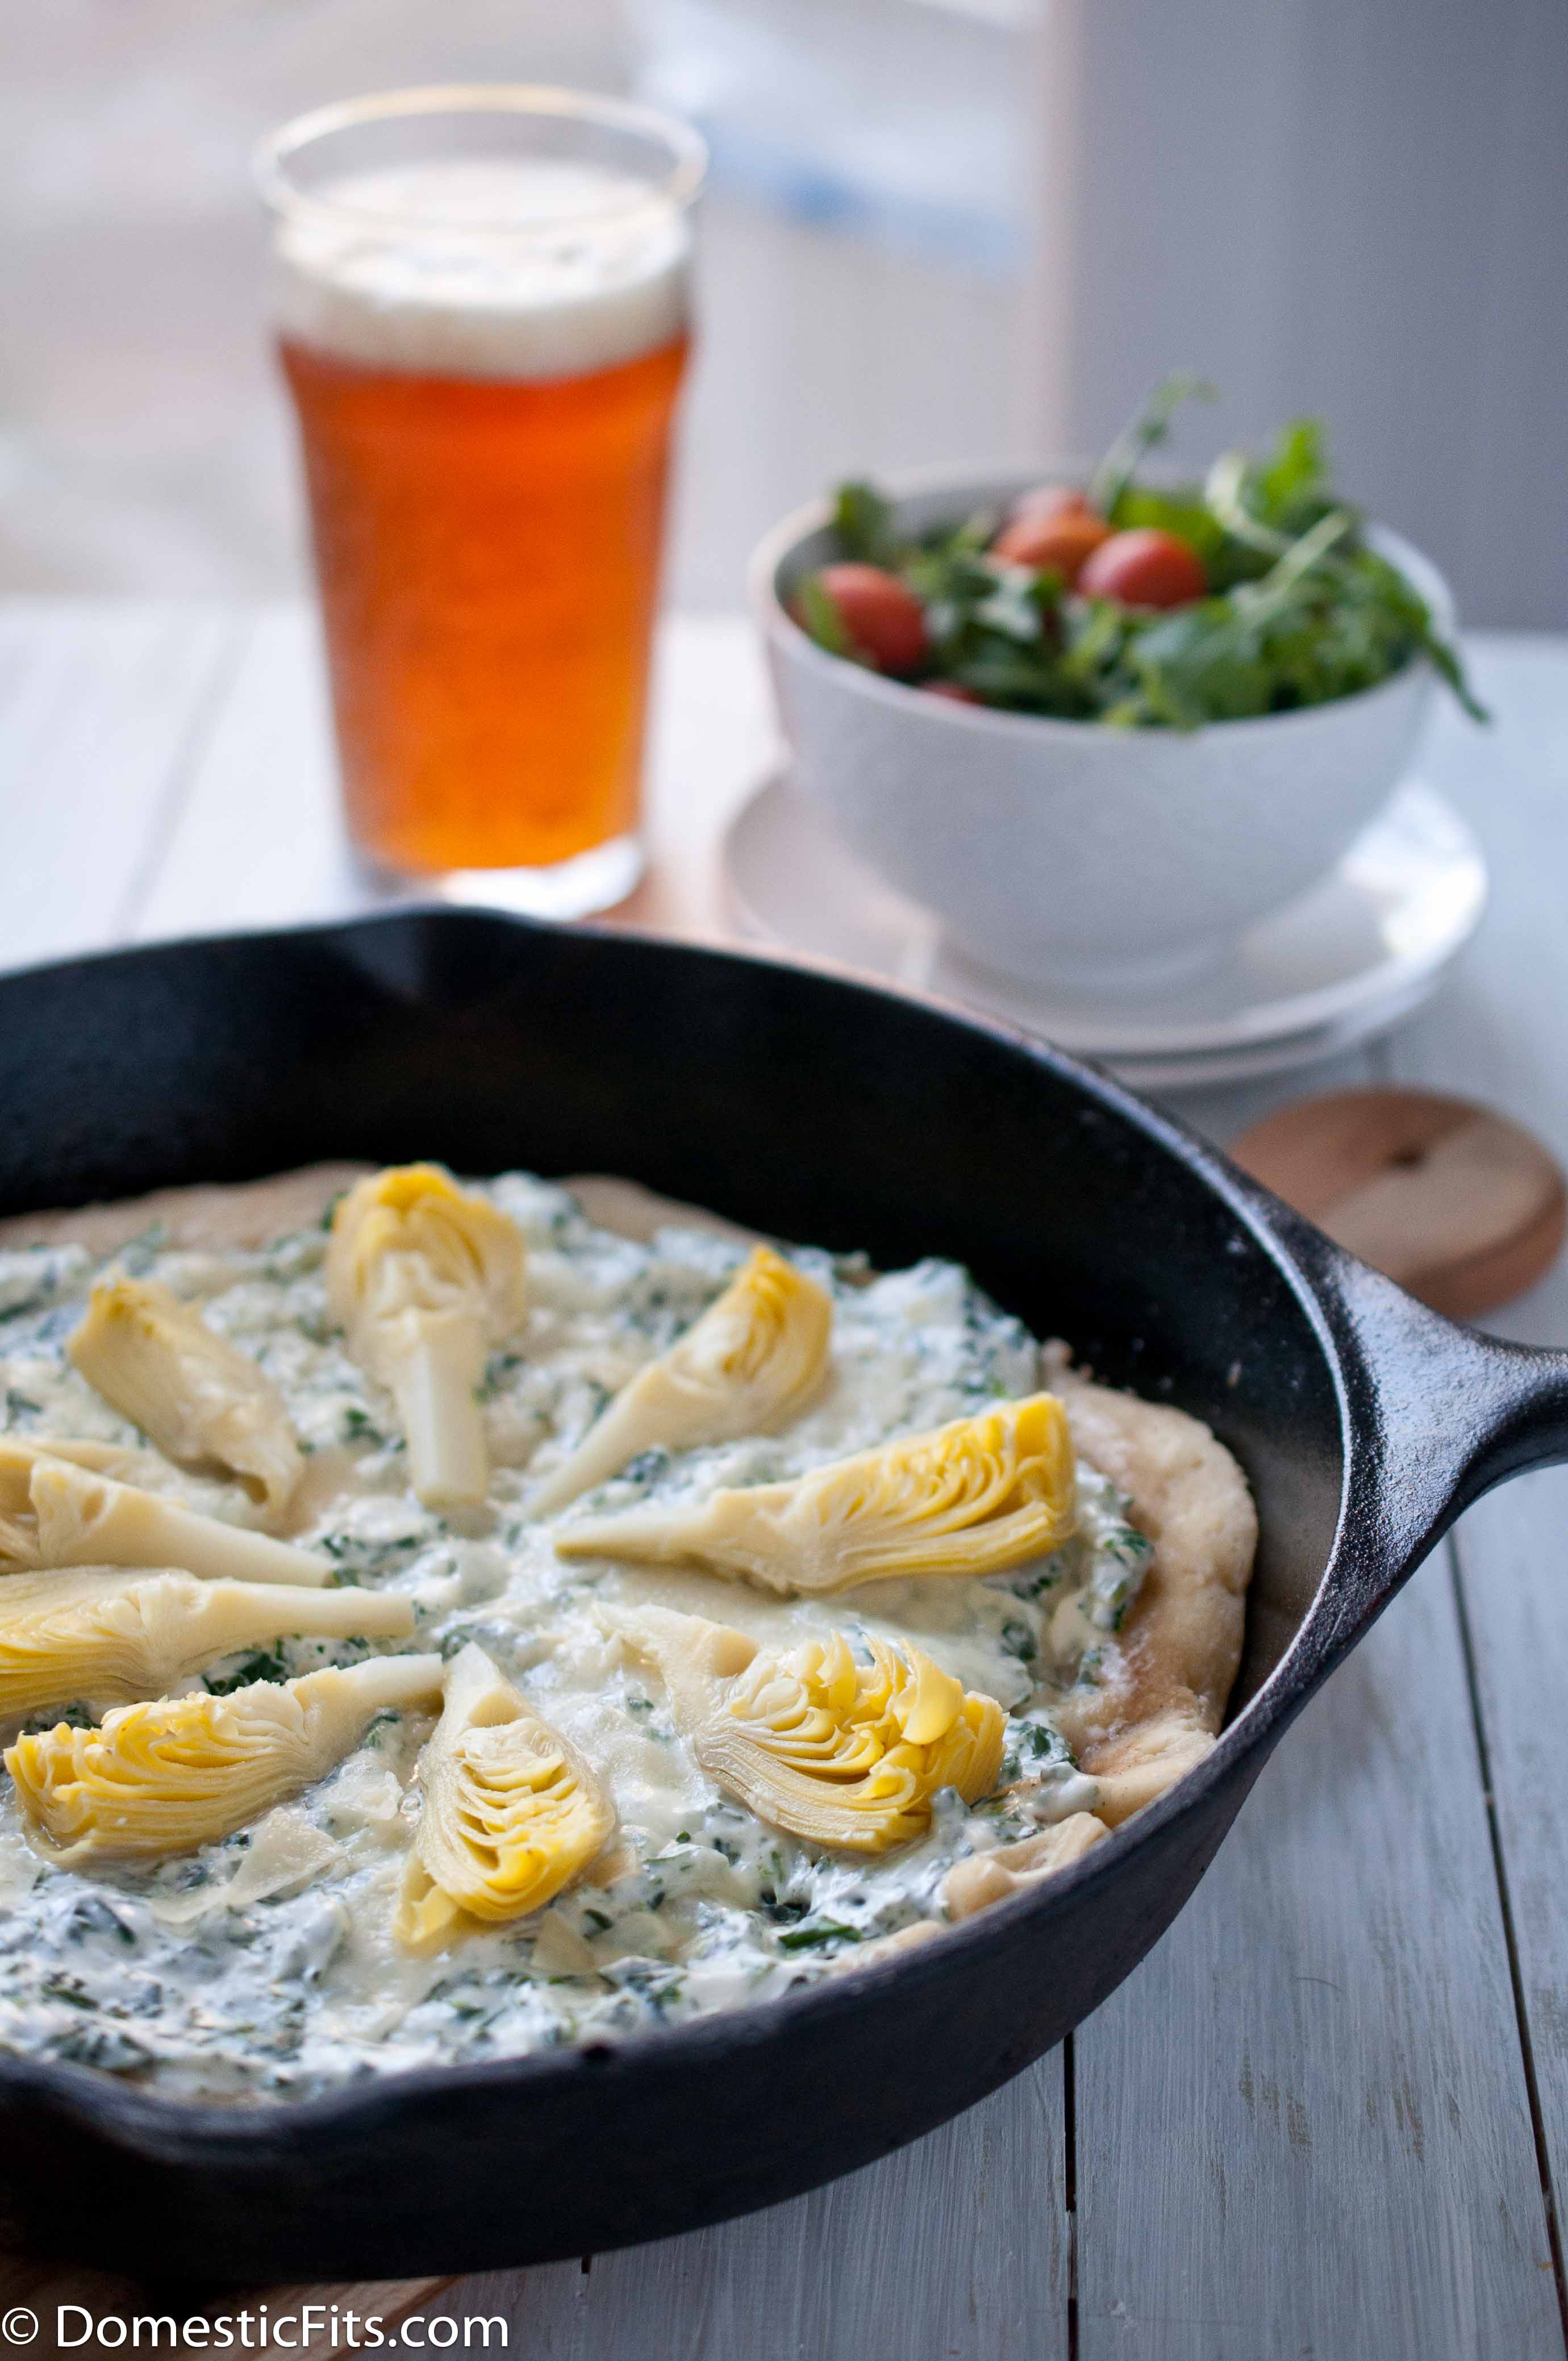
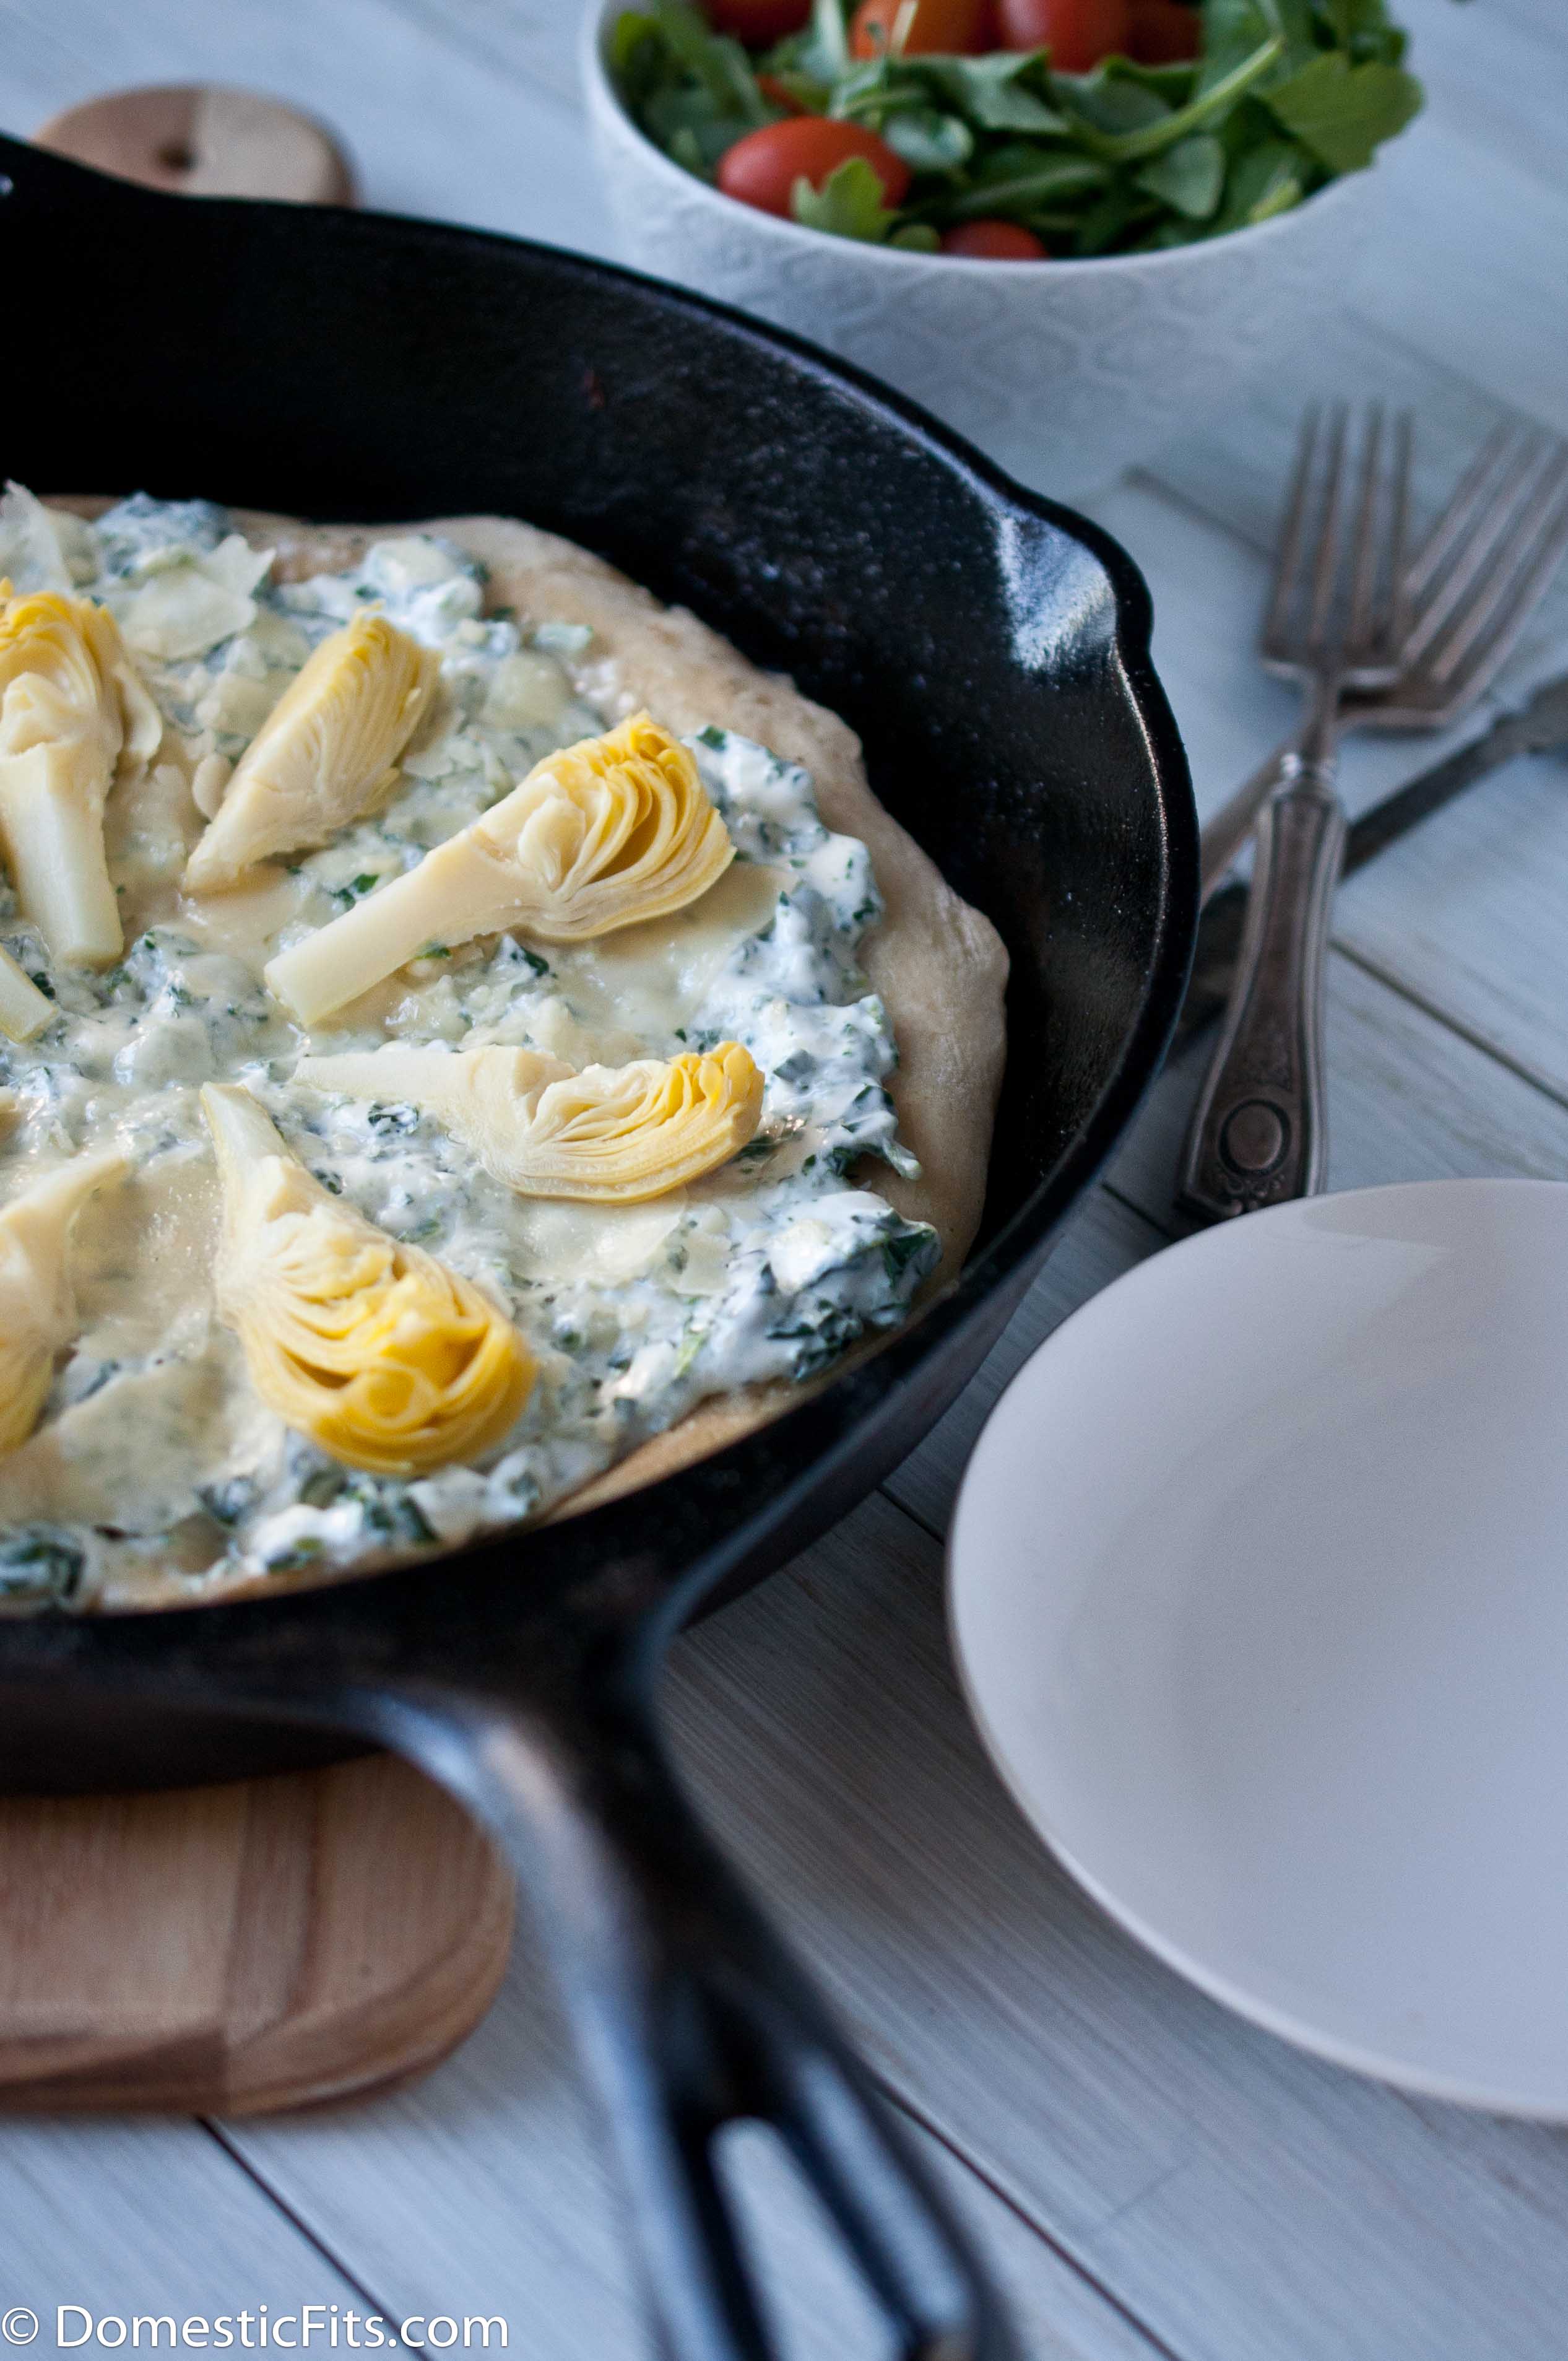
Have you done this yet? It’s amazing, you need to add this to your weeknight meal ideas. Outside of the dough, which you can buy at markets like Trader Joe’s and Fresh & Easy, it takes about 10 minutes and it’s amazing. Pizza in your grill pan!
If you don’t have a grill pan, use your cast iron skillet, of you don’t have a cast iron skillet run (don’t walk!) out and buy one right now. Without question it’s my favorite, most versatile cooking device. With it I’ve made brownies, bacon fat biscuits, chorizo egg breakfast skillet, countless chicken recipes, the perfect roasted potatoes, queso dip, bread, and now here we are with this fabulous pizza.
I own a cast iron grill pan (above) that was quite spendy, as well as a $9 10-inch cast iron skillet from Target. Both perform about the same. As much as many companies would love for me to tell you to run out and buy that $125 one (which, let’s be honest, I totally want), that $9 Target one has been a work horse.
But lets talk about that dough for a moment. This takes about a half of a standard pizza dough recipe, which usually yields one pound of dough. Which means you can make two pizzas (thats the Joey Special for all you FRIENDS fans) or save the other half for another night.
My favorite pizza dough recipe takes about a day to make, but Averie has a one hour pizza dough recipe that looks awesome. I’ve also had fairly good luck with dough from Trader Joe’s.
This is my favorite way to make a pizza right now. Pizza stones are great, but I always seem to have some struggles getting the raw pizza from the peel to the stone. The cast iron gives it that nice bubbly, crispy and slightly charred tasted of grilled pizza and it only takes ten minutes.
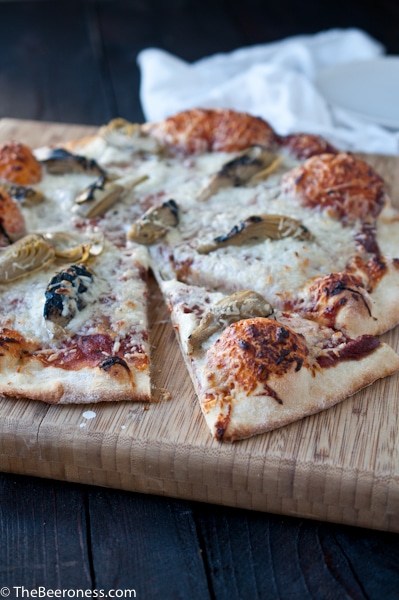
Spinach Artichoke Dip Grill Pan Pizza
Prep Time: 5 minutes
Cook Time: 7 minutes
Ingredients
½ lb pizza dough*
4 ounces cream cheese, softened
¼ cup sour cream
½ cup frozen spinach, thawed and drained
½ tsp garlic powder
¼ tsp salt
¼ tsp pepper
dash red pepper sauce (like Sriracha, Cholula)
¼ cup shaved parmesan or shredded mozzarealla
4 ounces artichoke hearts, quartered
Instructions
In a medium bowl, sitr together the cream cheese, sour cream, spinach, garlic powder, salt, peper and red pepper sauce, set aside.
On a lightly floured surface, roll the dough out to about a 9-inch circle.
Lightly brush a 9-inch grill pan with vegetable oil. Heat over high heat until just starting to smoke. Add the dough circle to the pan. Cook until browned on the bottom, about 2 minutes. Flip and immediately spread with the spinach dip. Sprinkle with cheese, top with artichoke hearts+. Cook until the cheese has started to melt and the bottom of the dough has browned, about 3 to 5 minutes.
Notes
*Note: Most dough recipes or store bought dough yield 1lb, use half of that for one pizza. +Note: Covering the pan with a large lid or another skillet after you put the cheese on will help the cheese to melt faster