
beer recipes

Chocolate Mint Stout Ice Cream

There are two ways to look at this.

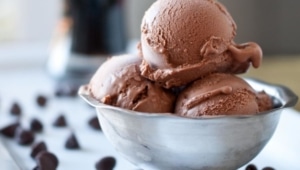
It’s either the summer death rattle manifesting itself in an ice cream during the first week of fall, or it’s the nexus of the best of summer treats and the best of fall beers joining forces at the perfect moment.

For this, I used Bison Chocolate Stout. Rich, dark and beautiful. Although I did try and hold out for the Stone Chocolate Mint Stout that I’ve been teased with for months now, I may have to give this recipe another try when the red tape is lifted and the world is able to indulge in that.

I also used Green & Blacks Mint Dark Chocolate, adding a smooth peppermint flavor.

Resulting in a rich, smooth ice cream that’s like a Girl Scout Thin Mint, but with beer. And, that’s really what those cookies need: beer.


Chocolate Mint Stout Ice Cream

Ingredients
  

  • 2 cups whole milk
  • 3 fresh mint leaves
  • 1 cup heavy cream
  • 1 cup chocolate stout or chocolate mint stout
  • 7 ounces of 60% dark chocolate with peppermint oil such as Dark Chocolate Mint from Green & Blacks, broken into chunks
  • 4 egg yolks
  • 1 1/4 cup white sugar

Instructions
 

  • In a pot over medium high heat, add the cream, milk, mint leaves cream and stout. Bring to a gentle simmer. Remove from heat, remove and discard mint leaves, and stir in the chocolate until melted.
  • In a separate bowl, add the egg yolks and the sugar, whisk until well combined. Slowly add the chocolate milk, whisking continually, until about 1/2 the mixture has been added to the egg yolks. Add the egg yolk mixture back into pot, whisk until well combined. Return pot to heat and bring to a mild simmer.
  • Refrigerator until chilled, about 3 hours.
  • Churn in ice cream maker according to manufactures directions. Chill until firm.


Green & Blacks provided me with a sample of chocolates used in this post. I was not monetarily compensated for this recipe. All thoughts, opinions and ideas are my own. 

Beer Braised Chicken Tacos with Beer Corn Tortillas


When it seems like your entire life revolves around a food blog, small things make you really excited.

Like making homemade tortillas with beer and realizing how much better they are than any other tortilla you’ve ever had.

Or getting a shout out from The Cooking Channel as if they knew just how to fuel your obsession with them.

Or realizing that because Foster Farms is willing to fly you into Napa a few days early for the National Cook-Off Finals, you get to visit the following breweries: Laguanitas, Russian River, and Bear Republic.

And then your Aunt tells you that your Grandma and Guy Fieri’s Grandma where roommates in college, which sounds like a Mad Lib, but turns out to be true.

Small wins that make me so excited, you’d think I won a Beer Cooking Oscar. This is what keeps us playing the Man Behind the Curtain on these little blogs we are so dedicated to. Bloggers are easily excitable, which maybe why we spend so much time on the other side of these computer. Sometimes our excitement isn’t fit for public consumption.

Back to these tortillas. Homemade tortillas are a completely different animal from those cardboard disks they sell in supermarkets. Soft, slightly sweet, and they only take 5 minutes to make. To use a beer analogy fit for an SAT exam:

Coors Light is to Pliny as Store Bought Tortillas are to Homemade Tortillas

I’m not kidding, that much different. If you don’t believe me, and really, why should you, I’m just the overly excited girl behind the screen, try it and report back. I really think you’ll be amazed.

For this recipe, I used Lagunaitas IPA. And like I’ve mentioned before, IPA’s give you a huge punch of beer flavor. If you want a milder beer flavor, grab a traditional Pale Ale, a Blonde or a Wheat Beer.


Beer Braised Chicken Tacos with Beer Corn Tortillas

Ingredients
  

For the Tortillas

  • 2 cup Masa
  • ½ tsp salt
  • 1 1/4 cup room temperature beer
  • 2 Tbs melted butter or olive oil

For the Chicken

  • 4 boneless skinless chicken thigh fillets
  • 1 tsp garlic powder
  • 1 tsp black pepper
  • 1/2 tsp salt
  • 1/2 tsp chili powder
  • 1/2 tsp smoked paprika
  • 2 tbs olive oil
  • 1 cup beer

Recommended Garnishes

  • 1/4 cup chopped onion
  • 1/4 cup chopped cilantro
  • 1 avocado chopped

Instructions
 

  • Chop Chicken thighs into small, bite sized pieces. In a bowl, place all spices and mix well. Add the chicken pieces and toss to coat.
  • Heat olive oil in a dutch oven. Add the pieces and sear quickly. Reduce heat, add beer, cover and cook until cooked through, about 10 to 15 minutes.
  • In a large bowl, add the Masa and the salt, stir to combine.
  • Add the beer and butter, stir to combine. If the dough is too dry to hold together, add additional beer or water. If it is too wet, add more Masa.
  • Form into balls a bit larger than golf balls.
  • Prepare a tortillas press by wrapping in plastic wrap or covering with parchment paper (you can place tortilla ball between two sheets of parchment and use a rolling pin). Place one ball in the center.
  • Press, rotate and press again until thin.
  • Heat a griddle (or cast iron skillet) to a medium high heat (about 350 for electric griddles).
  • Cook until slightly brown on the bottom (about 30 seconds to a minute) flip and cook on the other side. Don’t overcook.
  • Fill tortillas with chicken, garnish and serve.


Beer & Bacon Pecan Bars


Clearly, I’m ready for fall. And in Los Angeles, that just means that Dodgers games are starting to end and I get to wear a light sweater. If I feel like it. Oh, and fall produce. If I haven’t mentioned to you before my favorite part of living in Southern California, its this: Farmers Markets.

This Golden State that I live in grows half of all the produce grown in the United States (that’s a lot) and we get to have Farmers Markets nearly every day of the year. And although mid-rant I realize that this post doesn’t even contain any produce, it does contain those fabulous flavors of fall. With bacon. And beer. And fall farmers markets are my favorite. No matter what day of the week, somewhere in Los Angeles there is a Farmers Market in which I can unnecessarily bundle up and walk from stall to stall with a cup of coffee buying local vegetables in the "chilly" mid 60 degree weather.

Pecan pie will always remind me of fall and for nearly a year I’ve wondered what it would be like to add bacon. And of course, beer.

Turns out, these are the best damn pecan pie bars I’ve ever had.


Beer & Bacon Pecan Bars

Ingredients
  

For The Crust:

  • 1 stick plus 2 tbs 10 tbs unsalted butter
  • 2 cups flour
  • 1/4 cup brown sugar
  • 1/2 tsp salt
  • 2 tbs water

For the Filling

  • 1 cup stout
  • 1 stick butter
  • 2 cups chopped pecan
  • 2 cups brown sugar
  • 1/2 cup light corn syrup
  • 1/4 cup heavy cream
  • 2 eggs
  • 5 strips of bacon cooked and chopped

Instructions
 

  • Preheat oven to 350
  • In a food processor add the flour, 1/4 cup brown sugar, and salt, pulse to combine. Cut the butter into cubes and add to the food processor. Process until butter is incorporated into the flour mixture. Add the water and process to combine. Add additional water, 1 tsp at a time if there is flour that still hasn't been dampened.
  • line a 9 x 13 inch baking pan with parchment paper (this will make it easier to remove from the pan) and dump the shortbread into the pan. Press into the bottom of the baking pan in one even layer.
  • Bake at 350 for 12 minutes of until a light golden brown. Allow to cool before adding the filling or the crust and filling will mesh together.
  • In a pot over medium high heat, add the stout, cook until reduced by half. Add the butter and stir until melted, remove from heat. Add the sugar, pecans, cream, corn syrup and stir until melted. Once the mixture has cooled to room temperature, add the eggs and stir until combined.
  • Pour the filling over the crust, sprinkle with cooked bacon and bake at 350 until the filling no longer jiggles when you gently shake the pan, about 25-30 minutes.


Chocolate Chip, Stout & Beer Nut Cookies


If you live in the Los Angeles area, I’m going to need you to do me a favor. I’ve somehow been booked on CBS, Los Angeles mid-day news with a cooking segment this Friday, August 31st. They want me to do a quick Cooking With Beer segment on the news at noon. People will be hungry, naturally, it is lunch time, and my hope is that this will persuade them to ignore any brief moments of nervousness that I have.

But If you could tune in, and support me, that would be great. I’m not really nervous, I keep waiting for that to set in, but it hasn’t yet. When it does, I would love to know that people who have been visiting me here on this little blog for the past year are out there cheering me on.

That would be great.

In the meantime we’re going to make some cookies. These call for the classic Beer Nuts, which I found myself in possession of after a particularly round night of cards at my house. Several bags of Beer Nuts left by an anonymous donor.  And I can’t just leave them in my pantry, I need to find a use for them.

We are also going to revisit that crazy idea I have of making beer extract. Because vanilla is just too…well, vanilla.


Chocolate Chip, Stout & Beer Nut Cookies

Ingredients
  

  • 3/4 cup stout beer
  • 1 cup cake flour
  • 3/4 cup bread flour
  • 1/2 tsp cornstarch
  • 1 tsp baking powder
  • 1/2 tsp salt
  • 3/4 cup butter
  • 2/3 cup brown sugar
  • 1/2 cup white sugar
  • 1 egg
  • 1 cup dark chocolate chips 60%
  • 3 oz bag Beer Nuts

(Makes 10-12 cookies)

    Instructions
     

    • In a pot over medium high heat add the beer. Cook, stirring occasionally, until reduced to about 1 tbs.
    • In the bowl of a stand mixer, add the butter and both types of sugar, beat until well creamed. Add the egg and beat until well combined. Add the 1 tbs of beer extract and beat until well combined, scraping the bottom to make sure all the ingredients are well combined.
    • In a sperate bowl, add both types of flour (these two types of flour are very important to the end result of your cookies, regular all purpose flour will not give you the same results), cornstarch, baking powder and salt. Mix well. Add dry ingredients to the stand mixer and mix on medium/low speed until just barely combined, don't over mix. Add the chocolate chips and Beer Nuts, and stir until incorporated.
    • Resting the dough is an important step in this recipe. Cover a baking sheet with parchment paper, scoop golfball sized scoops of dough, roll them into round balls and place on the baking sheet, cover with plastic wrap and chill for at least 4 hours.
    • Preheat oven to 350.
    • Bake for 20-22 minutes or until light golden brown, don't over bake. (If you don't chill the dough, or if you make smaller sized cookies, the cooking time will be much shorter. Start to keep an eye on your cookies after about 14 minutes).


    Jalapeno IPA Hummus


    This recipe has been in my brain for a while.

    For weeks it’s been taunting me, begging to be flushed out, poured into my food processor and immortalized in internet print.

    And this weekend three failed attempts to make IPA lemon bars that never really gave me the results I was hoping for coupled with this tweet:

    gave this hummus it’s shot.

    And I’m so glad that the stars didn’t align and the beer cooking God’s didn’t smile upon the IPA lemon bars (which have become my culinary nemesis, mocking me with vague imperfections) because this hummus was exactly what I wanted on a hot day. It didn’t last long.

    For this recipe, I used one of my favorite IPA’s, Ballast Point’s Sculpin IPA. A beautiful example of an IPA, even if this one was sans Habaneros.


    Jalapeno IPA Hummus

    Ingredients
      

    • 2 fresh jalapenos stemmed, seeded and chopped (about 1/4 cup)
    • 3 tbs tahini
    • 1 1/2 cups cooked garbanzo beans drained
    • 1/3 cup chopped cilantro
    • 1 tbs olive oil
    • 1 lime juiced (about 1 tbs)
    • 1/2 tsp garlic powder
    • 1/2 tsp salt
    • 1/3 cup IPA Beer plus additional if needed

    Instructions
     

    • Add all ingredients to a food processor and process until smooth. Add additional IPA for a thinner dip. Serve with pita or chips.
    • *Note: most of the heat from Jalapenos are in the seeds. If you want a hotter hummus, you can leave the seeds in. If the finished dip is too mild, add 1/4 tsp chili powder for a spicier dip

    Join me: Facebook, Twitter

    Stout Jerk Chicken

    Literary Grief. This is the term I use for the moment you finish a great book and realize that it’s gone. This sort of anchor to those free moments in your life is now spent and the characters that ran behind your consciousness during the busy moments of your day, beckoning you back to the pages have run their course. You miss having more left to discover, but all mysteries have been unearthed and the plot has crescendoed. Most recently for me, that has been Blood, Bones and Butter by Gabrielle Hamilton.

    Inspired writing and an intriguing story peppered with mentions of thought-provoking recipes that I couldn’t help but mark for later reference.

     One of those recipes was a reference to a Jerk marinade that Gabrielle still makes on a regular basis. Her only notes about it were just that it contained Stout, Scotch Bonnet Peppers, and Honey as well as the fact that the recipe’s ingredients totaled an upwards of 25.

    The Stout Jerk marinade that I have created falls very short of the 25 ingredient threshold, but the inspiration to use stout, scotch bonnet and honey is from the above book. As fascinated as I am with Gabrielle, and grateful that I was able to eat at Prune years ago, I would bet all of my recipes on the hunch that she may have less than favorable opinions about lowly Food Bloggers.

    After all, I’ve never slept on a pile of chefs coats between 12-hour shifts. I’ve never scraped mold out of a walk in. I’ve never reached calloused fingers into a deep fryer or worked one handed with a blood-soaked bandage covered with a finger cot slowing my progress. I worked as a waitress in the front of the house, but I always knew my place. I begged to be allowed do deep prep when we were slow, took the fall for wasted produce when the owner would hassle the over-worked line cooks, and made sure the cooks "water" cups were full when we were slammed. But I know my place even now, in the world of food and I am still, in so many ways, "front of the house" hoping one day to be in the kitchen doing more than just deep prep.

    Here is a jerk marinade, inspired by Blood Bones & Butter and using Stout Beer for its flavor and its meat tenderizing properties.

    Wanna see the updated grilled version? Check it out here


    Stout Jerk Chicken

    Ingredients
      

    • 1/2 cup stout beer I used Storm King Stout, by Victory Brewing
    • 4 Scotch Bonnet or Habanero Peppers
    • 6 cloves of garlic peeled
    • 3 tbs ponzu sauce
    • 3 tbs brown sugar
    • 1 tsp dry mustard powder
    • 2 tsp Chinese 5 Spice powder
    • 1 tsp fresh ground black pepper
    • 3 tbs chopped shallots
    • 1 tbs fresh squeezed lemon juice
    • 2 tbs honey
    • 1 tsp Kosher or Sea salt
    • 3 lbs chicken wings legs, thighs

    Instructions
     

    • Add all of the ingredients (other than the chicken) to a food processor and process until smooth, about 2 minutes.
    • Add chicken to a large Ziplock style bag, pour marinade over the chicken and seal, removing as much air as possible.
    • Allow to chill and marinate in the fridge for 8-24 hours, rotating about every 3 hours to redistribute the marinate.
    • Preheat oven to 375. Line a baking sheet with aluminum foil. Remove the chicken from the marinade and arrange on the sheet, spooning a bit of the remaining marinade over the chicken. Bake at 375 for 18-22 minutes or until chicken is cooked through. Baking time will depend on the size of chicken you use. For very small chicken wings, start to check after 12 minutes.

    Join me: FacebookTwitter


    Oven Roasted BBQ Ribs With Stout Barbecue Sauce

    I hate to break it to you but you have probably never barbecued in your life. How dare I say such blasphemous things, you toss burgers and steaks on the grill every weekend?!

    That’s not Barbecue, it’s grill. And I would never take away from the fantastic results we can get with a backyard grill, and the amazing flavors that can work their way into your food, but it’s not barbecue.

    Barbecue is long, slow and low and the temperature is usually between 240 and 270 degrees. Grill is short, fast and hot, a nice char with a juicy middle.

    I wanted to see if I could use my oven to get close the flavors of true barbecue, and while I was missing the smokey flavor, these were some of the best homemade ribs I have ever had. The trick is long, slow and low.

    Meat choice is important as well, I used Choice ribs. You know that cute little sticker that sits beside the label on your steak packages, baffling you to some degree with the designation of Prime, Choice or Select, as to why they can’t just be honest and say, "Great," or "Pretty Good," and, "Not that great, but it’s cheap!"

    Here are the Cliffs Notes:

    Prime: The best and most expensive

    Choice: Still great, not as good or as expensive as Prime

    Select: Not good, don’t bother

    Unlabeled: Bad, didn’t even earn the lowly title of Select.

    Inspected By The USDA: Don’t be fooled, all meat is inspected by the USDA. Some stores use this to distract you from the fact that it is an ungraded piece of meat, and therefore not any good. Prime is obviously the best, but also the most expensive. When I experiment with a recipe, I usually go with Choice because it is a good cut of meat, but if the recipe doesn’t turn out well I didn’t waste $50 on the venture.

    Oven Roasted BBQ Ribs With Stout Beer Barbecue Sauce

    4 lbs Bone In Baby Back Beef Ribs (Choice or Prime)

    1 tsp salt

    1 batch Stout & Sriracha BBQ Sauce

    Preheat oven to 250.

    Line a baking sheet with aluminum foil, place ribs on top. Sprinkle ribs with salt on all sides. Brush with BBQ sauce and roast in the oven at 250, turning ribs and brushing with BBQ sauce every 30-45 minutes until fork tender, about 4 hours.

    Join me: Facebook, Twitter

    Homemade Beer Ricotta

    There are foods that I relent to making from scratch, taking hours to carve a meal out of whole ingredients. Hours spend on homemade pasta, breads, pie dough and sauces. The extra time is more than worth it for real food, feed to those I love from the earth, to my hands to the table.

    And then there are things that take so little time and effort, I am amazed that it took me so long to start making them from scratch.

    Like whipped cream, tortillas and ricotta.

    The active time on this recipe is so little, and the reward is so great, I will never buy it again. No special equipment or difficult to find ingredients. No extensive aging times or unusual techniques. Just a few simple ingredients and a stove.

    Spread it on bread and top with fresh vegetables.

    Make homemade ricotta ice cream.

    Stuffed cannellonis.

    Ricotta Cheesecake.

    You might need to make a double batch.

     This is  recipe that needs a wheat beer. The citrusy breadyness comes through in really great way. I used Colete By Great Divide. The flavors were perfect for this ricotta and lent themselves well to either sweet or savory recipes using the cheese.

    I was grateful that I bought a six pack, this is a beer that will make it’s way in my normal drinking and cooking rotation.


    Homemade Beer Ricotta

    3 cups whole milk (do not use Ultra-Pasterized, it won’t work)

    1 cup heavy cream

    1/2 tsp salt

    1/3 cup Saison beer, Plus 2 tbs divided

    3 tbs Apple Cider Vinegar (you can also use lemon juice, or a combination of the two)

    Makes about 1 1/4 cups

    In a pot over medium high heat (do not use an aluminum pan) add the milk, cream, 1/2 tsp salt and 1/3 cup beer.

    Clip a cooking thermometer onto the side of the pan.

    Bring the liquid to 190 degrees, stirring occasionally to prevent the bottom from scorching. Keep a close eye on it, the liquid reaches and passes 190 very quickly and you don’t want it rising above 200.

    Remove from heat, add the 2 tbs beer and then the vinegar (or lemon juice) and stir gently once or twice. It should curdle immediately.  Allow to sit undisturbed for about 5 minutes.

    Line a large strainer with 1 or 2 layers of cheese cloth, place the strainer in the sink over a large bowl.

    Pour the ricotta into the strainer and allow to drain for 15 to 30 minutes and up to an hour.

    After 15 minutes you will have a smooth creamy spreadable cheese. As you continue to allow it to drain, it will become more and more firm. It will also continue to firm once it is chilled, remove it from the strainer before it reaches the firmness level you want as it will continue to firm up in the fridge.

    Place in an air tight container and store in the fridge.

     Join me: FacebookTwitter 

    Cheddar Beer Bread Muffins

    I’ve noticed something about you.

    You seem to have no interest in healthy beer recipes. You want your beer recipes to be a flagrant indulgence of full-flavored stimulation. You want chocolate and bacon and sugar and whatever else I can manage to squeeze into your meal.

    I like that about you.

    No "semi-homemade" or "skinny" versions will do for your beer baking, you want it to be bold and extravagant, diet repercussions be damned. You also have no problem with my recipes that take hours, making Bacon Beer Jam with delighted voracity.

    So it is by pure accident that I offer to you a recipe that only takes 5 minutes to throw together and less than 20 to bake, allowing you to get a fully flavored beer muffin on your table in less than a half an hour.

    Although I know you would have been more than willing to spend much longer. I appreciate your tenacity.

    For these Beer Bread Muffins, I used Lagunitas Red, a special release that’s just so fun to drink.

    Beer Bread Muffins

    Cheddar Beer Bread Muffins

    Servings 8 muffins

    Ingredients
      

    • 1 1/2 cups flour
    • 1 tbs sugar
    • 2 tsp baking powder
    • 1/2 tsp salt
    • 3/4 cup shredded cheddar cheese plus additional for topping, if desired
    • 2 tbs chopped green onions
    • 1/4 cup melted butter plus 2 additional tbs, divided
    • 3/4 cup beer

    Instructions
     

    • Preheat oven to 350. Spray muffin tins with cooking spray.
    • In a bowl combine the flour, sugar, baking powder, salt, cheese and onions, stir until well combined. Pour in 1/4 a cup of melted butter plus the 6 oz of beer, stir until just combined.
    • Pour batter into muffin tins until each well is about 1/2 full. Pour remaining 2 tbs of butter onto the tops of the muffins, dividing evenly between each muffin. Top with additional cheese, if desired.
    • Bake at 350 for 18-20 minutes or until the muffins have puffed and a toothpick in the center comes out clean. Serve immediately, these are best right out of the oven.

    Join me: FacebookTwitter 

    Chocolate Stout Covered Beer Caramels

    You aren’t always aware of the nexus of a true obsession. It may only be in hind sight that the catalyst is revealed upon agonizing inspection of your past. For me, however, the spark was breathtaking, an obvious birth of a fixation that lead to this blog. That trigger was Bison Honey Basil Ale. A beer that begged to be turned into Beer Creme Brulee, my first post.

    If you enjoy this little blog that I have, and are as fascinated as I am with turning beer into chewable treats, you don’t have me to thank, you owe the lovely folks at Bison Brewery a debt of gratitude. As do I, or course.

    For this post, I used Bison Chocolate Stout, an excellent example of the genre.

    Chocolate Stout Covered Beer Caramels

    Ingredients
      

    For The Caramels:

    • 12 oz bottle low hop Pale or Amber ale divided
    • 2 cups white sugar
    • 1 cup light brown sugar
    • 1 cup butter
    • 1 cup heavy cream
    • 1 cup corn syrup

    For the Chocolate:

    • 1 1/2 cups 60% dark chocolate
    • 1/4 cup Chocolate Stout
    • 1 tsp flakey sea salt optional

    Instructions
     

    • In a large sauce pan over medium high heat, add 1 cup beer (reserve the remaining beer). Allow beer to boil and reduce until thick and syrupy and only about 1 tsp remains, about 20 minutes. Set aside. (Note: if you want a lower level of beer taste, skip this step and substitute the "extract" you have just made with 1 tsp of vanilla extract in the later step that calls for the beer extract)
    • Line a loaf pan with parchment paper, making sure the paper goes up and over the sides of the pan, set aside.
    • In a large sauce pan over high heat add both sugars, butter, cream, corn syrup and remaining 1/2 cup beer. Stir until butter has melted and then stop stirring while the candy boils (you can occasionally swirl the pan), clip a candy thermometer to the side of the pot, taking care that the tip doesn't touch the bottom. Allow to boil untouched until the liquid reaches 244 degrees. The caramel will reach 200 degrees rather quickly,but will take 15-20 minutes to reach 244. The last few degrees climb quickly so stay close to your pot.
    • Once the caramel has reached 244, remove from heat. Add the reduced beer "extract" that you have set aside and stir until the bubbling has subsided. Pour it into prepared loaf pan, allow to sit at room temperature for 10 minutes, then refrigerate until set, about 2 hours. Cut into squares.
    • In the top of a double boiler add the chocolate and the stout, stir over low heat until melted and creamy, about 5 minutes. Don't over heat or your chocolate will seize.
    • One at a time, place the squares into the chocolate with a fork. Roll around until covered, remove and add to a piece of wax paper, sprinkle with sea salt if desired. Once the squares been covered in chocolate transfer the to the refrigerator, repeat with remaining caramel. Chill until set, about 10 minutes.
    • Keep refrigerated.


    Join me: Facebook, Twitter

    Roasted Garlic Beer Butter Shrimp

    Remember the Beer Cooking Scale I told you about last month, the one I want to invent? The one that would let you know the approximate level of Beeryness the final product has? This recipe is at both ends of that yet-to-be-invented scale’s spectrum. The beer butter has a kick you in the mouth beer flavor that will be heartily enjoyed by beer enthusiast, and the shrimp has a subtle note of beer in it’s finish. If you are a Kick You In The Mouth kinda person, cooking for a Maybe Just A Touch kind of person, this will satisfy you both. You get a butter full of intense beer flavor to slather onto whatever you so choose, and your little friend gets a plate of shrimp with slight notes of beer. Harmony between the two of you once again.

    For this recipe I used a Saison brewed with sage, giving really great herb notes to the finished product. This is  a special release beer from Epic Brewing called  Utah Saison Sage #2.

    If you can’t find this beer, look for a Saison with herb or citrus notes.

    Roasted Garlic Beer Butter

    1 head of garlic

    1 tbs olive oil

    1/2 cup Saison beer

    1 stick of butter, softened

    Preheat oven to 425. Rub several layers of the white papery skin off the head of garlic, leaving a light layer still in tact to keep the bulb together. Cut off the top point of the head, exposing the cloves inside.

    Place on a sheet of foil, drizzle with olive oil and fold the foil tightly around the garlic. Place in a baking dish and roast in a 425 degree oven until the cloves are soft, about 20 minutes. Remove from oven and allow to cool.

    While the garlic is roasting, add the beer to a pot on the stove. Cook until reduced to 3 tbs, about 10 minutes. (To lower the level of beer flavor in the butter, reduce 1/4 cup of beer by half.)

    In a food processor, add the softened butter and the beer. Squeeze the head of garlic until the cloves push out, adding just the cloves to the food processor and discarding the papery skin.

    Process the butter until smooth. Add to an air tight container and store in the fridge.

    Roasted Garlic Beer Butter Shrimp, two methods

     3 tbs beer butter

    10 shrimp

    pinch of salt and pepper

    Metohd one: Grilling

    Preheat grill. Melt the beer butter in a microwave safe dish. Skewer the shrimp with a heat safe skewers(or water soaked wooden skewers). Sprinkle with salt and pepper, brush liberally with melted butter. Grill until pink and cooked through, about 2-3 minutes per side. Brush occasionally with butter while cooking.

    Method two: Stove Top

    In a pan over medium high heat, add the butter and stir until melted. Sprinkle the shrimp with salt and pepper, add to the pan and saute until cooked through about 5 minutes.

    Join me: FacebookTwitter 

    Beer and Bacon Jam

    Beer and bacon in a spreadable form, this may be the best thing to ever come out of my kitchen. It is a simple food, a few ingredients that over time become large with flavor and possibilities.  A conversation piece, something your guest won’t forget, or a handmade gift for those carnivorous beer lovers in your life. Although the cooking time is long, your active time is relatively short.

    This is the perfect way to spend a lazy sunday afternoon: The smell of bacon welling up around you in a sun soaked kitchen with Delta Spirit rising from the speakers and the rest of the demanding world no longer existing. Just you, music and the transformation of ingredients happening on your stove. Cooking, creating, lingering in my kitchen gives a very grounded feeling to my over extend life. A reminder that I need to slow down and enjoy, just be. A recipe that ask little of me other that the time it takes to simply simmer is a reminder of that, just be.


    Beer & Bacon Jam

    Ingredients
      

    • 12 oz thick sliced bacon 8-10 thick strips
    • 4 cloves of garlic smashed
    • 1/2 cup yellow onion chopped
    • 1 1/4 cups amber ale or imperial stout divided
    • 1/4 cup apple cider vinegar
    • 1/2 cup balsamic vinegar
    • 2/3 cup brown sugar

    Instructions
     

    • In a large pot or dutch oven, cook the bacon, working in batches if neccessary. Remove the bacon from the pan and allow to cool and then roughly chop. Drain off the bacon grease from the pot, leaving only about 1 tbs bacon drippings in the bottom of the pot. Return the pot to heat and cook the onions until soft and translucent, about 3 minutes. Add the garlic and stir for about 30 seconds. Add 1 cup beer and both vinegars, scraping to deglaze the bottom of the pot. Add the brown sugar and the bacon, reduce heat to maintain a simmer. Place the lid on the pot at an angle, allowing to vent the steam. Cook until reduced to a thick and syrupy consistency, stirring occasionally, about 45 minutes. Transfer to a food processor along with remaining 1/4 cup beer and pulse until most of the large pieces have been chopped.
    • Serve at room temperature.

    Join me: FacebookTwitter 

    Beer Braised Chicken Sliders With Hoisin Beer Barbecue Sauce

    There’s a good chance that when you think about cooking with beer, a meat recipe comes to mind. Your Dad’s beer marinated ribs? Beer can chicken? Beer braised pork? There’s a good reason for that.

    Not just for the spectacular flavors that craft beer can impart on the meat, but because beer, especially high acid beer, acts as a meat tenderizer by breaking down tissue.

    For this recipe you are free to run the spectrum of beer styles. Most recipes I write will be accompanied by stern warning about using any beer other than the type called for, this isn’t one of those recipes. That IPA I keep shaming you into avoiding? You can even give that a try. My gut instinct with a recipe like this was to use a light, high acid beer with herb notes (basil, sage, oregano) but I opted for a porter to test my "Any Beer Goes" theory.

    The porter effect, as I am now calling it, gave a "meatier" quality to the chicken. Which turned out wonderfully, and gave this a bit of a pork taste.

    The beer I used for this recipe was the Payback Porter by Speakeasy. It’s a fantastic choice for a porter because the notes are similar to those I see in barbecue sauces and rubs: smoke, coffee, cocoa, and molasses.

    Next time I’ll use a beer with a high acid content for a little contrast, but as far as the beer that you pick, experiment and let me know how it goes.


    Beer Braised Chicken Sliders With Hoisin Beer Barbecue Sauce

    Ingredients
      

    For the Barbecue Sacue:

    • 2 tbsp extra-virgin olive oil
    • 3 cloves fresh garlic minced
    • 1 cup hoisin sauce
    • 1 tsp chili powder
    • ¼ cup low sodium soy sauce
    • 1 cup beer

    For The Braised Chicken:

    • 2 tbs canola oil
    • 3 chicken breasts boneless and skinless
    • 1/2 tsp salt
    • 1 1/2 cups beer
    • 1/2 cup chicken broth
    • 15 mini Hawaiian bread rolls

    Yield: 15 sliders

      Instructions
       

      • Heat 2 tbs canola oil in large pot or Dutch oven. Sprinkle the chicken with salt on all sides. Place in the pot and cook on each side until browned, about 2 minutes per side. Cover with 1 1/2 cups of beer and 1/2 cup chicken broth, cover and cook for 15 – 20 minutes or until chicken is completely cooked.
      • While chicken is cooking, prepare barbeque sauce by warming olive oil in large saucepan over medium-high heat. Add garlic and sauté for 30 seconds; add 1 cup beer, hoisin sauce, chili powder and soy sauce. Cook for 10-15 minutes or until thickened and reduced, remove from heat.
      • When chicken is cooked, remove from pot and allow to cool. Using two forks, shred chicken to as thin slices as possible, then add to hoisin barbeque sauce pan, tossing well to coat.
      • Split rolls in half across the middle to resemble small sandwich buns, fill with chicken.

      Join me: FacebookTwitter 


      Chocolate Pretzel Beer Toffee

      The best part about visiting a brewery is the opportunity to sample those special release beers that never make it into bottles. Those brews that are only made in small batches, put into casks that sometimes make it to local pubs or events but will never make it into bottles in your local distributors shelves. Like those songs your favorite band will never record but will occasionally play live if you happen to catch a show on the right night, these are beers that make you feel special for having been granted the experience. In a world where it seems everything is accessible with the right google word search, these near mythical concoctions are only available to those who happen to be in the right place at the right time.

      One of my favorites is the Habanero Sculpin from Ballast point. Because of the process they use, the heat is fresh and bright. An uncooked scorch that isn’t shy. Habaneros are an extremely unpredictable ingredient, with heat levels that vary widely from pepper to pepper, making every cask of Habanero Sculpin different from the last. If you ever make it down to San Diego, stop in for a pint and count yourself among the special few.

      Since I wasn’t able to get my hands on any Habanero Sculpin, I found myself fixated on this Ballast Point Calico Amber Ale. And the result was a toffee that I couldn’t stop eating. So addictive, and it only takes about 20 minutes to make. I already have plans to make and hand this out as Christmas gifts, if I can wait that long to make it again.

      Chocolate Pretzel Amber Ale Toffee

      Chocolate Pretzel Beer Toffee

      Ingredients
        

      Toffee:

      • 1 Cup Sugar
      • 1 Cup Butter 2 sticks
      • 1/2 Cup Amber Ale

      Topping:

      • 2 Cups Pretzels Smashed
      • 2 Cups Dark Chocolate Chips 60% caco content
      • 1/4 Cup Amber Ale or Chocolate Stout

      Instructions
       

      • In a large pot over high heat add the sugar, butter and 1/2 cup amber ale, it will triple in volume during the cooking process so make sure to use a large pot. Stir until the mixture starts to boil. Allow to boil untouched until the mixture starts to darken and thicken at about 230 degrees. Stir continuously until it turns a very dark amber and hits 290 degrees. This process will take between 15 and 20 minutes from start to finish. pour onto a baking sheet covered with parchment paper or a Silpat. Allow to cool.
      • Add the chocolate to a large bowl. Heat the beer until hot but not boiling. You can heat it on a pot on the stove or microwave it in a microwave safe bowl. If you use the microwave, know that the beer will foam up once it reaches it's boiling point. Pour the hot beer over the chocolate chips and stir until well combined and melted.
      • Pour the chocolate over the toffee and smooth out in an even layer. Sprinkle the crushed pretzels over the chocolate and chill until the chocolate has set. Cut into pieces.

      Notes

      If you use a chocolate with less than 60% cocoa content, it will have higher levels of milk solids, because of this it will have a more difficult time hardening once the beer is added. Try to fine 60% and chill it to set.

      Join me: Facebook, Twitter