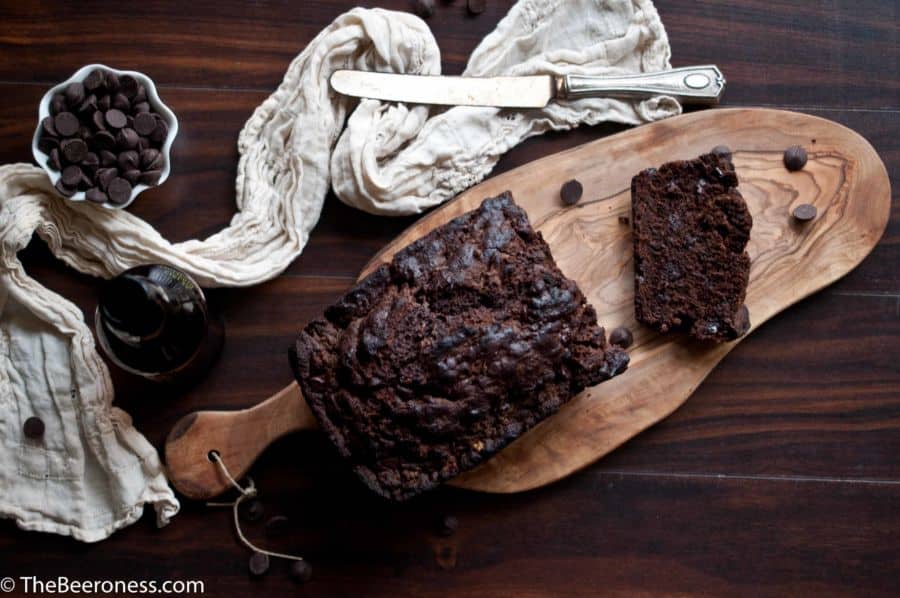
We could never manage to get ourselves through an entire conversation about cooking with beer without talking about meat. Sure, the magical leavening powers of beer give bread that awesome texture, and after making a chocolate stout cake none of my cakes will ever be sober again, but meat is where it all begins.
There is no hard data on the inception of beer cooking, but my educated guess leans me towards meat. Not just for the incedible meat tenderizing properties of beer, but also due to the fact that it’s a mild preservative, important in those pre-Frigidare days of trying to feed a crowd. These days, meat and beer just seem to have found a seamless connection, a perfect marriage that leads to the birth of outstanding crowd pleasing meals. This union is due in no small part to the fact that beer gives meat an amazingly tender texture while infusing it with a little bit of that beer flavor we all know and love.
So, what beer with what meat, you ask? Great question. Here are my recommendations:
Beef: Imperial Stout
Pork: Smoked Porter
Chicken & Turkey: Brown Ale
Fish: White Ale
In my history of beer cooking, those are the pairings that have proven the most successful. Also, don’t forget to save some of that beer for drinking.
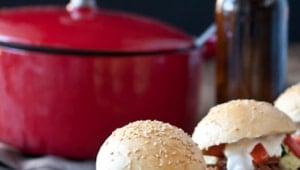
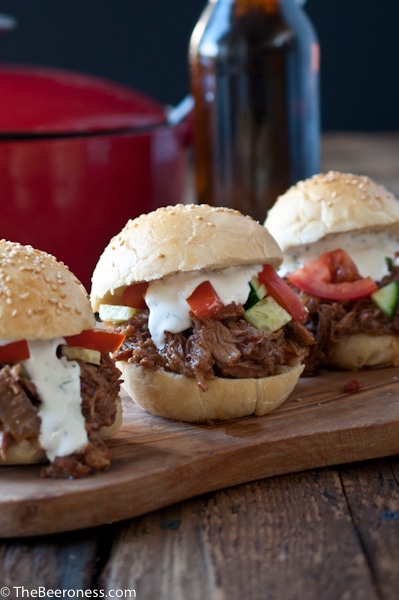
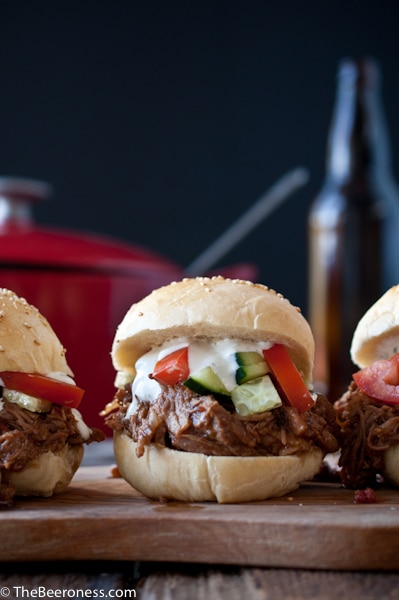
In a small bowl stir together the brown sugar, smoked paprika, salt, onion powder, garlic powder, black pepper and cumin.
Sprinkle pork on all sides with spice mixture.
Heat the olive oil in a large Dutch oven until hot but not smoking. Sear pork on all sides, working in batches in necessary.
Pour the stewed tomatoes and beer over the pork. Add the Worcestershire, onions and garlic. Reduce heat to a low simmer. Add a lid at a vent and allow to cook until pork is very tender and falling off the bone, about 4 hours. Shred using two forks, removing the bones from the pot. Remove meat from the pot with a slotted spoon to drain off excess moisture.
To make the sauce, whisk together the yogurt, lemon juice, dill and red onion. Chill until ready to serve.
Split the burger buns and fill with pork, top with cucumber, tomatoes and yogurt sauce.
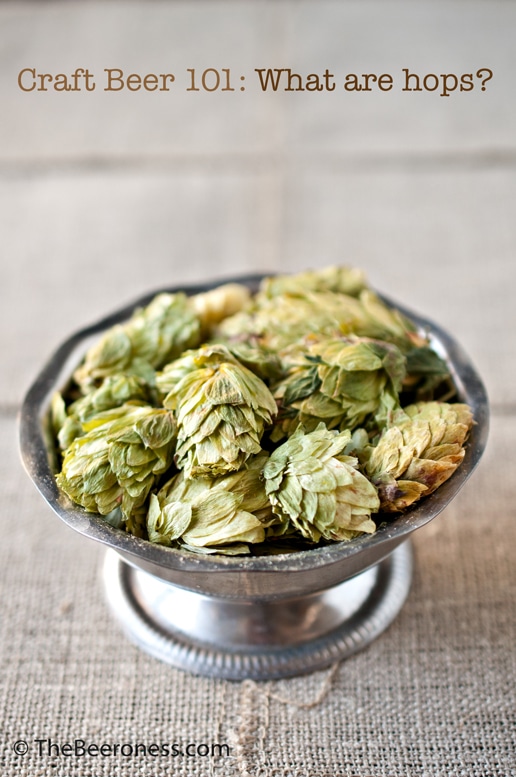
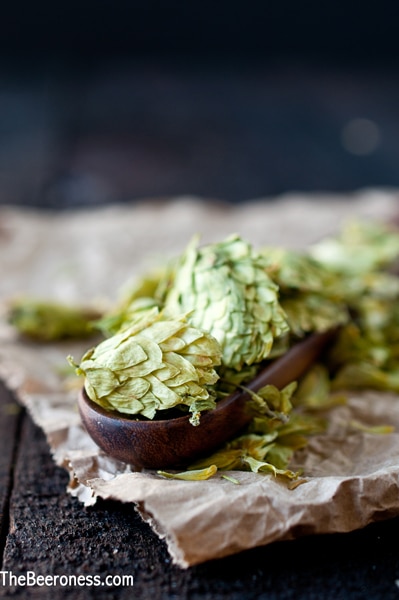
Chances are, if you’ve spent anytime within stumbling distance of a Craft Beer Lover, you’ve heard the word "hops" thrown around like a rag doll. You may have been leery asking the "What are hops?" question for fear that you’ll be subjected to the mad beer-geek ramblings of your semi-inebriated friend. So, here I am to save you from the possibility of a lecture on beta, delta, and gamma resins whist trying to hide your shell shocked expression, with a quick and dirty introduction to this essential beer ingredient.
Hops are a flower that comes from a plant in the marijuana family. It’s believed that they were originally added as a preservative when trying to make water safe to drink, but due to their uniquely bitter flavor, the use became more about taste than preservation.
Hops have a very specific taste that comes from the oil and gives beer it’s bitterness. These levels of bitterness are measured along a scale called the International Bitterness (or bittering) Units, that we just refer to as a beers "IBU’s." Generally, the higher the IBU’s, the more bitter the beer. That bitterness is used to counter the sweetness in the sugars used to feed the yeast, and it’s that balance that dictates how "hoppy" or bitter a beer tastes, more so than the amount of hops used. For instance, most stouts have a very malty taste (malt, essentially, is the opposite taste of hops), but can have a very high IBU rating. Think of this like weather, the same temperature feels much colder with the wind chill factor. Beer tastes much more bitter without a malty balance. IBU’s are only one indicator of what’s in store for you, bitterness wise, but isn’t always a linear expression of experience.
Hops can be added at various phases of the brewing process and are often added more than once while the beer is being made. If you hear the term "dry hopping" it really has nothing to do with the hops being actually dry, it means that the hops were added at the end of the brewing process and steeped like tea, giving a bright floral taste to the beer, rather than a strictly cooked hop flavor. Most likely, the hops were also added previously in that brewing process and the dry hopping was purely for that bright hop flavor and an extra kick of bitterness.
Hops can be used in the flower state, but are commonly used after being compressed into a pellet that looks like food for a small furry pet. The highest concentration of US hops are grown in the Pacific Northwest. If you’re driving through Oregon and see long green vines strung up on tall wires, you are probably looking at the makings of beer’s most notable ingredient.
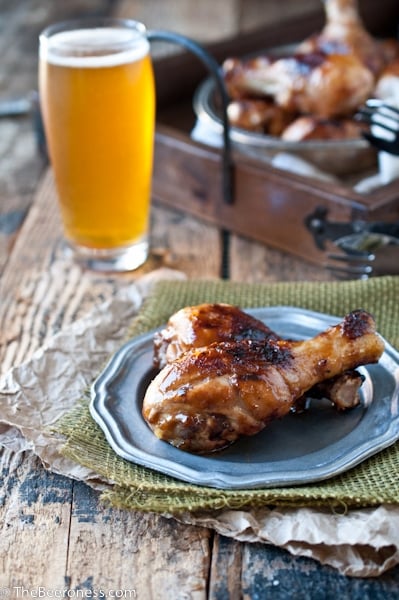
Oh, and hey, I have some food for you. Thank you for indulging my need to Beer Geek Out for a few paragraphs. Because I’m so nice, I gave you both the oven and grill methods as not to taunt the grill-less causing Sad Face reactions across the world.
This chicken was great from the oven, but I have a huge crush on my grill right now so the win goes to grilled.
In a large bowl whisk together the buttermilk, 12 ounces pale ale and salt. Add chicken, cover and allow to sit at room temperature for 30 minutes (if all ingredients are cold from the fridge, this is not long enough from any foodborne pathogens to form). Alternately, chicken can also be allowed to soak in the fridge for 3 to 6 hours.
Rinse chicken well with cold water, pat dry.
While the chicken is soaking, make the glaze. Add the sesame oil to a pot over medium high heat, add the garlic, stir. Add the stout, soy sauce, honey, hoisin, smoked paprika and sriracha, bring to a boil, stirring frequently until thickened, about 8 minutes.
Oven method:
Preheat oven to 425.
Heat olive oil in a skillet over high heat until just starting to smoke. Add the chicken (working in batches if necessary) and sear on all sides until browned, transfer to a baking sheet that has been covered with parchment paper or aluminum foil. (note: browning the chicken before the oven will help you to avoid rubbery, chewy, skin on your chicken).
Brush the chicken on all sides with glaze. Cook for thirty minutes, removing chicken from the oven and re-glazing every ten minutes. Cook until internal temperature reaches 165.
Grill method:
Preheat grill to medium high.
Brush the grates with olive oil.
Brush chicken on all sides with glaze.
Place on hot grill, close the lid.
Turn and brush with glaze every 2 minutes until cooked through, about 8-10 minutes.
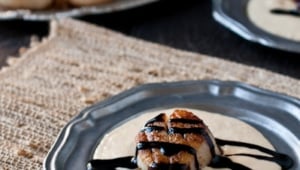
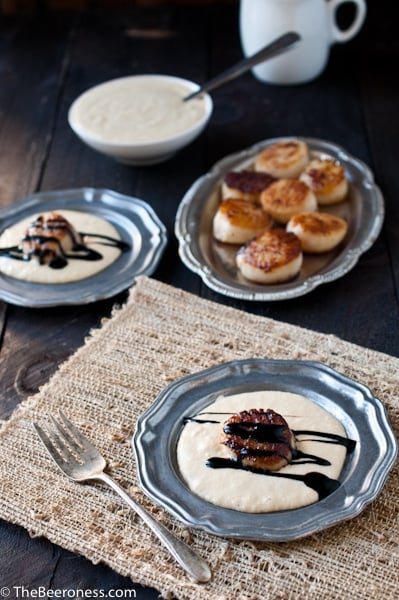
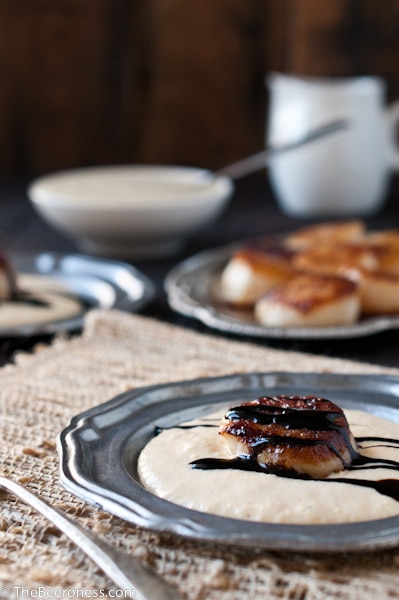
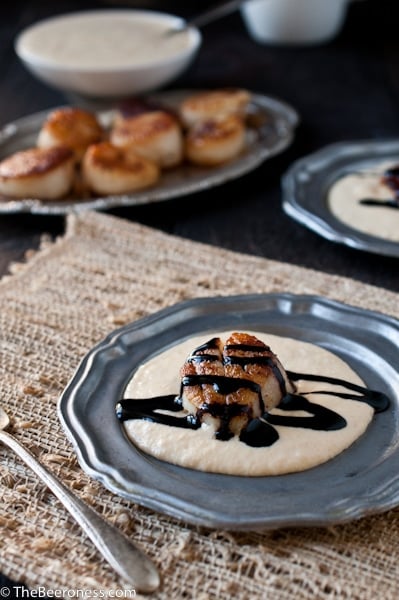
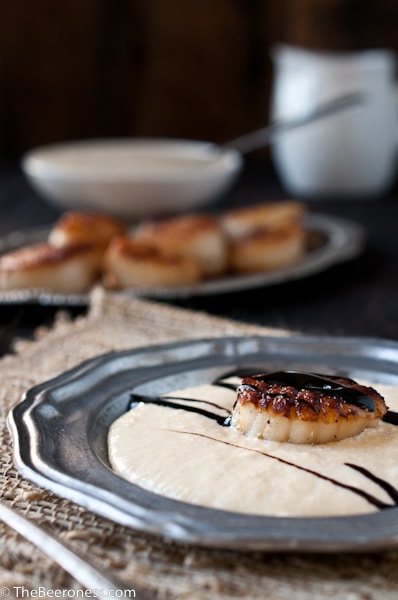
While flavor may be a great go-to reason to cook with beer, don’t overlook the more practical applications of beer cooking. One of the cornerstones of Practical Beer Cooking is the inherent meat tenderizing properties of beer, making it the perfect brining liquid. While infusing the meat with flavor and uping the juiciness factor, beer also lends it’s powers to giving you extra tender meat. While land dwelling meat is often the target of brining, most scallops need a good long soak in a hoppy brine.
Scallops are a deceptive beast. For the most part, these sweet and mild little sea treats look simple to prepare. But a few minor issues could be robbing you of that restaurant quality greatness. The first, and most damaging issue is that the majority of grocery store scallops will come soaked in a phosphate solution that, while whitening and preserving, infuses the scallop with a soapy taste. This phosphate solution also permeates the meat, leaking out during cooking and preventing you from getting a good sear. So, really, you need to flush the beast to get a great meal out of it. The phosphate soaked scallops are generally referred to as "wet" scallops and those that are not soaked in anything are referred to as "dry" scallops. While dry scallops are still available, they are harder to come by, more expensive, and much more rare the farther you get from the water. If your scallop is white and sitting in a pool of milky liquid, it’s a wet guy. If it isn’t labeled "dry packed" you can bet your dinner that your new found culinary delight has been hanging out in phosphates for a while.
The cure to this is really simple, and relying on those meat tenderizing properties of beer will give you a great wash to get your scallop back to a dry pack quality. Allowing the scallops to brine will work the phosphates out, giving you the ability to sear those beautiful scallops without that nasty milky liquid seeping out in the pan, ruining that beautiful sear you want. Make sure to allow them to dry really well before searing to get that great golden crust that always drives us crazy.
For this recipe I used a smokey stout for the sauce (the Sauce of Dreams, that I sort of want to take a bath in), the slight notes of smoke are really beautiful and add a bit of a Texas Barbecue flavor to these nicely seared scallops. I used Still Life by Beachwood Brewing, a really nice stout, with beautifully layered flavors. Look for a stout or a porter (both dark beers that are interchangeable when cooking) that have notes of smoke or espresso.
Beer Brined Scallops over Smokey Corn Puree and Stout Molasses Sauce
In a large bowl stir together the pale ale, salt, water and lemon juice.
Add the scallops, cover and refrigerate for 1 hour.
While the scallops brine, make the puree. Cut the kernels off the corn cob, set aside.
In a saucepan over medium high heat, melt the butter. Add the kernels, salt, pepper, smoked paprika and cream. Allow to simmer until corn has softened, about 8 minutes. Add to a blender or food process and process until smooth, about 5 minutes. Pass through a fine mesh strainer or chinois (this will remove any fibers and give you a really creamy puree).
Make the sauce: Add the stout, molasses, balsamic and soy to a sauce pan over high heat. Bring to a boil, reduce heat to maintain a strong simmer, cooking until reduced and slightly thickened, about 10 minutes (should easily coat a spoon). Sauce can be made three days ahead of time and stored in the fridge, but with thicken as it cools. Heat slightly to thin.
Remove the scallops from fridge and place on top of a stack of 4-5 paper towels. Add another layer of paper towels and allow to drain and dry for 15 minutes. Sprinkle with pepper on both sides.
Add the butter and olive oil to a pan over high heat. Allow the butter to melt and get very hot, nearly smoking.
Add the scallops, flat side down, and allow to cook until a dark golden brown crust forms on the bottom, about 2 minutes. Flip and cook until seared on the opposite side. Remove from pan when a slight hint of translucent pink still remains at the center, don’t over cook.
Falling into the world of craft beer, I lacked a full grasp of the type of people this obsession attracts. Over the years I never cease to be amazed at the warmth and heart that exists in the gatherings of the Craft Beer Enthusiasts, the salt of the earth types that dwell here. It’s hard to explain to people who are outside, how to really articulate how golden the souls, how quickly we connect to one another over a shared fascination. How our celebrities brew beer, and our Mecca lives in various 750 ml bottles.
Over the weekend I was fortunate enough to spend a truly unforgettable weekend in Boston, courtesy of Attune Foods, to marinate in the company of the Craft Beer Crowd. The final night gave me a clear tableau of the heart of this community. In the middle of a large conference space, in the bottom of a Boston hotel, was an impromptu potluck of rare beer, a spontaneous gathering spread out by strangers. People from all over the country packed bottles of beer, rare beer, sacred beer, hard to track down beer, beer that people dream of, in order to share it with strangers. They pulled from their stash of beer that took them months, even years to track down, in order to share it with people they have never met.
I was honored, and so grateful, to be handed beer I’ve only read about, from people I’d never met. "I though you’d like this," or "I brought this to share, do you want some?" It was touching, and even a bit overwhelming, that people who didn’t know me would share, with such enthusiasm, what is often rare and hard to come by. Some bottles weren’t even replaceable, aged for several years. This is craft beer. People who just want to share, in community, what they have come to love.
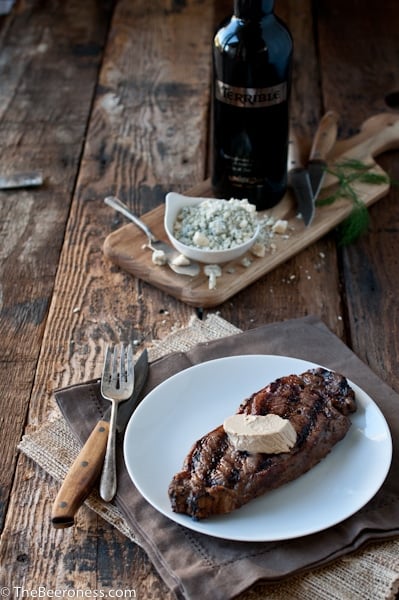
And all I have to offer in return is my gratitude, and some knowledge about food, and a few recipes. Let’s start with steak. A few tips can give you an unforgettable meal, to serve with that rare beer.
First, is the selection process. Have you ever noticed those stickers on the packages of steak in the grocery store? Prime, Choice and Select? While they should put: Great, Pretty Good and Don’t Bother, they leave it a bit ambiguous. If you know what to buy, you’ll be ahead of the game.
Prime is the best, but of course, most expensive. Choice is runner up to prime, not as good as Prime, but it’s often much less expensive. Select should be labeled: Please Don’t Select, it’s poor quality. If a steak isn’t labeled, it probably was so poor, it didn’t even earn a Select designation. If you see an unlabeled piece of meat that has a sticker that says, Inspected by the USDA, don’t fall for it, all meat is inspected by the USDA. Look for a well marbled steak, about an inch in thickness that’s labeled Prime or Choice.
Second: marinate and dry. Beer is a natural meat tenderizer, using it in a marinade gives steak an amazing texture. Drying the meat well, while it feels counter intuitive, is the only way to get a good sear and avoid 50 shades of gray meat.
Third: excessively salt your meat. Don’t be shy with the salt, it’s imperative. Liberally salt the steak on all sides, it’s pretty difficult to over salt a steak and salt is extremely important to the final flavor.
Fourth: buy a meat thermometer. If you cook meat a lot, you get used to the feel test and you can vibe it. But until then, testing with an inexpensive meat thermometer is a foolproof way to get the exact doneness that you want. You really don’t want to spend all that time and money only to over cook your steak because you didn’t want to spring for the $7 meat thermometer.
For this recipe I love a smoked porter, it’s one of my favorite go-to beers when it comes to cooking with beef.
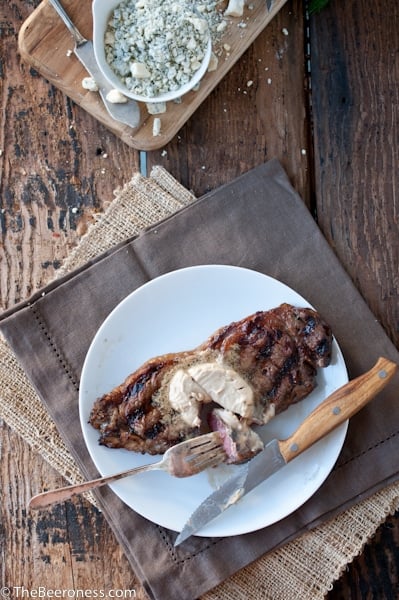
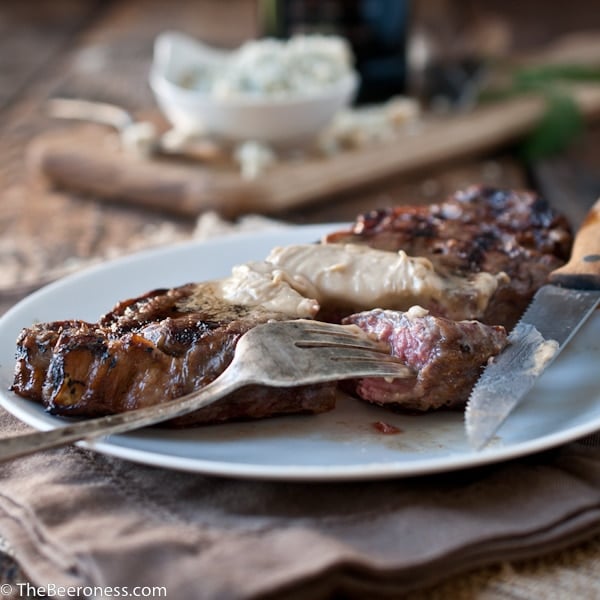
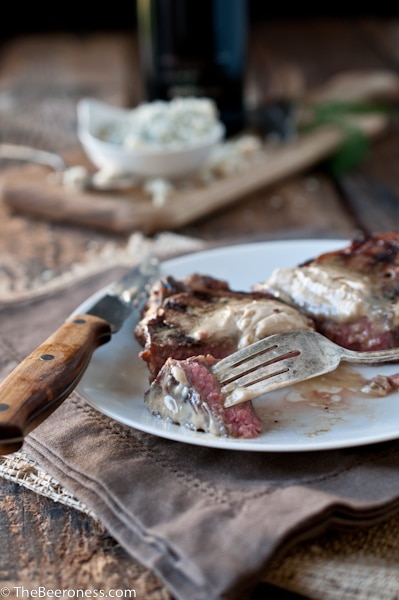
Beer Marinated Steak with Porter Gorgonzola Butter
In a small bowl, whisk together the beer, Worcestershire, onion powder, paprika and salt.
Place the steaks in a baking dish, cover with the marinade. Cover and refrigerate for 6 to 12 hours, turning at least once while marinating.
While the steak is marinating, make the butter. In a saucepan over medium high heat, add the ½ cup porter. Cook, stirring occasionally, until reduced to 2 tbs, 8-10 minutes.
In a food processor add the butter and reduced beer, process until well combined. Add the Gorgonzola and pulse to combine.
Add butter to a sheet of plastic wrap, roll into a log and refrigerate until solid, about 1 hour.
Fifteen minutes before cooking, remove the steaks from the marinade. Place on a stack of paper towels, top with additional paper towels, pressing down firmly. Allow to dry for about ten minutes.
Grill Method:
Preheat the grill to medium high.
Salt and pepper the steak liberally on all sides.
Brush the grill with olive oil.
Place the steaks on the hottest part of the grill until grill marks appear, flip. Once grill marks appear on the other side, flip again. Flip a total of 4 times to create a diamond grill pattern, keeping the grill closed between flipping. Test the temperature and remove when desired doneness is achieved.
Allow to rest for at least 5 minutes.
Slice the butter into 1 inch pats, add one pat to each steak.
Oven Method:
Preheat oven to 350.
Salt and pepper the steak liberally on all sides.
In a pan over medium high heat add the olive oil, heat until hot but not smoking. Add the steaks (two at a time) and cook on each side until a brown seared crust has formed, about 2 minutes per side. Avoid crowding the pan, cook in batches if necessary. Move steaks to a sheet pan or baking dish.
Cook in the oven for 5-7 minutes, or until desired level of doneness. Allow to rest for at least 5 minutes.
Slice the butter into 1 inch pats, add one pat to each steak.
Notes
Temperatures for doneness: 126°F Rare,131°F Medium Rare,145°F Medium,154°F Medium Well,
There are a few buzz words that seem to grab peoples attention and promote a recipe to Social Media Sharing Gangbusters status. These words include: Skinny, Quick, Easy, No Bake, Only 3 Ingredients, You’ll Never Guess The Secret Ingredient! None of these phrases are the type to attract my attention on their own.
I like a recipe that takes time, uses fat and sugar, and I’m not scared of a long list of ingredients or complicated directions.
Sometimes, however, I do invent a recipe that inadvertently falls into one of those Gangbusters categories that people seem to like. This, for example, takes 15 minutes and zero baking. It also tastes amazing in a way that seems to contradict the short amount of time it took to make.
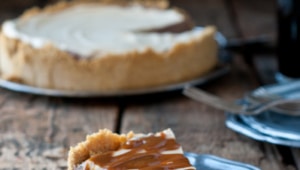
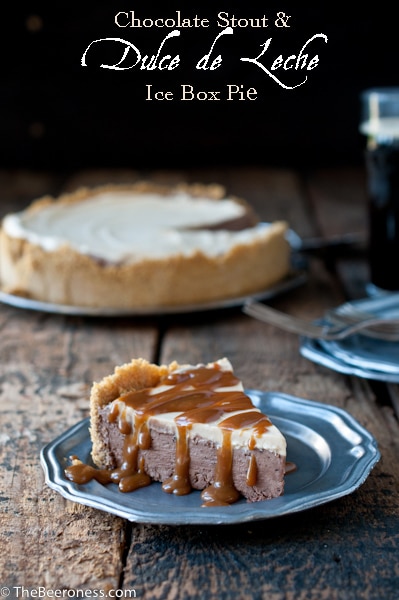
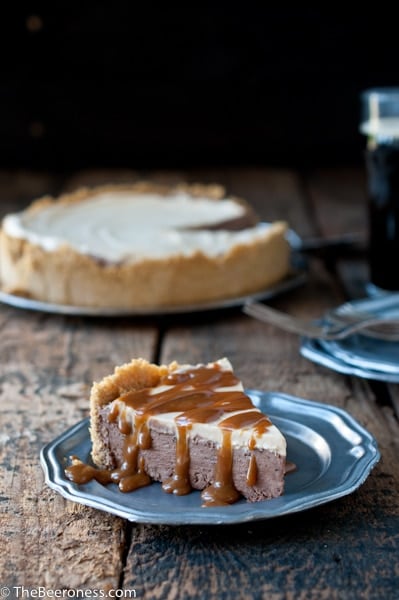
You can buy Dulce de Leche, or make it from scratch (here is a really great post on How to Make Dulce de Leche from a blogger I have a girl-crush on). It’s simple to make from scratch, but if that doesn’t fit your time schedule, or intimidates you, it’s fairly easy to find in markets.
I found myself in ownership of a batch of Dulce de Leche after spending a 100 degree day knee deep in Holiday Cheer while making and shooting Christmas Cocktails for the Holiday Issue of a print magazine. Nothing screams July like Brandied Hot Chocolate with Candy Cane Whipped Cream or Dulce de Leche Eggnog. Although I was incredibly grateful for the opportunity, I can’t say that I really wanted to consume hot buttered rum or mulled wine on triple digit summer day.
In a food processor add the graham crackers and brown sugar, process until reduced to fine crumbs.
While the food processor is running, add the melted butter, process until combined.
Add crust to a 9 inch spring form pan. Using a heavy, flat bottom glass, press very well into the sides and bottom of the pan (starting with the sides), make sure to press very well until the crust is very compacted into the sides and bottom of the pan.
Add the chocolate chips to a small bowl. Heat the stout until very hot (about 170 degrees), pour stout over the chocolate chips, stir until well combined and creamy. Allow to cool to room temperature.
In the bowl of a stand mixer, add 1 ½ cups heavy cream and ¼ cup powdered sugar, beat on high until soft peaks form. While the mixer is running, slowly drizzle the cooled chocolate mixture into the mixer. Once it has all been added, turn off the mixer and gently stir until all of the cream and chocolate has been combined an no white streaks or dark chocolate streaks remain. Pour into the crust. Place in the freezer while you work on the Dulce de Leche layer.
In the bowl of a stand mixer, add 1 cup heavy cream and 3 tablespoons powdered sugar. Beat on high until soft peaks form. While the mixer is running, slowly drizzle the Dulce de Leche into the mixer. Once it has all been added, turn off the mixer and gently stir until all of the Dulce de Leche and whipped cream have been combined.
Add the Dulce de Leche cream on top of the chocolate layer, smooth into an even layer.
Freeze until set, about 1 hour. Remove from freezer 10 minute prior to serving and allow to warm slightly before cutting. To remove from pan, run a sharp knife under very hot water, then run the knife between the crust and the side of the spring form pan to release.
Heat remaining Dulce de Leche and drizzle over slices prior to serving.
When I first got into food blogging I had this idea that I would just take pictures of my dinner and post the recipe online. Somewhere between installing Google Analytics and starting an LLC, I realized that I was cooking in order to develop content rather than just posting what I was eating.
I guess that’s inevitable when I started to earn an income and see my website as a small business. I also realized that although I often stray from who I am as a cook in order to cultivate blog hits, I love cooking, I love food and I got in this business because of those things. When the recipes you love get ignored and the ones you don’t have strong feelings about go viral, it’s hard not to just continue to post those Pandering to the Masses recipes that go viral, but I know that I am the most happy when I cook the food I want to cook and hope that you love it, too.
I loved the way this came out, even though I know it wont go viral. It’s how I like to eat, and how I like to spend my time in the kitchen, hope you don’t mind too much.
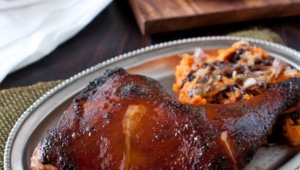
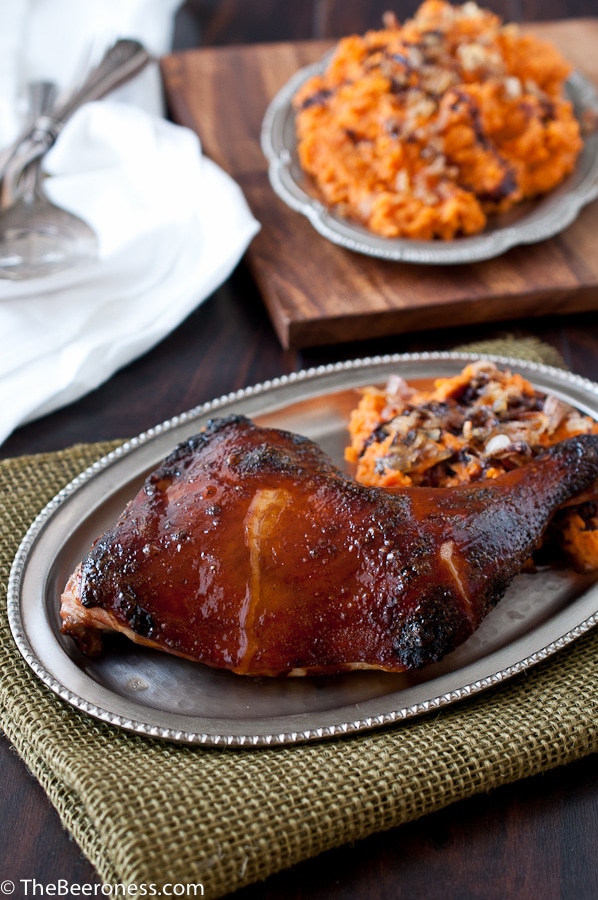
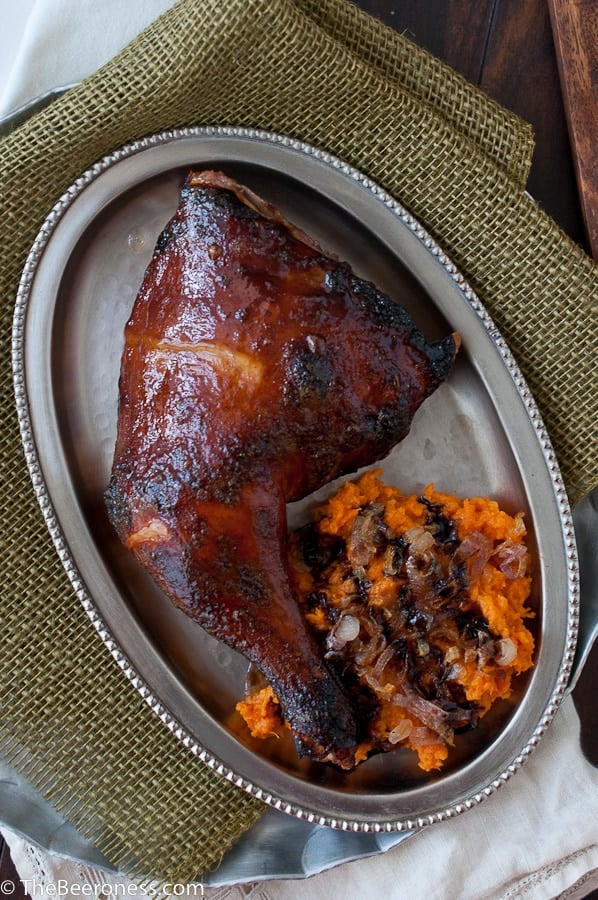
Mirin Stout Glazed Roast Chicken with Maple Sweet Potatoes topped with Caramelized Shallots and Balsamic Glaze
4chicken leg quartersor 1 whole roasting chicken, cut into quarters
For the Glaze:
1cupstout
2/3cupmirin
¼cupsoy sauce
½tspchili powder
1tbscornstarch
3tbshoney
For the Sweet Potatoes:
2large shallotssliced (2/3 cup)
2tbsbutterplus 4 tbs divided
1tbsoil
3large sweet potatoespeeled and sliced
2tbsreal maple syrup
2tbsheavy cream
¼tspnutmeg
¼salt
1/4cupchopped pecans
3tbsbalsamic gaze
Instructions
In a pot over medium high heat, add the water and the salt. Stir until salt has dissolved, remove from heat, add the beer and ice. Stir until ice has dissolved and brine is at room temperature or below.
Add the chicken quarters to a large bowl. Pour the brine over the chicken, cover loosely with plastic wrap, refrigerate for 3 hours and up to 24 hours.
Preheat oven to 425F.
Add the stout, mirin, soy, chili powder, cornstarch and honey, whisk to combine. Add sauce pan to high heat, allow to boil until slightly reduced and thickened, about 5 minutes.
Cover a baking sheet with aluminum foil, place a wire rack over the foil lined baking sheet.
Remove chicken from brine, discard the brine. Rinse the chicken well and pat dry. Place chicken on the wire rack.
Brush liberally with the glaze.
Roast at 425F for 45 to 55 minutes, brush with glaze every 10-15 minutes. Remove from oven when the internal temperature reaches 175F.
While the chicken is cooking make the sweet potatoes. In a saucepan, melt the butter with the oil over medium heat. Add the shallots and cook over medium-low heat until caramelized, about 20 minutes.
Boil the potatoes in a pot of lightly salted water until fork tender, about 12-15 minutes. Drain, return sweet potatoes to the dry pot. Add 4 tbs butter, cream, maple syrup, salt, and nutmeg, mash with a potato masher until well combined and potatoes are well mashed, transfer to a serving dish. Top with caramelized shallots, chopped pecans and drizzle with balsamic glaze.
Notes
Balsamic glaze can be bought at the store, often by the balsamic vinegar, or you can make it by reducing 1 cup balsamic and 1 tbs white sugar or honey in a saucepan until reduced and thickened.
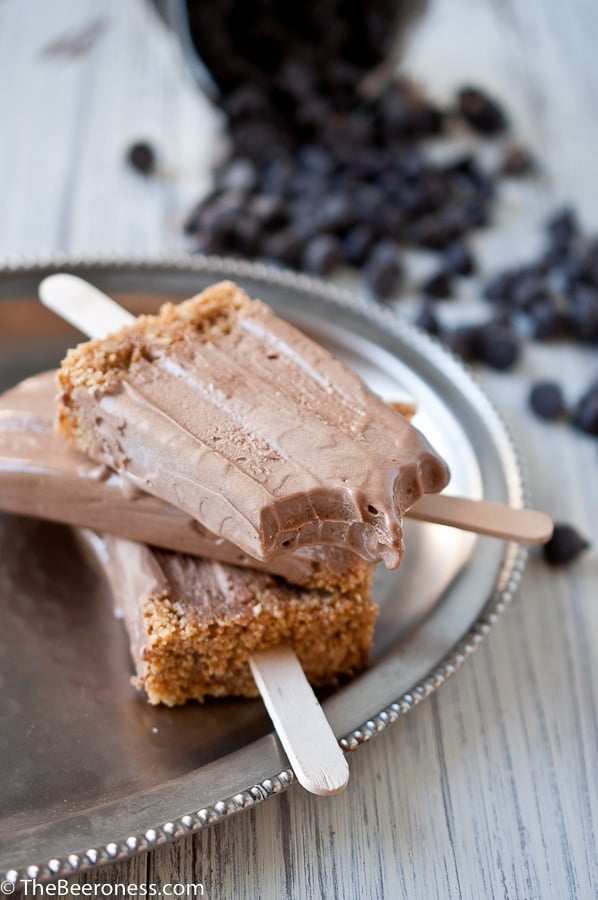
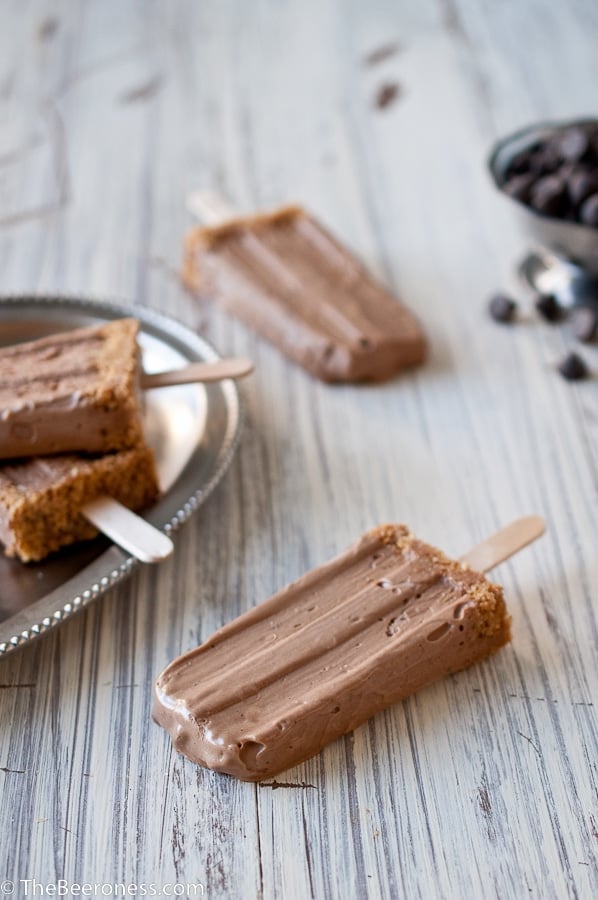
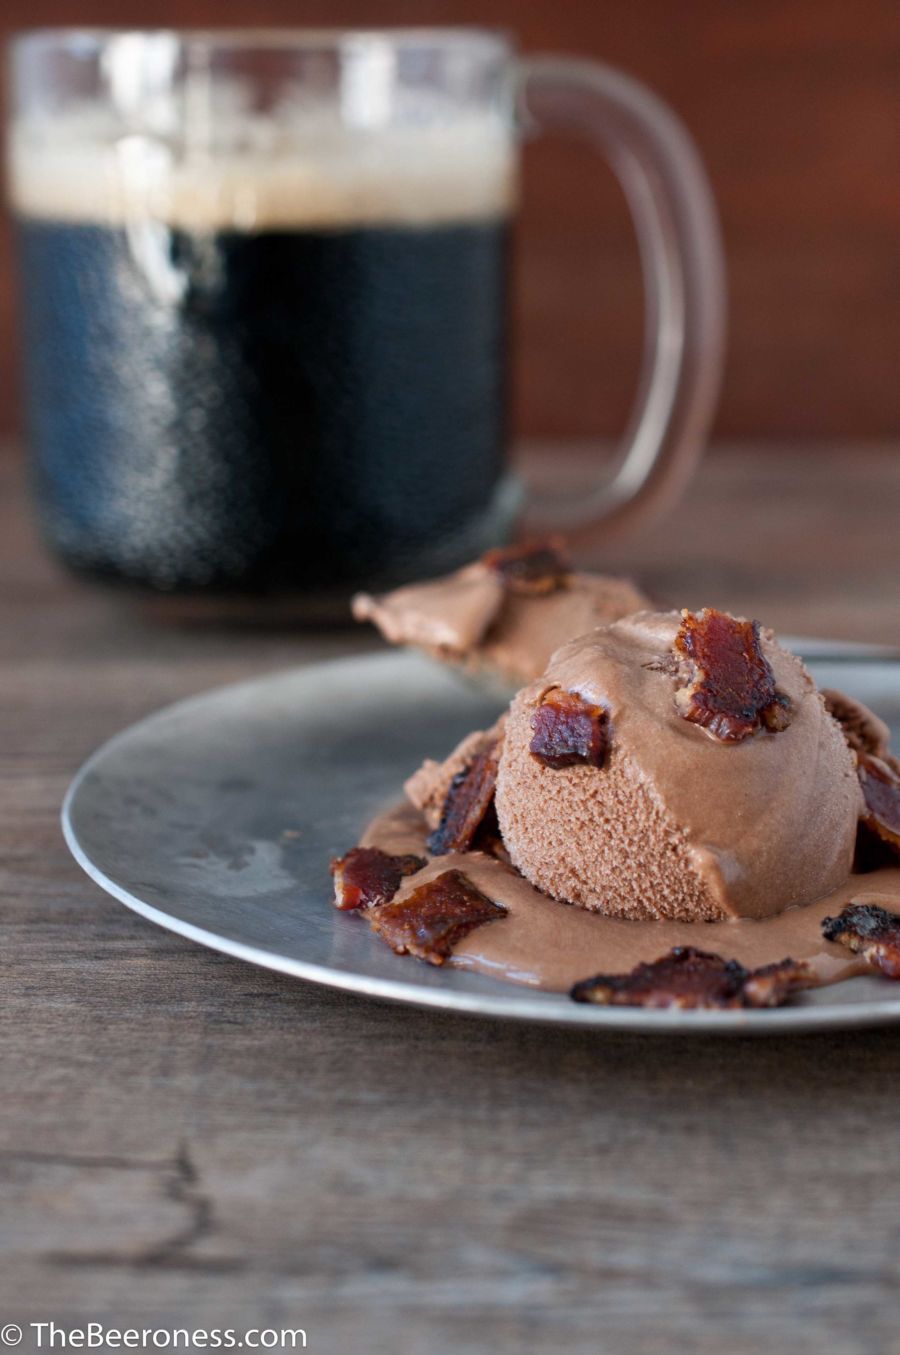
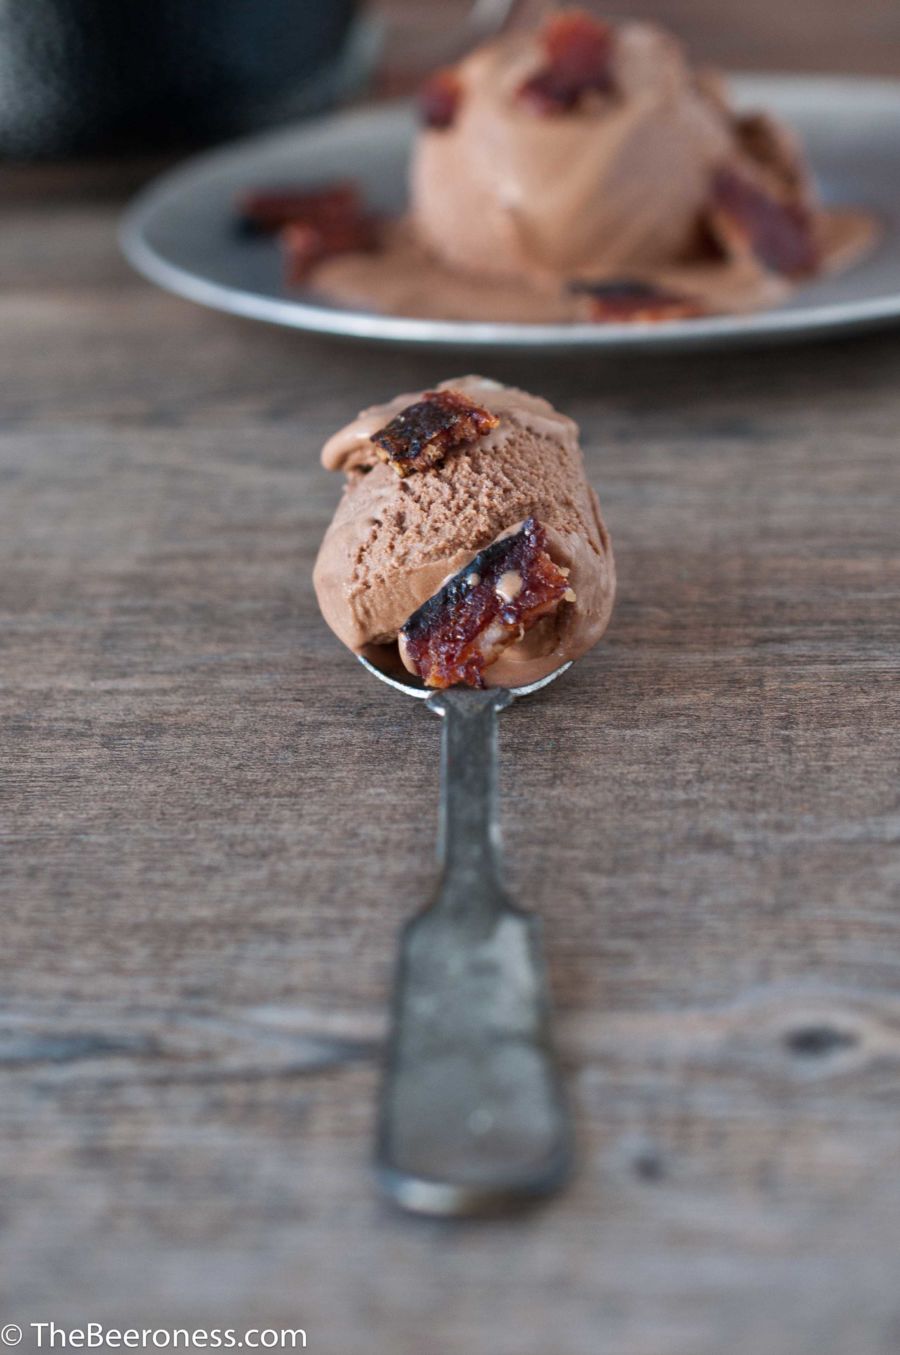
Would you judge me if I tell you that I’m not a huge fan of ice cream? Clearly, I like it just fine I have several ice cream recipes on this blog, but it’s never my first choice.
Of course, I’ll eat it, although I do tend to prefer it in the winter (probably more of that inherent rebellion I told you about earlier), but there are just so many other desserts I’d rather run five miles to work off. Like, cheesecake. Or doughnuts. Or cheesecake doughnuts.
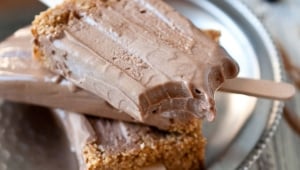
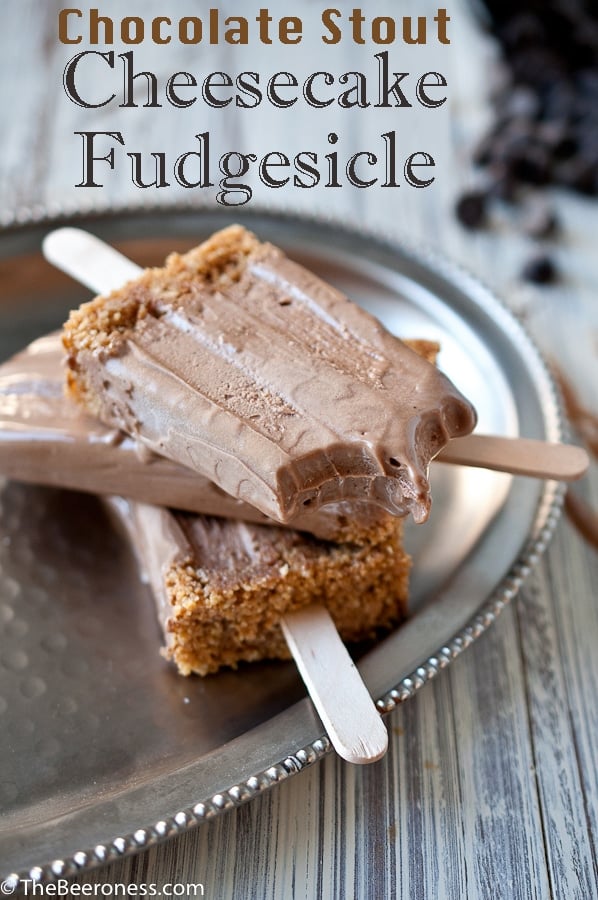
I love cheesecake. So this cheesecake version of ice cream, in pre-portioned sizes (this addresses my serious portion control issues) is just about the most perfect way to consume a frozen dessert.
And because the recipe only calls for 1/3 cup, you are going to have some stout left over that you’re going to have to figure out what to do with.
In a bowl (or a food processor) mix together the cream cheese, sour cream and powdered sugar until well combined.
Add the milk and stout, stir to combine.
Add the chocolate chips to a microwave safe bowl, microwave on high for 30 seconds, stir and repeat until melted. Pour the chocolate into the cream cheese mixture, stir until combined.
Pour mixture into popsicle molds, leaving about 1 inch of the top empty for the crust (if you don’t have popsicle molds, use small paper cups and popsicle sticks) tap the molds gently on the counter to remove air bubbles.
In a food processor add the graham crackers, process until only crumbs remain.
While food processor is running, add the melted butter in a slow stream until the mixture resembles wet sand.
Divide the crust evenly between the popsicles, press down gently to compact. Insert popsicle sticks, freeze for at least 6 hours and up to 3 days.
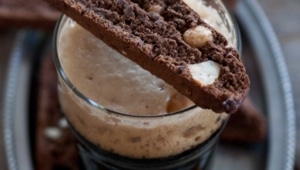
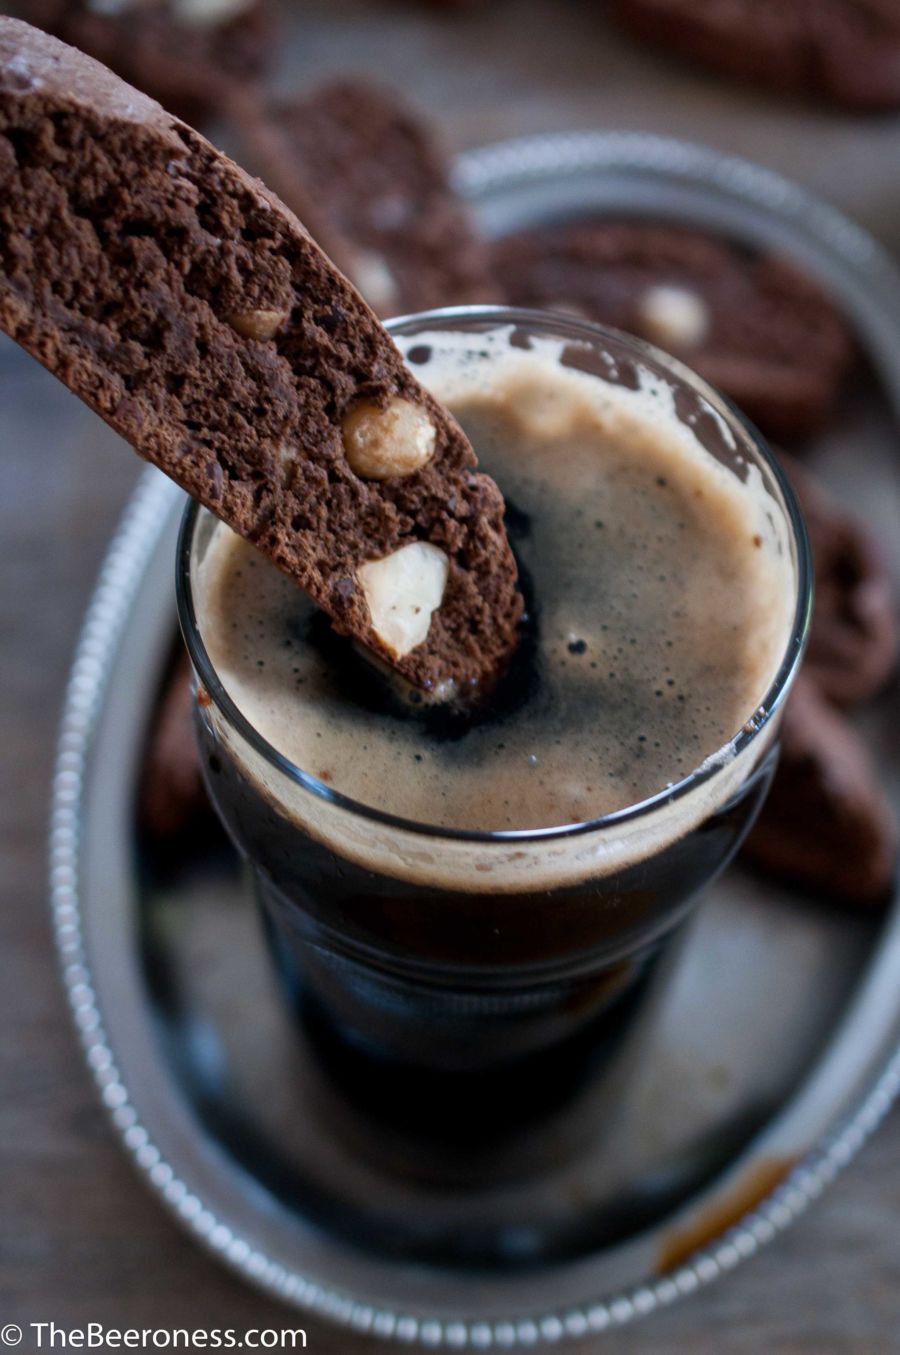
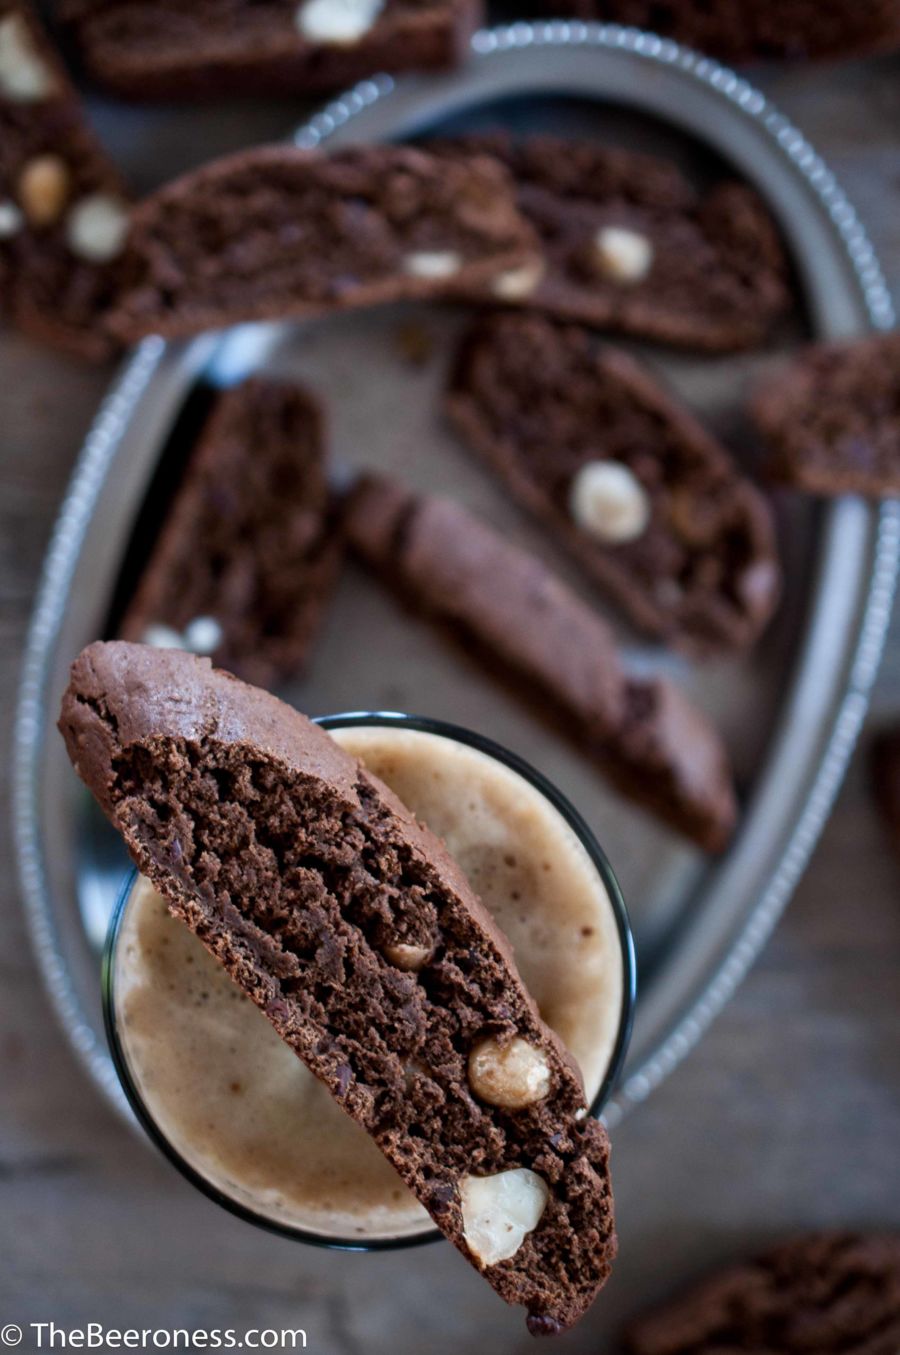
Something about this just isn’t right, it’s a cookie made to dunk in your beer. Who does that? Maybe I’m trying to start a beer cookie revolution that ends with crumbs at the bottom of your pint glass. Maybe I just liked the alliteration, or maybe this just ends up working. You’ll have to judge for yourself.
For this I wanted a big beer, with lots of roasted chocolate malt. Drakes Drakonic Imperial Stout works great, it’s a malty beast, as they say, and has those dry cocoa notes that work with the cocoa nibs and hazelnuts in the Beerscotti. It’s a sippin' stout, made for lingering and conversation, it’s not a beer that wants to be ignored.
But who can ignore the guy dunking a cookie in his beer? Not me.
In the bowl of a stand mixer, add the sugar and butter. Beat on medium high speed until well creamed.
Add the eggs and yolk, mix until mixture is pale and fluffy.
Add the stout, vanilla and almond, mix until well combined.
In a separate bowl whisk together the flour, cocoa powder, baking powder, corn starch, espresso powder and salt.
Sprinkle the dry ingredients over the butter mixture, mix on low until just incorporated. Stir in the hazelnuts and cocoa nibs.
Scoop half of the dough onto a baking sheet that has been covered with a Silpat or parchment paper that has been sprayed with cooking spray.
Shape into a log that is about 8 inches long and 2 inches wide. Repeat with the other half of the dough.
Bake at 350 for 30 minutes or until slightly firm to the touch. Cool for about 5 minutes. Cut diagonally into ¾ inch slices. Return to the baking sheet, cut side up.
Bake until slightly crispy, about ten minutes.
Cool on a wire rack.
Biscotti can be made up to three days ahead of time and taste the best 24 hours after baking. Store in an air tight container.
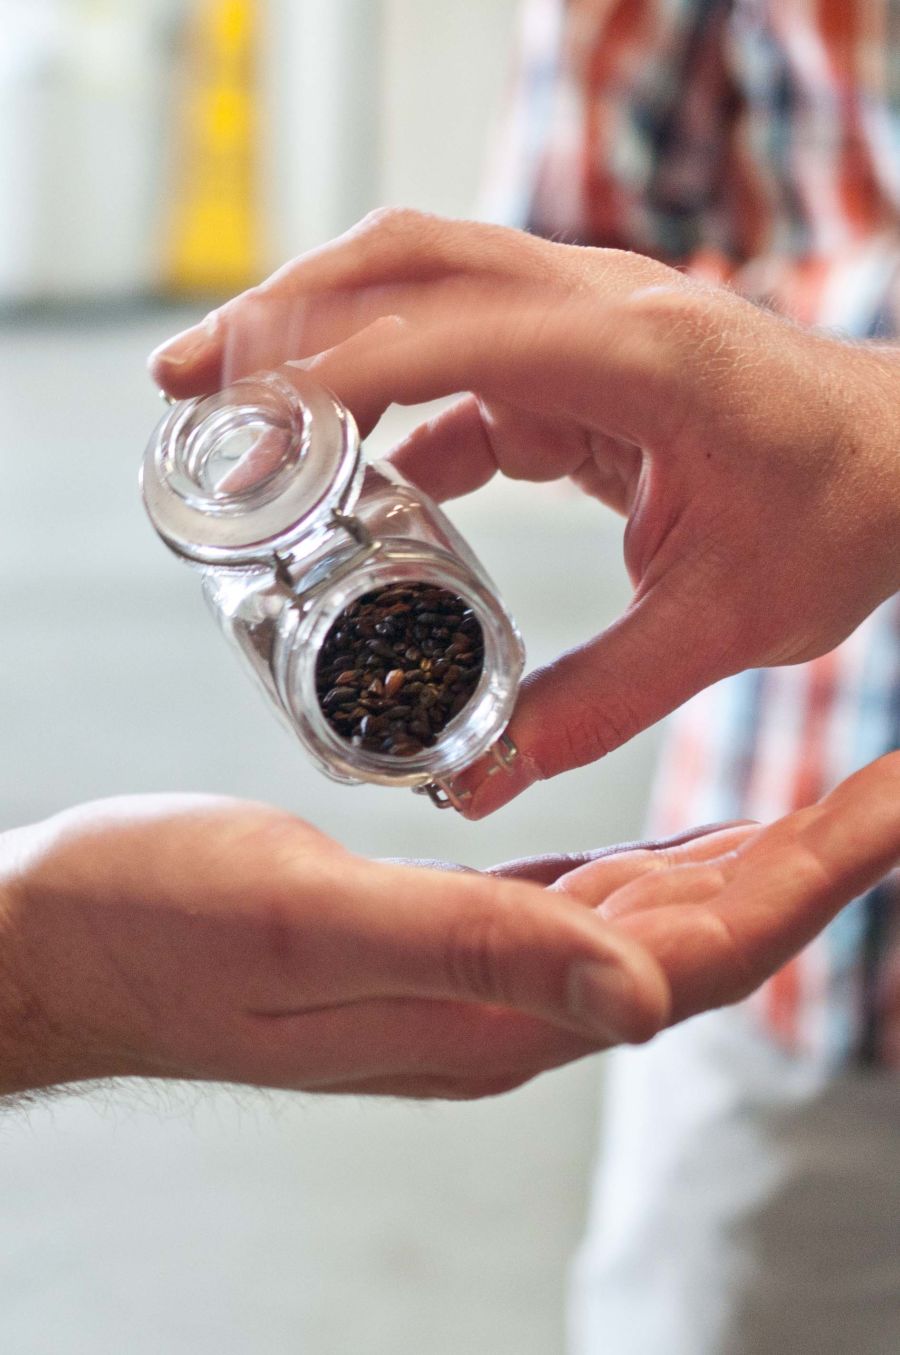
If you aren’t aquatinted with these Dark Knights, you might be under the impression that your beer will be like a tall glass of malty chocolate milk. For the most part, that isn’t the case. While I was at Hanger 24, those awesome guys let me taste some of the grains they use in their Chocolate Porter.
(By the way, neither of those hands are mine, I’m taking the photo)
It tastes, even pre-brew, more along the lines of unadulterated raw cocoa rather than a giant slice of cake. For me, this is great news. The flavors of cocoa (before the butter, cream and sugar are added) are dry and even bitter, making a great addition to the flavors of a stout. If you’re afraid of a beer flavored Yoo-Hoo, you’re in luck. For the most part, chocolate stouts grab those great dry flavors of that cocoa bean without that cloying sweetness of a dessert that you don’t really need in your pint glass.
Here are some of my favorite chocolate stouts and porters, please let me know if you have a favorite of your one:
Yesterday I was a guest on KCRW’s St. Patricks day episode of Good Food. The host was Evan Kleiman, a chef, author and Los Angeles food scene legend. She called my recipes, "smart," which if you are a home cook, sitting in front of an accomplished chef, is the best word you can hear.
We chatted about stouts, one of my favorite beer topics. Forget about pale lagers and green food dye, stouts are the life blood of St. Patrick’s day. In preparation for our stout conversation, I asked my Facebook readers what their favorite stouts are, and the response was amazing. My non-scientific poll concluded the most popular stouts among those who have clicked "like" on The Beeroness Facebook page are: Old Rasputin, Souther Tier Choklat, Lagunitas Cappuccino Stout and Founders Breakfast Stout. All of which would be amazing in this recipes, but I used Alaskan Brewing Smoked Porter. Just goes to show how many amazing dark craft beers there are in this nation. If you have a stout or porter that you love, let me know about it. I’m always up for a tall glass of dark beer.
Whatever you use, don’t forget to make it a chocolate bacon beer float.
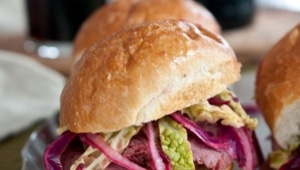
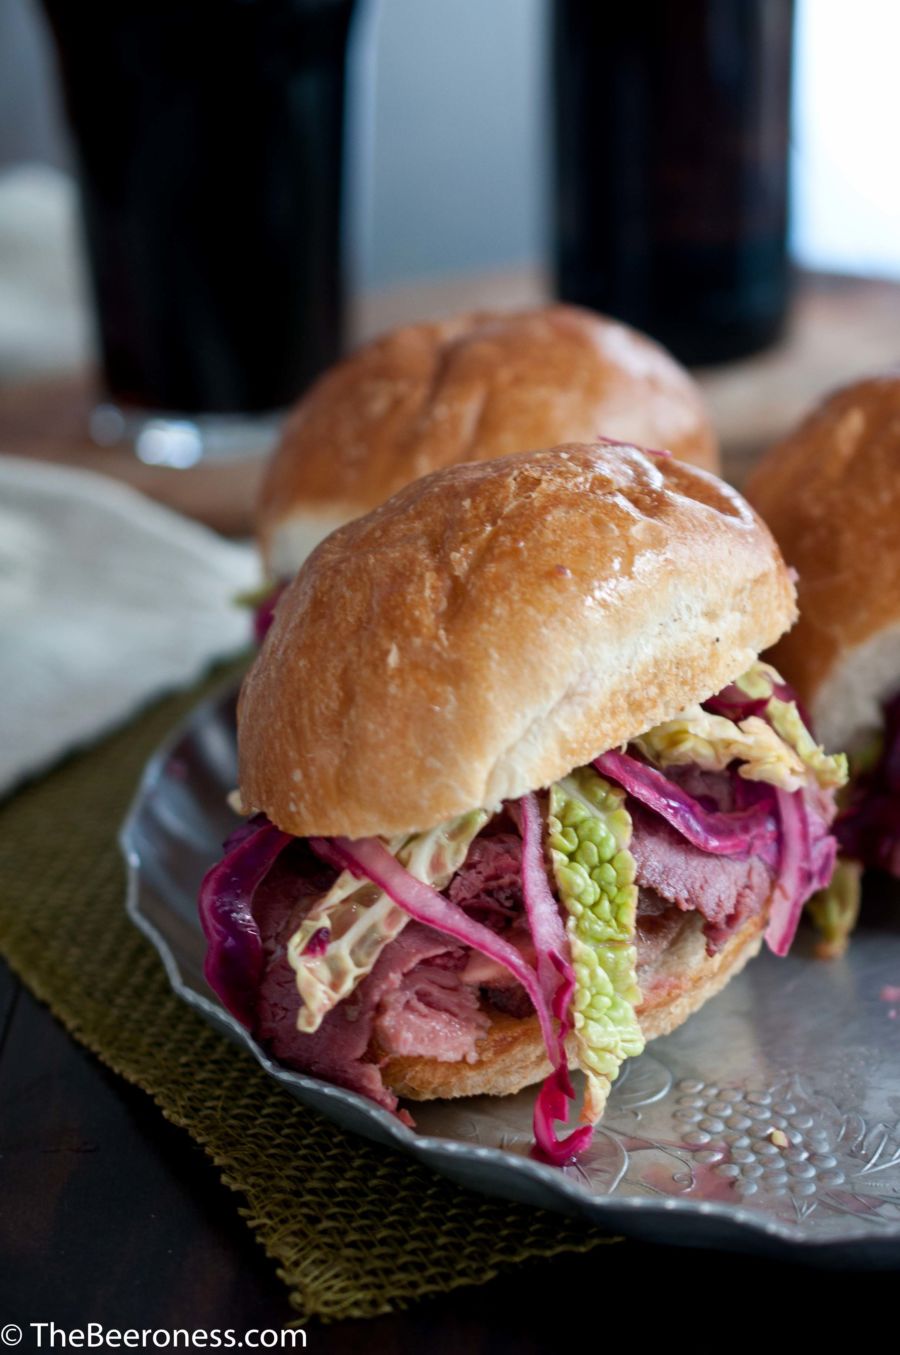
Beer Brined Corned Beer Sliders with Pickled Cabbage Slaw
I just turned my completed book into my publisher.
One hundred recipes, along with sixty-five photos, are now out of my hands. You’d think I’d be relieved, so did I, but I’m worried. I just let go of the summation of 90 percent of my waking hours from the past 4 months. It’s in someone else’s care, and that scares the crap out of me.
I have these momentary panics:
Did I make the pavlovas enough, do the directions make sense?
I say jackass in the book, will people hate that?!
Was I clear about how grateful I am for this, or will I come off as smug?!
I even worry about whether or not you’ll like it, as if I’m just an insecure school girl. I thought I would be relieved and elated, but I’m more anxious than I’ve been during this entire process. I want people to love it, to leave me glowing reviews on Amazon and tell their friends about how much they love it. I hope that happens, but for now, I’m still losing sleep.
For the time being, I have a St. Patricks Day recipe for you. I posted my veggie lovers St Patricks Day offering last week, but this one is about that corned beef we all associate with that Irish Holiday.
So if you will, drink a pint and say an Irish prayer for me and my forthcoming book.
Beer Brined Corned Beef Sliders with Pickled Cabbage Slaw
3tablespoonscuring saltthis will make the meat pink
3tbswhole allspice berries
1tbswhole cloves
1tbsground ginger
2tbsmustard seeds
2tbswhole peppercorns
1yellow onionquartered
2cupswater
312 ounces bottles of stout
8cupsice
Pickled slaw:
2cupred cabbageshredded
2cupsavoy cabbageshredded
½red onionthinly sliced
1/3cuplemon juice
2cupsapple cider vinegar
1tbskosher salt
3tbspsugar
¼tspgroung ginger
2tbswhole dried allspice berries
2tspwhole cloves
2tspblack peppercorns
_
12soft potato dinner rollssplit to resemble hamburger buns
Instructions
In a large pot or Dutch oven, add brown sugar, 3 tbs curing salt, 1 cup kosher salt, 3 tbs allspice berries, 1 tbs cloves, ginger, mustard seeds, 2 tbs peppercorns, along with 2 cups of water.
Cook on high just until the salt and sugar dissolve, remove from heat. Add 2 bottles of stout (reserve the last bottle for cooking) and 8 cups of ice, stir until ice has melted and brine is cool.
Add the brisket, cover with lid and refrigerate for 3 days and up to 10.
Remove from brine and rinse well. Discard the brine and clean the Dutch oven well.
Place the brisket back in the cleaned pot, along with the onion, pour the remaining bottle of stout and then cover with cold water until the brisket is fully cover with one to two inches of water above the beef.
Bring to a low boil, cover and reduce heat to maintain a gentle simmer. Simmer for 3 hours or until the meat if fork tender. Move to a carving board, thinly slice against the grain.
While the brisket cooks, make the pickled slaw. In a sauce pan over medium heat, add the lemon juice, vinegar, salt, sugar, ginger, allspice, cloves and peppercorns in a pot. Bring to simmer just until the salt and sugar dissolve, remove from heat. Allow to cool to room temperature. In a large bowl, add the cabbage and onion. Pour the cooled pickling liquid over the cabbage and onion, refrigerate for one hour.
Slightly warm the buns, fill with corned beef and slaw before serving.
A bunch of years ago I was in Dublin, Ireland for the St. Patricks day celebrations. I had flown over from LA, with only two nights booked at the Brewery Hostel at the base of the Guinness brewery. The night of the festival I was without a room, all at once ecstatic to be in Dublin for the Merriment and panicked to be without a place to stay.
I had three options.
1. Through a friend of a friend twice removed, I was connected with an Irish man willing to take me in for the night.
2. I had met some lovely Australians who were working on renovating a flat in town, but it was completely empty of any furniture and the electricity and water were both shut off, but it was walls and a roof.
3. Wander the streets for the evening, falling in and out of pubs, until I pass out on the street with some of the more rowdy locals.
I hesitantly opted for option one. If you have ever been a young girl with a backpack and a guidebook in a foreign city, I don’t need to underscore the concerns I had with this set up. Lucky for me, this man was Irish to the core: friendly, hospitable and a perfect gentleman.
I spent most of the evening running around Dublin, from pub to pub, drinking the local beer (Guinness), probably offending the bartenders by tipping them (not a custom in Ireland, "Would you tip your doctor?!") and watching the locals swell with patriotic pride as fireworks burst over the River Liffey in the heart of Dublin.
All of this, the people who welcomed me in, the beer that warmed my soul, and the celebration that swirled around me, will always give me a deep love for Ireland and Her people.
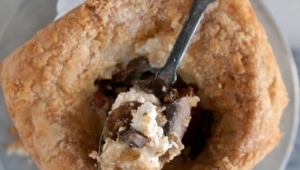
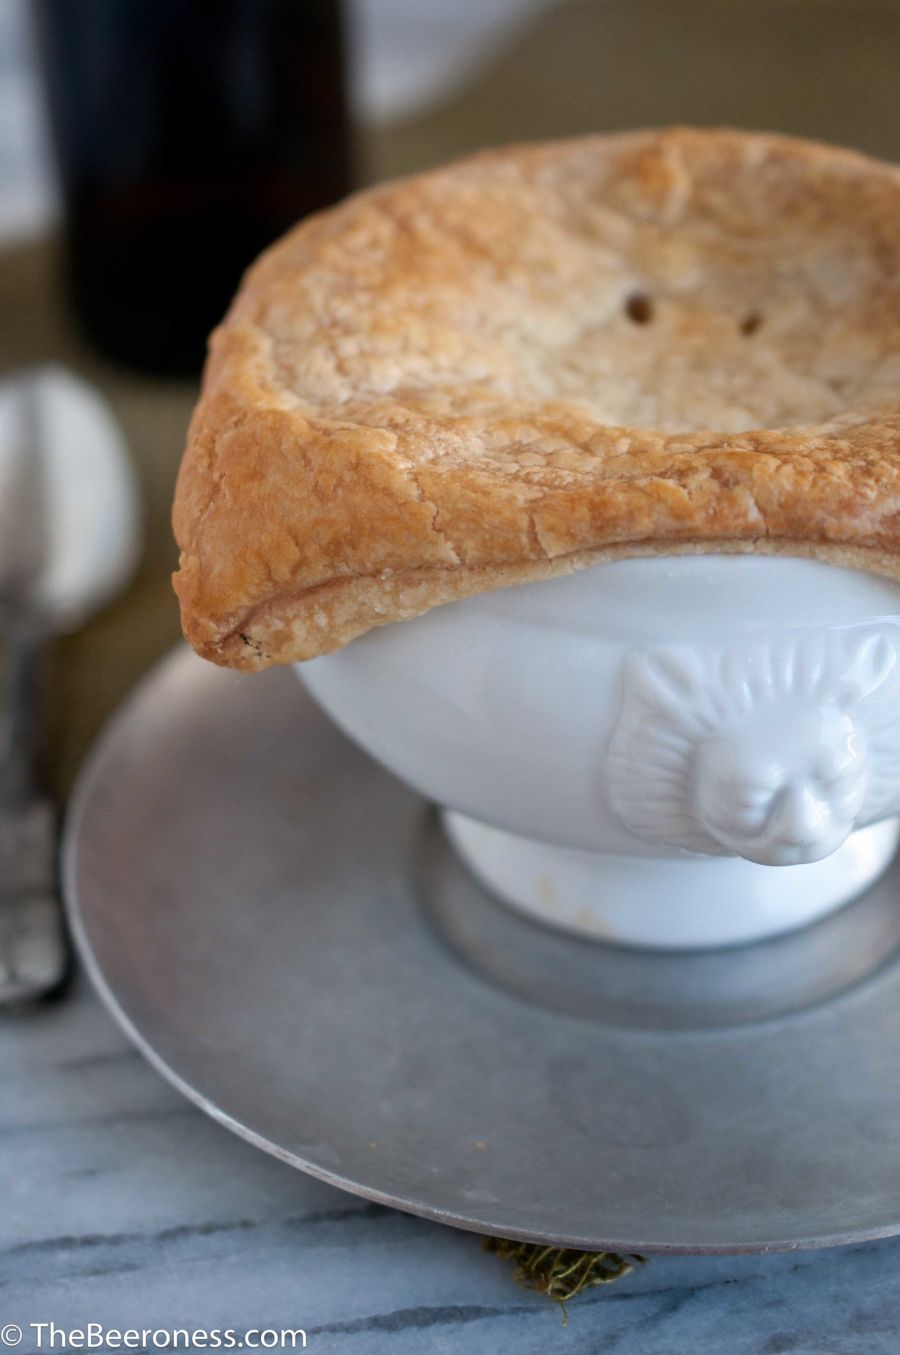
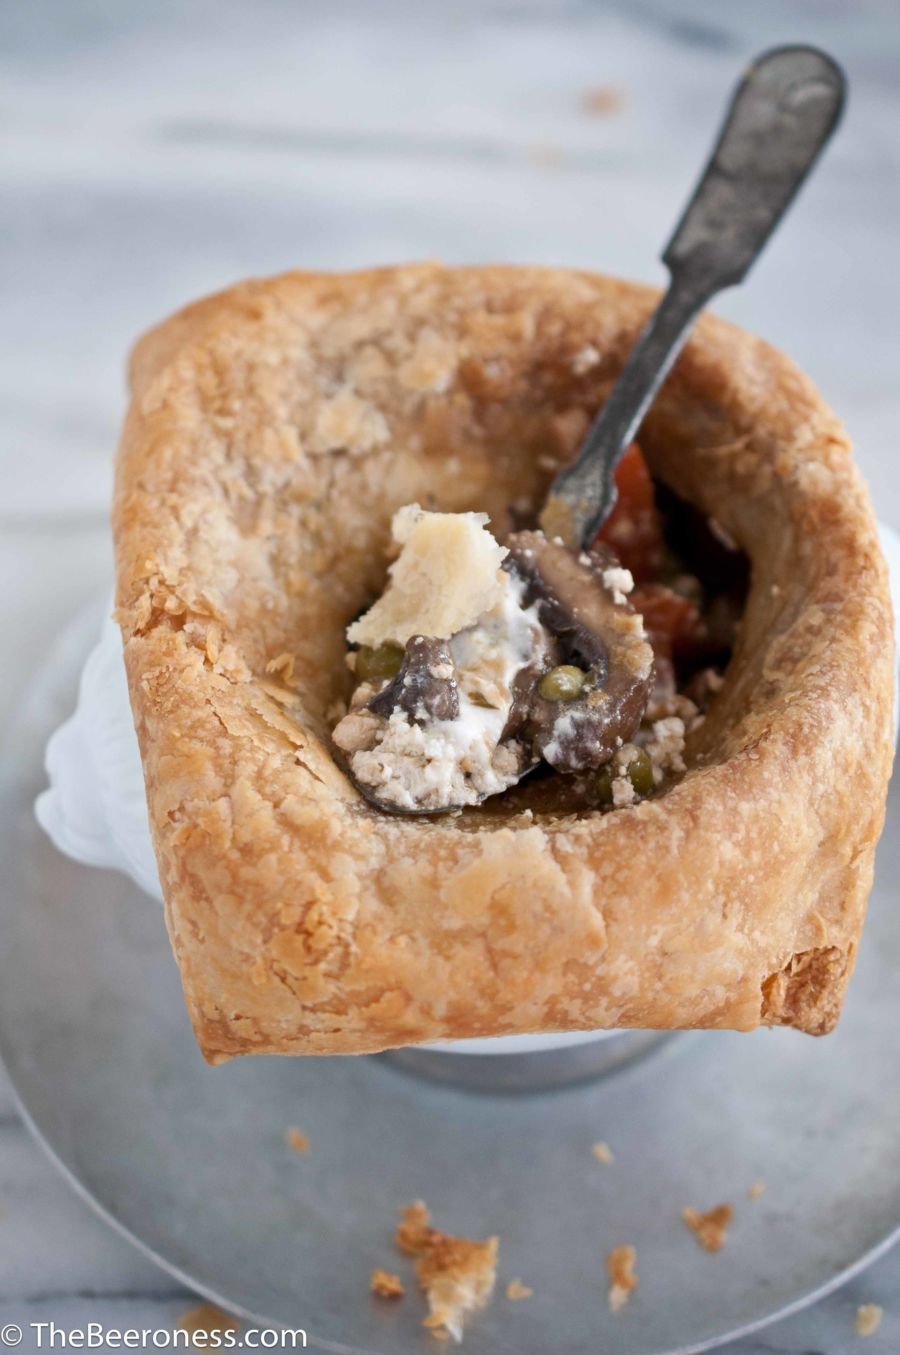
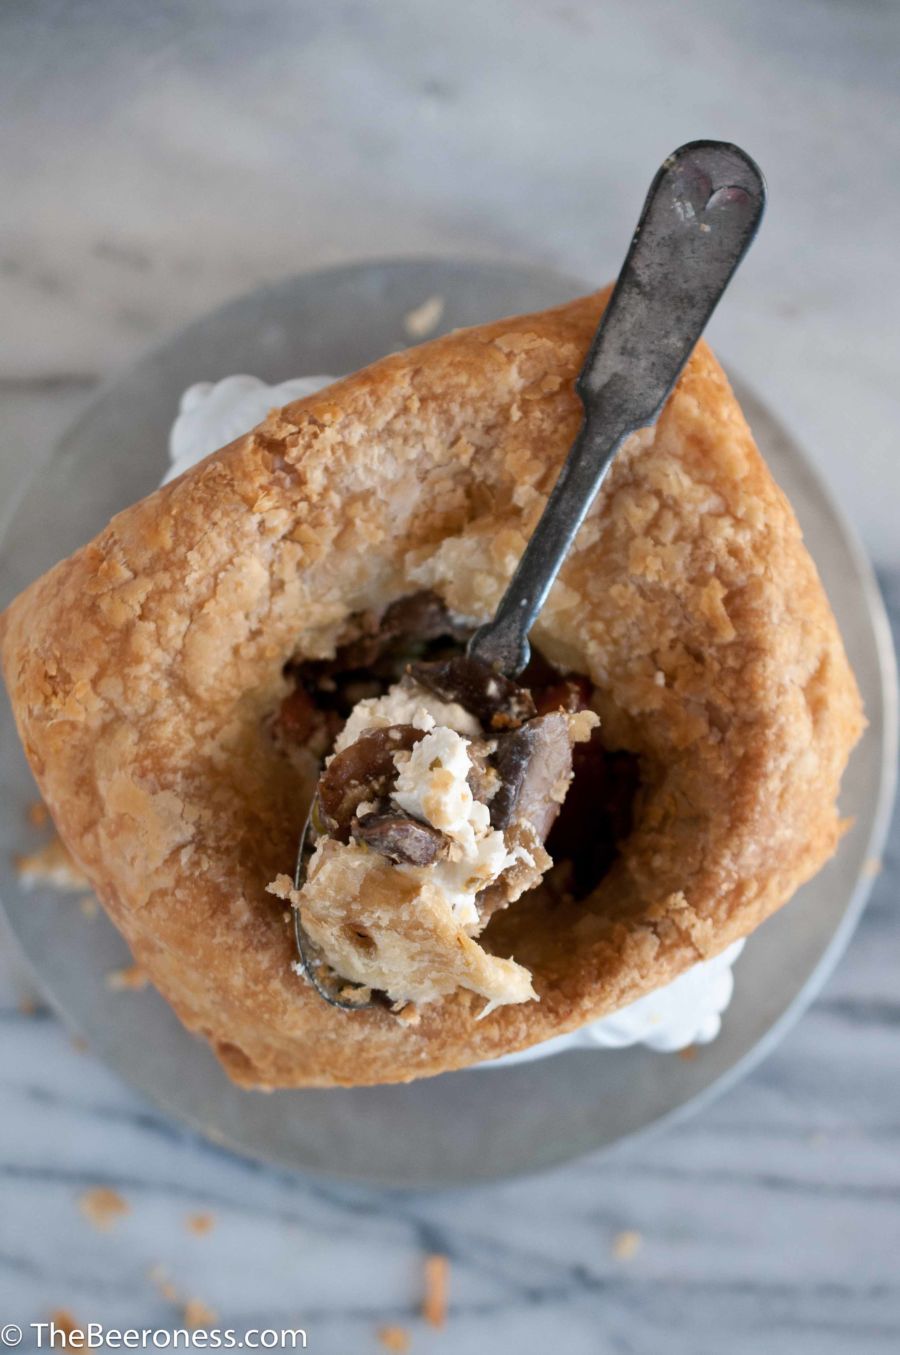
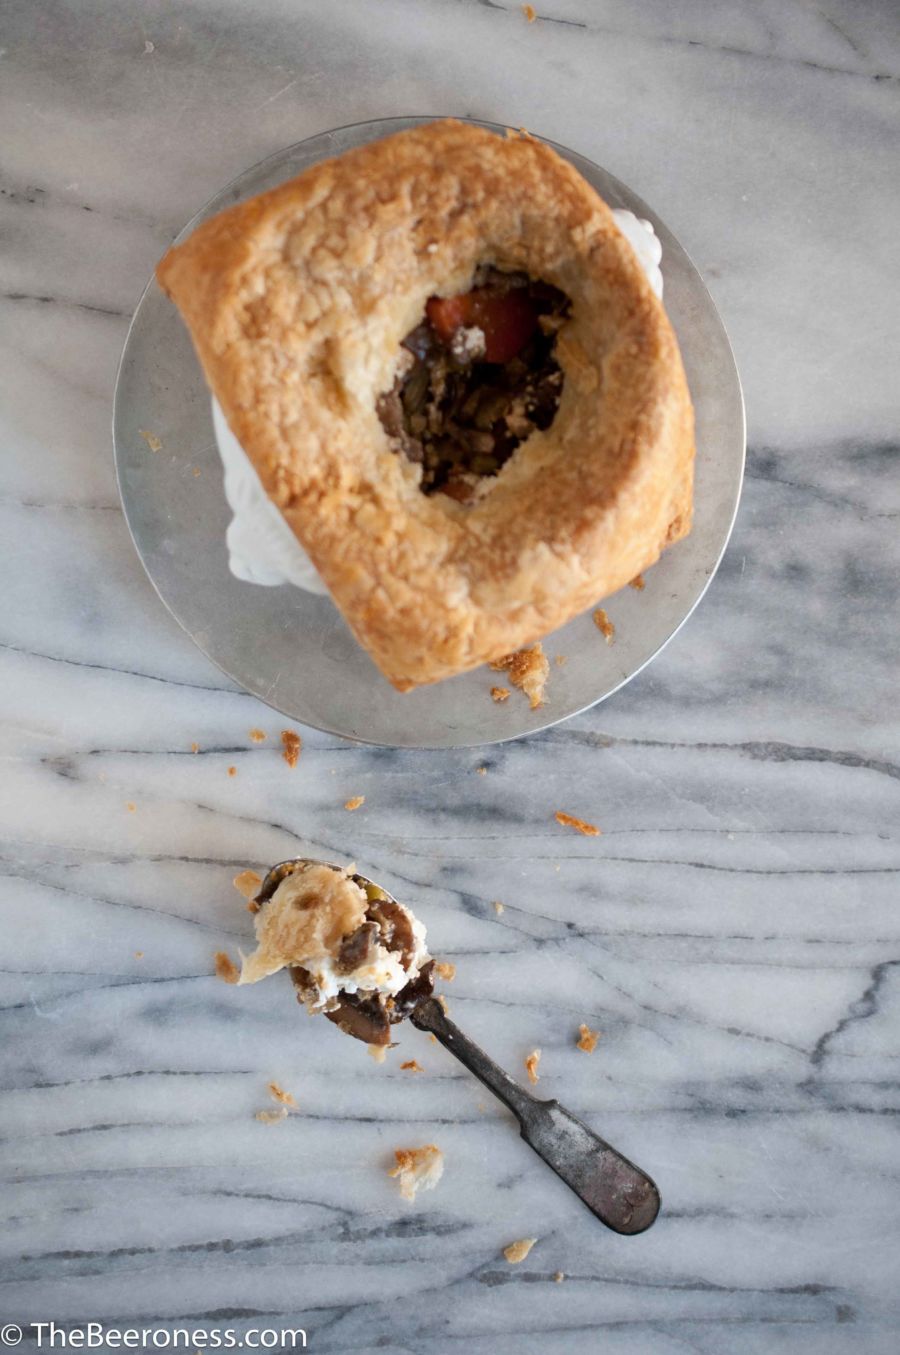
In a large skillet, heat the olive oil. Add the carrots, leeks and celery, sauté until the carrots start to soften.
Add the mushrooms and cook until softened and darkened, about 5 minutes (add additional olive oil if the pan starts to dry).
Add the peas, broth and stout. Bring to a simmer. Sprinkle with flour, stir to combine. Stir in the oregano, pepper and salt. Cook until thickened, about 2 minutes, remove from heat.
Divide evenly between 6 oven safe (12 to 14 ounce) serving bowls, sprinkle with crumbled goat cheese.
Roll out puff pastry on a lightly floured surface, cut into 6 equal squares.
Top each bowl with one square, press into shape.
Brush with melted butter, slice 3 to 4 small slits in the top of each bowl.
But that being said, I ate it at 3 in the afternoon (mostly because I wanted to make it for you, and I refuse to photograph using artificial light, necessitating a mid-day desert for picture taking purposes).
Breakfast in my land, is savory. Although I occasionally indulge in sugar loaded calorie bomb in the morning hours only because for some reason it’s socially acceptable, but if we step back and look at it objectively, this is dessert.
Since I put beer in your breakfast on multiple occasions (Like this, and this and don’t forget about this), I would never judge you for eating this pre-noon. BUT, it’s dessert. And it needs to be served with a stout that’s almost warm. Maybe a sipin' stout that’s been aged in a bourbon barrel, or a smokey porter.
But it’s definitely dessert. Even if you eat it in the middle of the day.
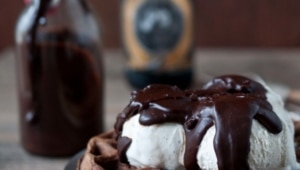
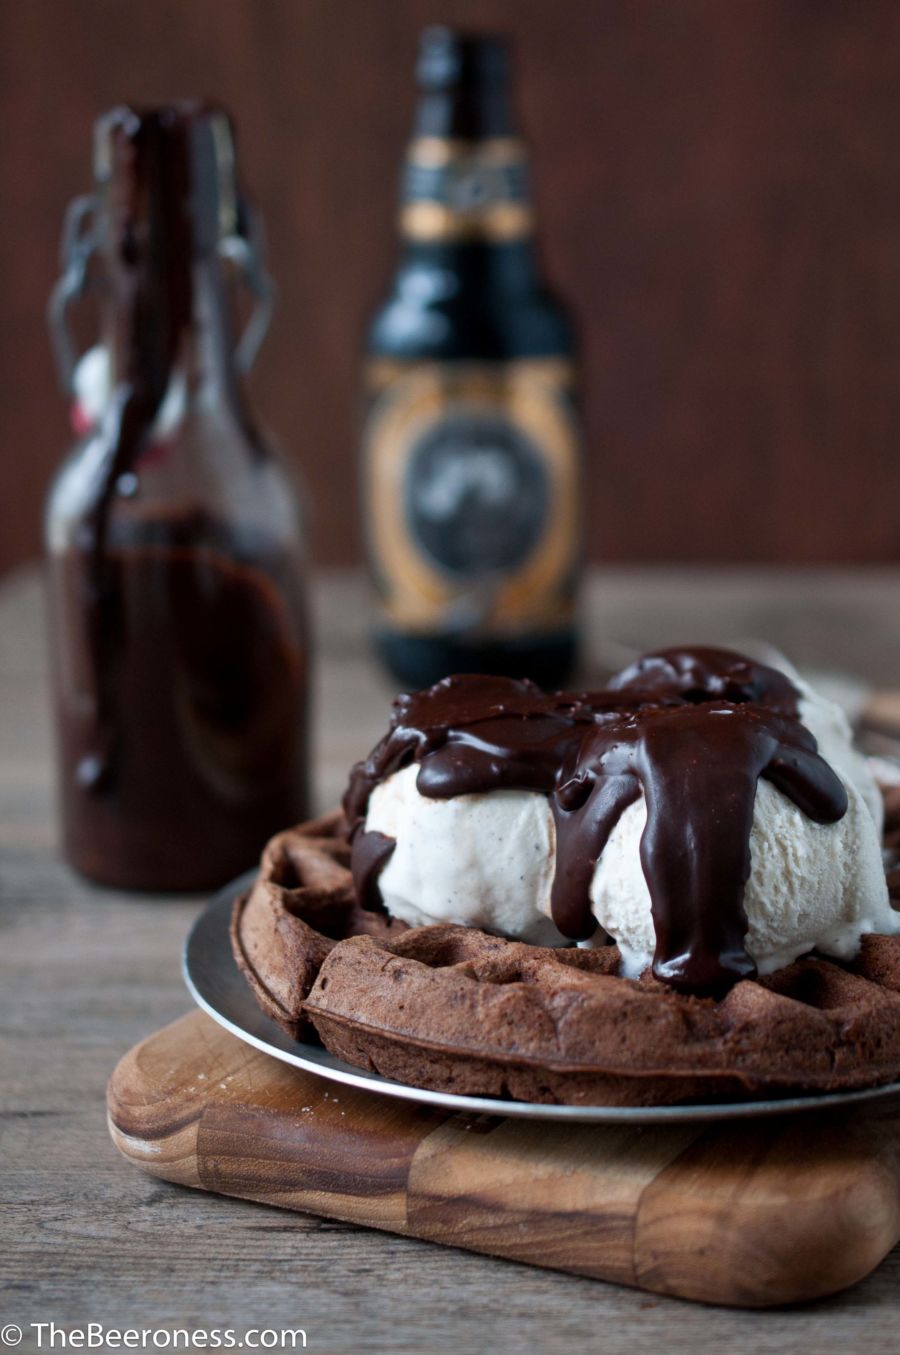
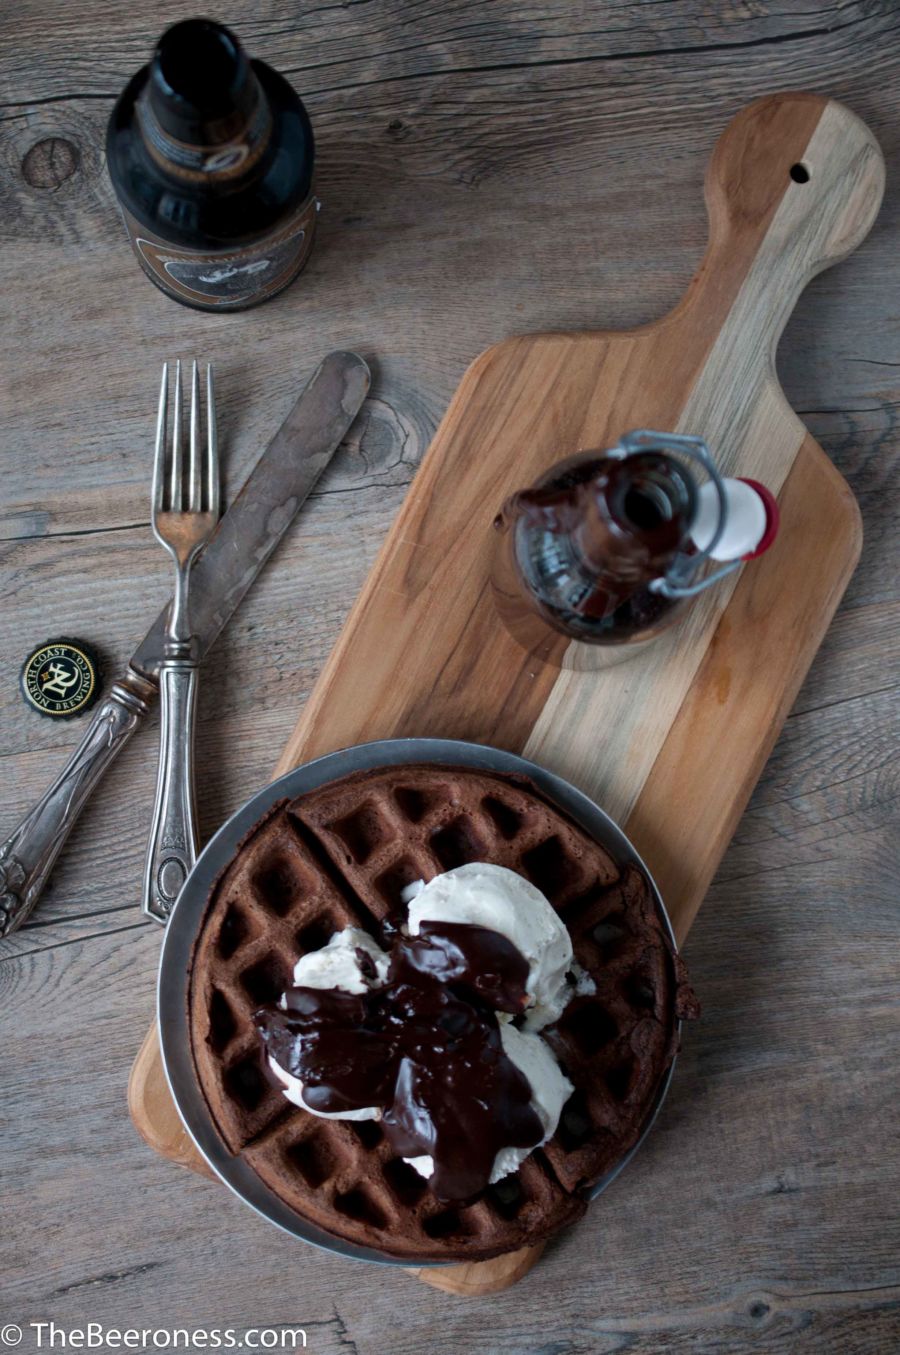
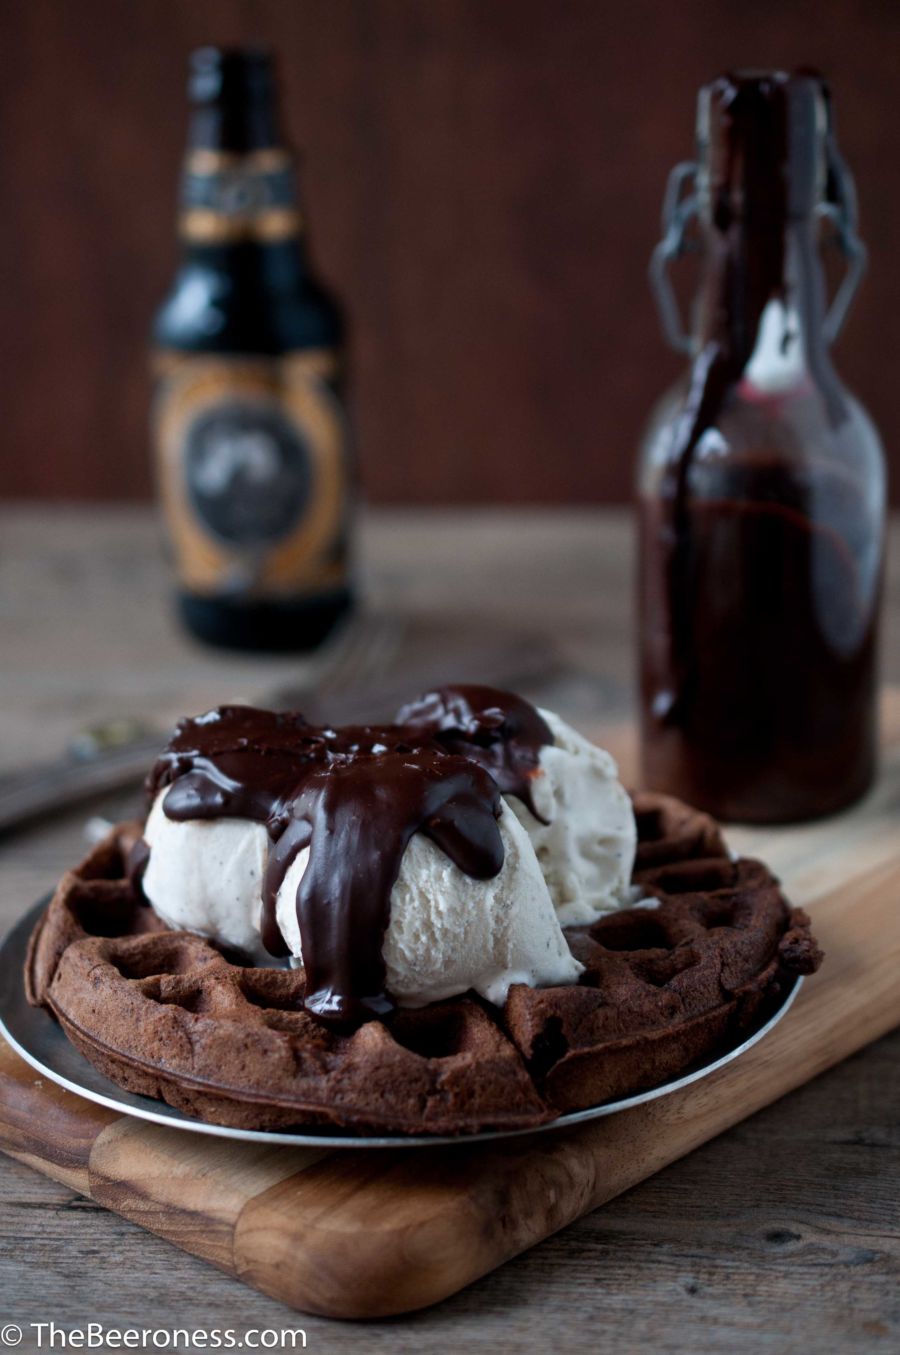
Chocolate Stout Waffle Sundae with Chocolate Stout Fudge Sauce
Add the butter, 1/2 cup stout and corn syrup to a sauce pan. Cook over medium high heat until butter has melted and the mixture has just started to boil.
Turn off heat and stir in 1 cup chocolate chips until completely melted. Allow to cool slightly before using.
Preheat waffle iron according to manufacturers specifications.
In a large bowl add the flour, baking powder, cocoa powder, and salt, stir.
In a microwave safe bowl, add the chocolate chips and milk. Microwave for 30 seconds, stir and repeat until melted. Stir in the beer, vegetable oil, vanilla and only the yolks of the two eggs.
Add the whites to separate bowl, along with the sugar. Whip with a hand mixer until soft peaks form, about 5 minutes.
Make a well in the dry ingredients, add the chocolate milk mixture and stir until just combined. Gently fold into the egg whites until just incorporated.
Cook in waffle iron according to manufacturers specifications, using butter flavored cooking spray if indicated.
Plate waffles, top with desired amount of ice cream, drizzle with chocolate sauce. Serve with a malty stout.
When you write, reading isn’t important, it’s essential. Unfortunately, my days are packed too full and reading has become a rare luxury. All due in no small part to the fact that I’m not only writing a cookbook (due to my publisher at the beginning of next month) I’ve also started writing for a print magazine as well as two other websites. Once I can, at least, check "cookbook" off my to-do list, I can get back to being a normal human and indulging in reading, and sleep, and all those sorts of activities that I’m currently ignoring.
I’m making a list, I thought I’d share. About a month ago, I posted on The Beeroness Facebook page asking for suggestions for beer books. Since you all are so amazing, the list has been growing.
Beer & Food:
The Brewmaster’s Table: Discovering the Pleasures of Real Beer with Real Food, Garrett Oliver
Beer, Food, and Flavor: A Guide to Tasting, Pairing, and the Culture of Craft Beer, Schuyler Schultz
The Craft of Stone Brewing Co.: Liquid Lore, Epic Recipes, and Unabashed Arrogance, Randy Clemens & Steve Wagner & Greg Koch
The Oxford Companion to Beer, Garrett Oliver
Beer Non-fiction:
America Walks into a Bar: A Spirited History of Taverns and Saloons, Speakeasies, Christine Sismondo
Ale, Beer, and Brewsters in England: Women’s Work in a Changing World, Judith M. Bennett
Boozehound: On the Trail of the Rare, the Obscure, and the Overrated in Spirits, Jason Wilson (beer & liquor)
The Search for God and Guinness: A Biography of the Beer that Changed the World, Stephen Mansfield
Bitter Brew: The Rise and Fall of Anheuser-Busch and America’s Kings of Beer, William Knoedelseder
For The Homebrewer:
The Naked Brewer: Fearless Homebrewing Tips, Tricks & Rule-breaking Recipes, Christina Perozzi & Hallie Beaune
For The Love of Hops: The Practical Guide to Aroma, Bitterness and the Culture of Hops, Stan Hieronymus
Brew Like a Monk: Trappist, Abbey, and Strong Belgian Ales, Stan Hieronymus
IPA: Brewing Techniques, Recipes and the Evolution of India Pale Ale, Mitch Steele
In a small bowl, combine the brown sugar, black pepper, salt, cayenne, and smoked paprika.
Pat the roast dry. Rub with spice mixture.
Heat olive oil in a Dutch oven, or other large oven safe pot, until hot but not smoking. Add the roast, sear on all sides. Pour beer and broth over the meat. Cover and roast in oven at 325 for 3 hours or until very tender. Move meat to a cutting board.
Place Dutch oven back on the stove. Bring to a boil, stirring occasionally, until slightly reduced, about 10 minutes.
Shred meat using two forks. Split rolls, fill with meat. Spoon a bit of sauce over the meat. Serve remaining broth in bowls with sandwiches for dipping.
If you’re new to the Craft Beer scene, it might surprise you how many vegetarian and vegans there are here.
While I am a meat eater (clearly, I put bacon in desserts), I did spend three years as a vegetarian. Mostly, this was a response to growing up on a farm and getting up close and personal to the butchering process as well as the jarring realization of knowing the first name of my dinner. It did, however, give me a profound respect for the food I eat and the farms that share that respect.
I still eat vegan quite often, and there are some dishes, like lasagna, that I just think are just better in vegetarian form.
My true and honest feeling about vegan cooking is that regardless of what your typical diet is if you can’t cook a vegan meal that you love, you just aren’t that good of a cook. Produce is amazing, you get to use all the grains, seeds and nuts that you want and by the way, for the most part beer is vegan.
I first heard about Cashew Cream from this guy, and the idea was intriguing, given that I would have a much easier time giving up meat than sour cream and goat cheese. I like the idea of having a creamy element when I want to go non-dairy. This cashew cream was a really beautiful creamy addition to a vegan chili, when sour cream isn’t an option. I wanted to balance the sweetness so I added some acid and some spices, but feel free to experiment. This would also be a great place to add a little chipotle.
Add the cashews to a bowl, pour almond milk over cashews until covered. Let stand for 4 hours.
Drain cashews and add to a food processor with 1/3 cup almond milk, IPA, salt, pepper, onion powder, garlic powder and vinegar. Process until smooth, about 5 minutes, possibly longer. Add additional almond milk or beer for a thinner consistency.
In a pot over medium high heat, add the olive oil, onions, red peppers and mushrooms. Cook until onions and peppers have softened and the mushrooms have darkened.
Add the garlic and the soyrizo, stir, breaking up the soyrizo.
Add the stout, broth, tomato paste, black beans, kidney beans, tomatoes and chipotle, allow to simmer for about 10 minutes.
Add the quinoa, bulgur, cumin, smoked paprika, salt and garlic powder, simmer until the quinoa has cooked, about 15 minutes. The longer chili simmers, the thicker it will be.
Plate on top of tortilla chips, if desired, top with cilantro, avocado, and cashew cream.
I’m somewhere around halfway done with this cookbook, and I need some feedback. I have about 50 recipes ready to go, but they have never been cooked outside of my kitchen.
I want to know if they work for you, if you like them (or didn’t), if the directions make sense. This part is important to me, it increases the chances that we can catch some of the flaws, some of the directions that may be misleading, or some factor I might have overlooked.
This book means so much to me, and the recipes working for as many people as possible is a high priority.
And I can’t do this on my own. If you are willing to make one (or more) of the Top Secret recipes I have in the works, keep it secret until the book goes to print, and give me your honest opinion, I need that.
If you’re at all interested, Please, check out my Book Page for more info. Please.
3cupsmini pretzels twistslightly crushed (about 1 ½ cups once processed)
2tbsbrown sugar
½cupmelted butter
24ouncescream cheese
½cupsour cream
pinchsalt
2tbsflour
1 ½cupsgranulated sugar
2eggs
½tspvanilla
Instructions
Place dried cherries in a bowl or tall glass. Pour stout over cherries until fully submerged. Allow to sit at room temperature for 1 to 2 hours. Drain, reserving ¼ cup of the soaking liquid.
Preheat oven to 400.
In a food processor, add the pretzels and brown sugar, process until only crumbs remain, about 3 to 5 minutes. Slowly add the melted butter while the processor is running. Pour into the bottom of a 9 X 13 inch baking pan. Use the flat bottom of a heavy glass, measuring cup or mug to press the crust really well into a flat even layer.
In the bowl of a stand mixer, add the cream cheese, beat on high until creamy, about 3 minutes. Add the sour cream and beat until well combined. Add the salt, flour and sugar, mix until well incorporated. Add the eggs and vanilla, one at a time, mixing well between additions. Add ¼ of the stout used to soak the cherries, mixing until just incorporated. Stir in the cherries.
Pour cream cheese mixture over the crust, smooth out into an even layer.
Place in the oven and reduce oven temp to 350. Bake at 350 for 28-32 minutes or until the cheesecake has puffed slightly and center no longer jiggles when you shake the rack it sits on. Don’t over bake, it will firm up once it chills. Remove from oven (allow to stand at room temp until slightly cooled, about 10 minutes) refrigerate until chilled and set, at least 4 hours and up to 24. Cut into squares for serving
I’m so glad I can share this recipe with you. I’ve been working like a crazy person to develop and test recipes that I fall in love with but I can’t share them with you because I need to save them for the cookbook.
And, of course, I’m putting a tremendous amount of pressure on myself to make each recipe a home run.
Because once you buy the book, and actually pay for the recipes, I want them all to be amazing. This, my friend, is a huge amount of pressure on me and the limits of my culinary creativity.
But then I get these crazy ideas, like putting crushed Chicharrones on top of chili and I can’t even wait to share it. I have to post it as soon as possible, even pushing back a more "seasonally appropriate" post because I want to show you this.
And Chorizo, with its spice and fatty goodness, is perfect in chili. In fact, I pretty much raided the "C" section of my local Mexican food market (there isn’t a "C" section, by the way, but there should be) to bring you a dish with chipotle, chorizo, chicharrones, cilantro, cheddar and cumin.
And then I ate three bowls before I could even share it with anyone.
If I was planning on tailgating anytime soon, I would make this in huge vats.
And if you are a "beans in your chili" kind of guy, go ahead and throw some in, I won’t mind.
Or add some sour cream, if that’s your thing.
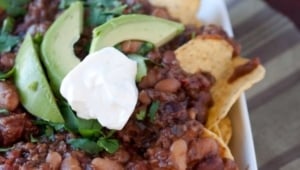
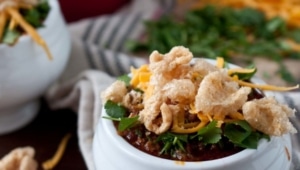
Chipotle Stout and Chorizo Chili Topped with Pork Rinds
1chipotle pepper in adobofrom can, minced plus more if desired
1tspadobo sauce
½tspsmoked paprika
1tspblack pepper
1tspcumin
2tbsWorcestershire sauce
Toppings:
1cupcheddar cheeseshredded
½cupcilantrochopped
2cupsChicharronespork rinds, lightly crushed
Makes 4-6 servings
Instructions
In a large pot or Dutch oven, heat the olive oil. Add the onion and bell pepper and cook until onion softens but isn’t browned, about 5 minutes.
Add the chorizo and beef, cook until meat starts to brown. Add the garlic and stir.
Add the beer, diced tomatoes, one chipotle pepper, adobo sauce, smoked paprika, pepper, cumin and Worcestershire sauce. Allow to simmer for about 30 minutes, until thickened. Add additional chipotle peppers as desired to raise heat level.
Pour into bowls, top with cilantro, cheddar and Chicharrones.
If you Follow me on Twitter, you probably already know the Big News.
I signed a book deal on Thursday. A publisher has actually decided to pay me to write a cookbook.
How amazing is that?
Writing a cookbook has long been on my list of goals, and as I somewhat naively and idealistically jump into this process, I am reminded that it is you I have to thank for this milestone. The ones who share my posts, tell their friends about my little blog, believe in what I’m doing here, the ones who read every silly word I write, and yes, even those of you who write creepy comments about wanting to wake up in my bed and email me about how you google stalk me on a weekly basis. I am grateful for all of you.
This isn’t just my book, it’s yours too. The ideas you give me, the way I’m inspire by your questions and humbled by being seen as a source of knowledge and beer-cooking wisdom.
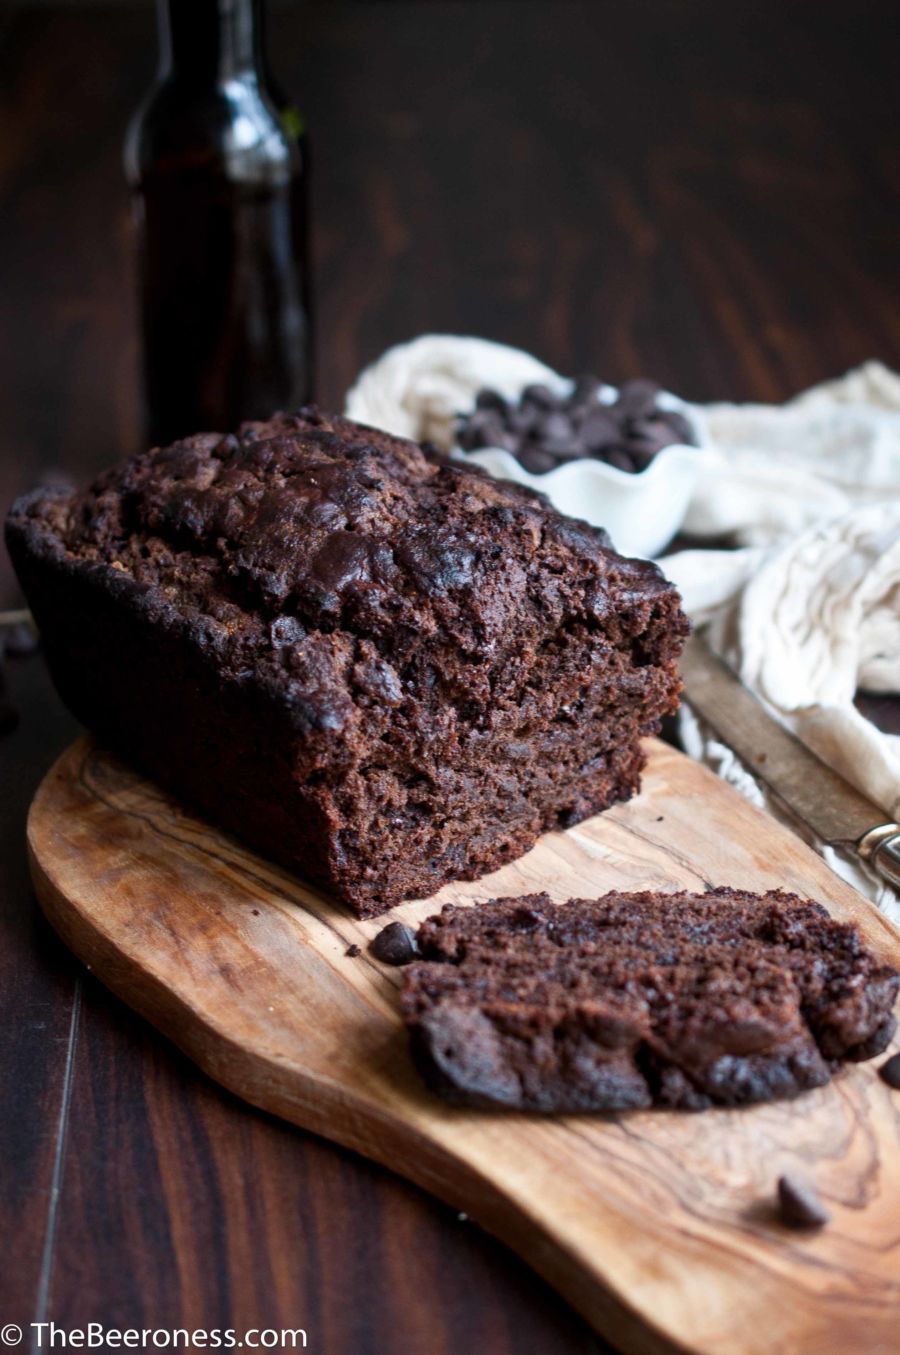
I wish I could properly thank you all, over a beer and some possibly inappropriate conversation. But for now, we’ll have to settle for some Creme Brulee Brownies made with two different types of beer. Which seems to be fitting, since chocolate stout was the first beer I ever cooked with and creme brulee was the subject of my first post. It’s an homage to my beer cooking beginnings, hope you like it.
If you are at all interested in helping me with this book, as an un-paid but thoroughly appreciated, recipe tester, for which you will receive my undying love and affection, a mention in the book, a sneak peek at never-before-seen-recipes, and possibly more, stay tuned. Once we get to that place, I’ll let you know how you can be my beer cooking partner in crime.
1vanilla beansplit and scraped or 1/4 tsp vanilla bean paste
3eggs plus 2 yolks
1/2cupsugar
2tbscorn starch
Plus 1/4 cup sugar for the brulee topping
Instructions
Preheat oven to 350.
In the bowl of a stand mixer, beat the 3 eggs, white sugar, brown sugar and vanilla on high for at least ten minutes. You need a meringue type consistency in order to create a crust on top of the brownies to insure the layers stay separate. In a separate bowl, add the flour, cocoa powder, espresso powder and salt, stir to combine.
In a microwave safe bowl, add the butter and the chocolate. Microwave on high for 30 seconds, stir and repeat until melted.
While the stand mixer is on medium speed, slowly add the chocolate until mostly combined. Add the beer and stir. Add the flour mixture and stir until just combined.
Grease and flour a 9x13 inch baking dish. Pour batter into dish and smooth out the top. Bake at 350 for 25 minutes or until the top is matte and a bit cracked. Don't over bake.
Allow to cool to room temperature.
For the creme brulee layer:
In a sauce pan over medium heat, bring the cream, beer and vanilla to a slight simmer, removing from heat when bubbles start to form around the edges. Remove from heat and allow to cool to room temperature.
In a separate bowl, whisk the 1/2 cup sugar, eggs and yolk, and cornstarch until well combined and slightly frothy.
While continuing to whisk the egg mixture, slowly add the cream and whisk until well combined. Make sure the cream has cool or you will just have created vanilla scrambled eggs.
Return the cream to the stove and stir over medium heat until it comes to a low simmer. Continue to whisk until thickened, between 5 and 10 minutes. The cream should leave a track when you drag the whisk through it. Allow to cool to about room temperature.
Pour over the brownies, cover tightly with plastic wrap and chill until set, about 1 hour.
Just prior to serving, cut into squares, cover with a light layer of white sugar and brulee the top with a kitchen torch until the sugar has melted and turned a dark amber color.