Mr. Fits loves the idea of homemade doughnuts. In fact, one of the first conversations I ever had with him was about how he wanted to own a bar that served high end doughnuts. And it only took us 15 years to make our first attempt at making these ourselves. I do have to pause a second to talk about the deep fryer. Mr. Fits is super excited about this deep fryer, he even did research. He’s more of an impulsive shopper when it comes to…well, just about everything so I was VERY impressed that he spent so much time reading product reviews before hitting the BUY button. I was NOT excited about the fact that he bought it about 3 months after I had Tater and was JUST about to lose that last 3 pounds of baby weight. Due to tempura batter and deep frying everything that wasn’t nailed down, those last three pounds did take me another 3 months. Totally Worth it.
Heat up your deep fryer to 350 or you can heat up oil in a big pot on your stove until it reaches that temp, adjusting the heat to maintain it.
First, proof the yeast. Yeast hates me, I always have trouble with it so I let Mr. Fits do it. Yeast likes him and always proofs for him. in a small bowl add 3 tbs of water that is between 100-110 degrees. sprinkle with 1 package of dry active yeast (.25 ounce) and let it get foamy, about 5 minutes.
Then in a large bowl combine:
your proofed yeast
3/4 cup lukewarm milk
1/3 cup white sugar
1/2 teaspoon salt
1 eggs
3 tablespoons shortening
1 cups all-purpose flour
Mix with a wooden spoon until just combined
Add another 1 1/2 cups of flour to the dough, about 1/4 a cup at a time, until it is no longer sticky and is able to form a ball
coat the inside of a large glass bowl with oil. knead the dough a bit with your hands until soft and elastic, form into a ball and then place in your greased glass bowl.
Cover it and allow it to rise until doubled in size
Then take your dough ball and roll it out on a lightly floured surface
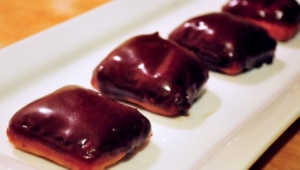
Mr. Fits really wanted square doughnuts. He just used a knife to cut the dough, but you can use biscuit cutters if you want them in circles. I like the squares, no waste and they turned out pretty darn cute
Cover with a light cloth or paper towels and allow your little doughnuts to rise again until doubled in size, about an hour.
Drop the doughnuts in to the hot oil and allow to cook on each side for about 2 minutes or until puffy and golden. We used chopsticks to turn the doughnuts
Don’t crowd the fryer, just a few at a time.
The glaze!! We used 12 ounces (1 1/2 cups) of 60% chocolate,1 tsp instant espresso powder, 2 tbs of butter, and 3/4 cup heavy cream. Put the chocolate chunks in a bowl with the espresso powder. In another bowl, add the cream and the butter and microwave until steamy. Pour the hot cream over the chocolate and stir until combine. OK, if you have never made ganche the last step takes longer than you expect. at some point during the stirring your will look at the mess that looks like chunky hot chocolate and think “That girl lies!! This looks terrible, Did I do it wrong??” and then your will keep stirring, and stirring and then at some point you will think, “Oh…wait.. it looks great. I kinda want to lick it and give that Domestic Fits girl and big chocolaty kiss.” At that point, it’s done.
Once your cute doughnuts are out of the fryer and cooled,
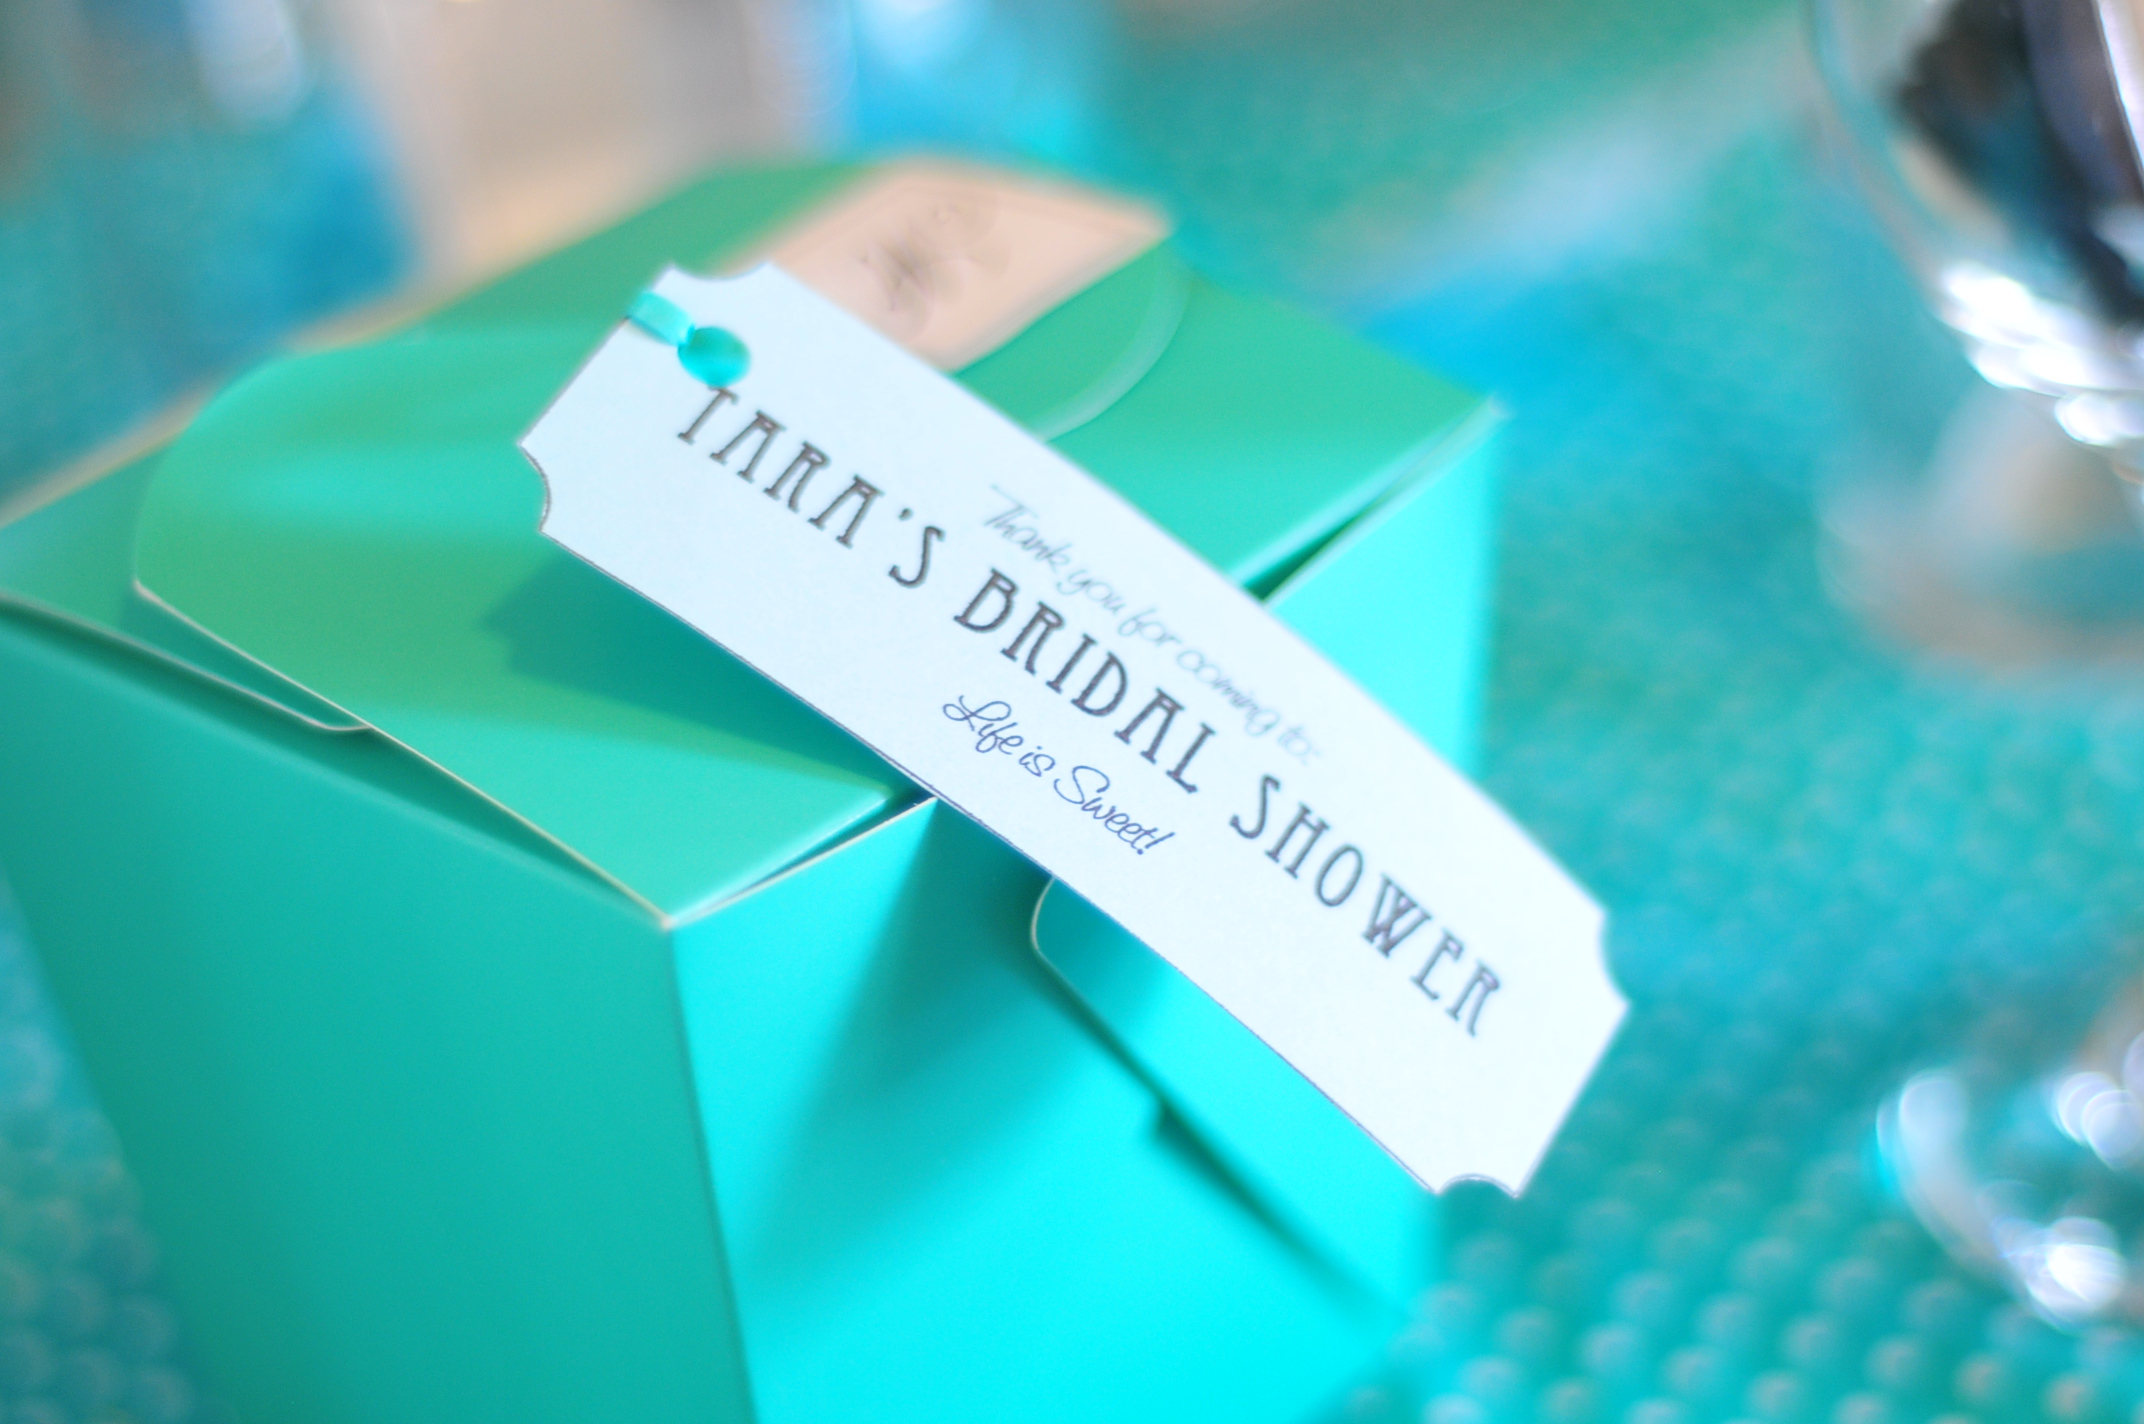
My Adorable little sister is getting hiched next month. My eqauly as adorable older sister and I planned a bridal shower using Little Sisters wedding colors.
We had the candy buffet:
I made lables for the take away boxes that we gave to all the guests
And of course, there were cupcakes
The food was lovely,
we had
Goat Cheese and Flank Steak Crustinis
Roasted Chicken Salad on Crosants
Caprese Skewers
Fruit Skewers
Meatball Sliders with Pesto Sauce
For the drinks we had a lovely Peach Sangria as well as Jones Soda’s that matched her colors
My favorite of all was the photo banner that I made using a Chipboard Book Kit (http://www.stuff4scrapbooking.com/6-x8-with-8-pages-2-rings-chip-art-chipboard-bracket-book-kit-466594.html) I covered each page with paper that matched her wedding colors by tracing the shape, cutting it out, and then using spray adhesive to attach the paper to the book page. I then used pictures of the couple and photo corners on each page. I strung the pages up with a ribbon and put a color coordinating pinwheel at each end
When the party was over, I used binder rings to make it into a book that she can put on the guest book table at her wedding
I love you little sister and I wish you a long and happy marriage.
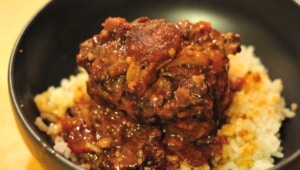
Oxtails scare me a bit. Not really because of what they are, but the gamey-ness is hard to tackle at times. This recipe was inspired by Carne Asada, another cut of meat that finds a delicious outcome only after the right treatment. A reminder that there really isn’t a “throw away” cut of meat, just ones that need the right touch.
Braising just means you brown the meat first, and then slow cook it in liquid. Really similar to pot roasting, although much more fancy sounding.
You’ll need about 4-6 large oxtails. The most often overlooked step in successful browning is to pat the meat dry. Sounds really counter intuitive, to REMOVE moisture when you want your meet juicy, but its important, just trust me. After the patting, season the meat with salt, pepper, onion powder and smoked paprika and don’t be shy.
Roll them in flour
Cut up half of an onion and saute in a cast iron pot in about 1/4 cup of olive oil
Once they are translucent and soft, take them out and set them a side. You’ll be putting them back in the pot soon.
Brown the oxtails on all sides, it’ll take about 10 minutes, work in batches if you have to. Add more olive oil if the pot starts to get dry, you want a thin layer at all times
Add all of the following to the pot:
your previously sautéed onions
2 cups of red wine
3 cups of sliced tomatoes
3 cloves of garlic, minces
3 chipotle chilies (from a can in Adobo sauce) chopped up, plus about 1 tbs of the Adobo sauce
2 tbs cummin
juice from 3 large oranges
pinch of salt and pepper
lower the heat to maintain a low simmer and put the lid on. Cook for 2 1/2 hours, stir occasionally. Then take the lid off and add 1 tbs Grade B Maple syrup, juice from 2 more oranges and simmer uncovered until the sauce reduces and thickens a bit, about 20 minutes. Serve over rice
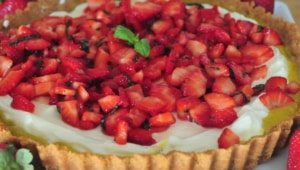
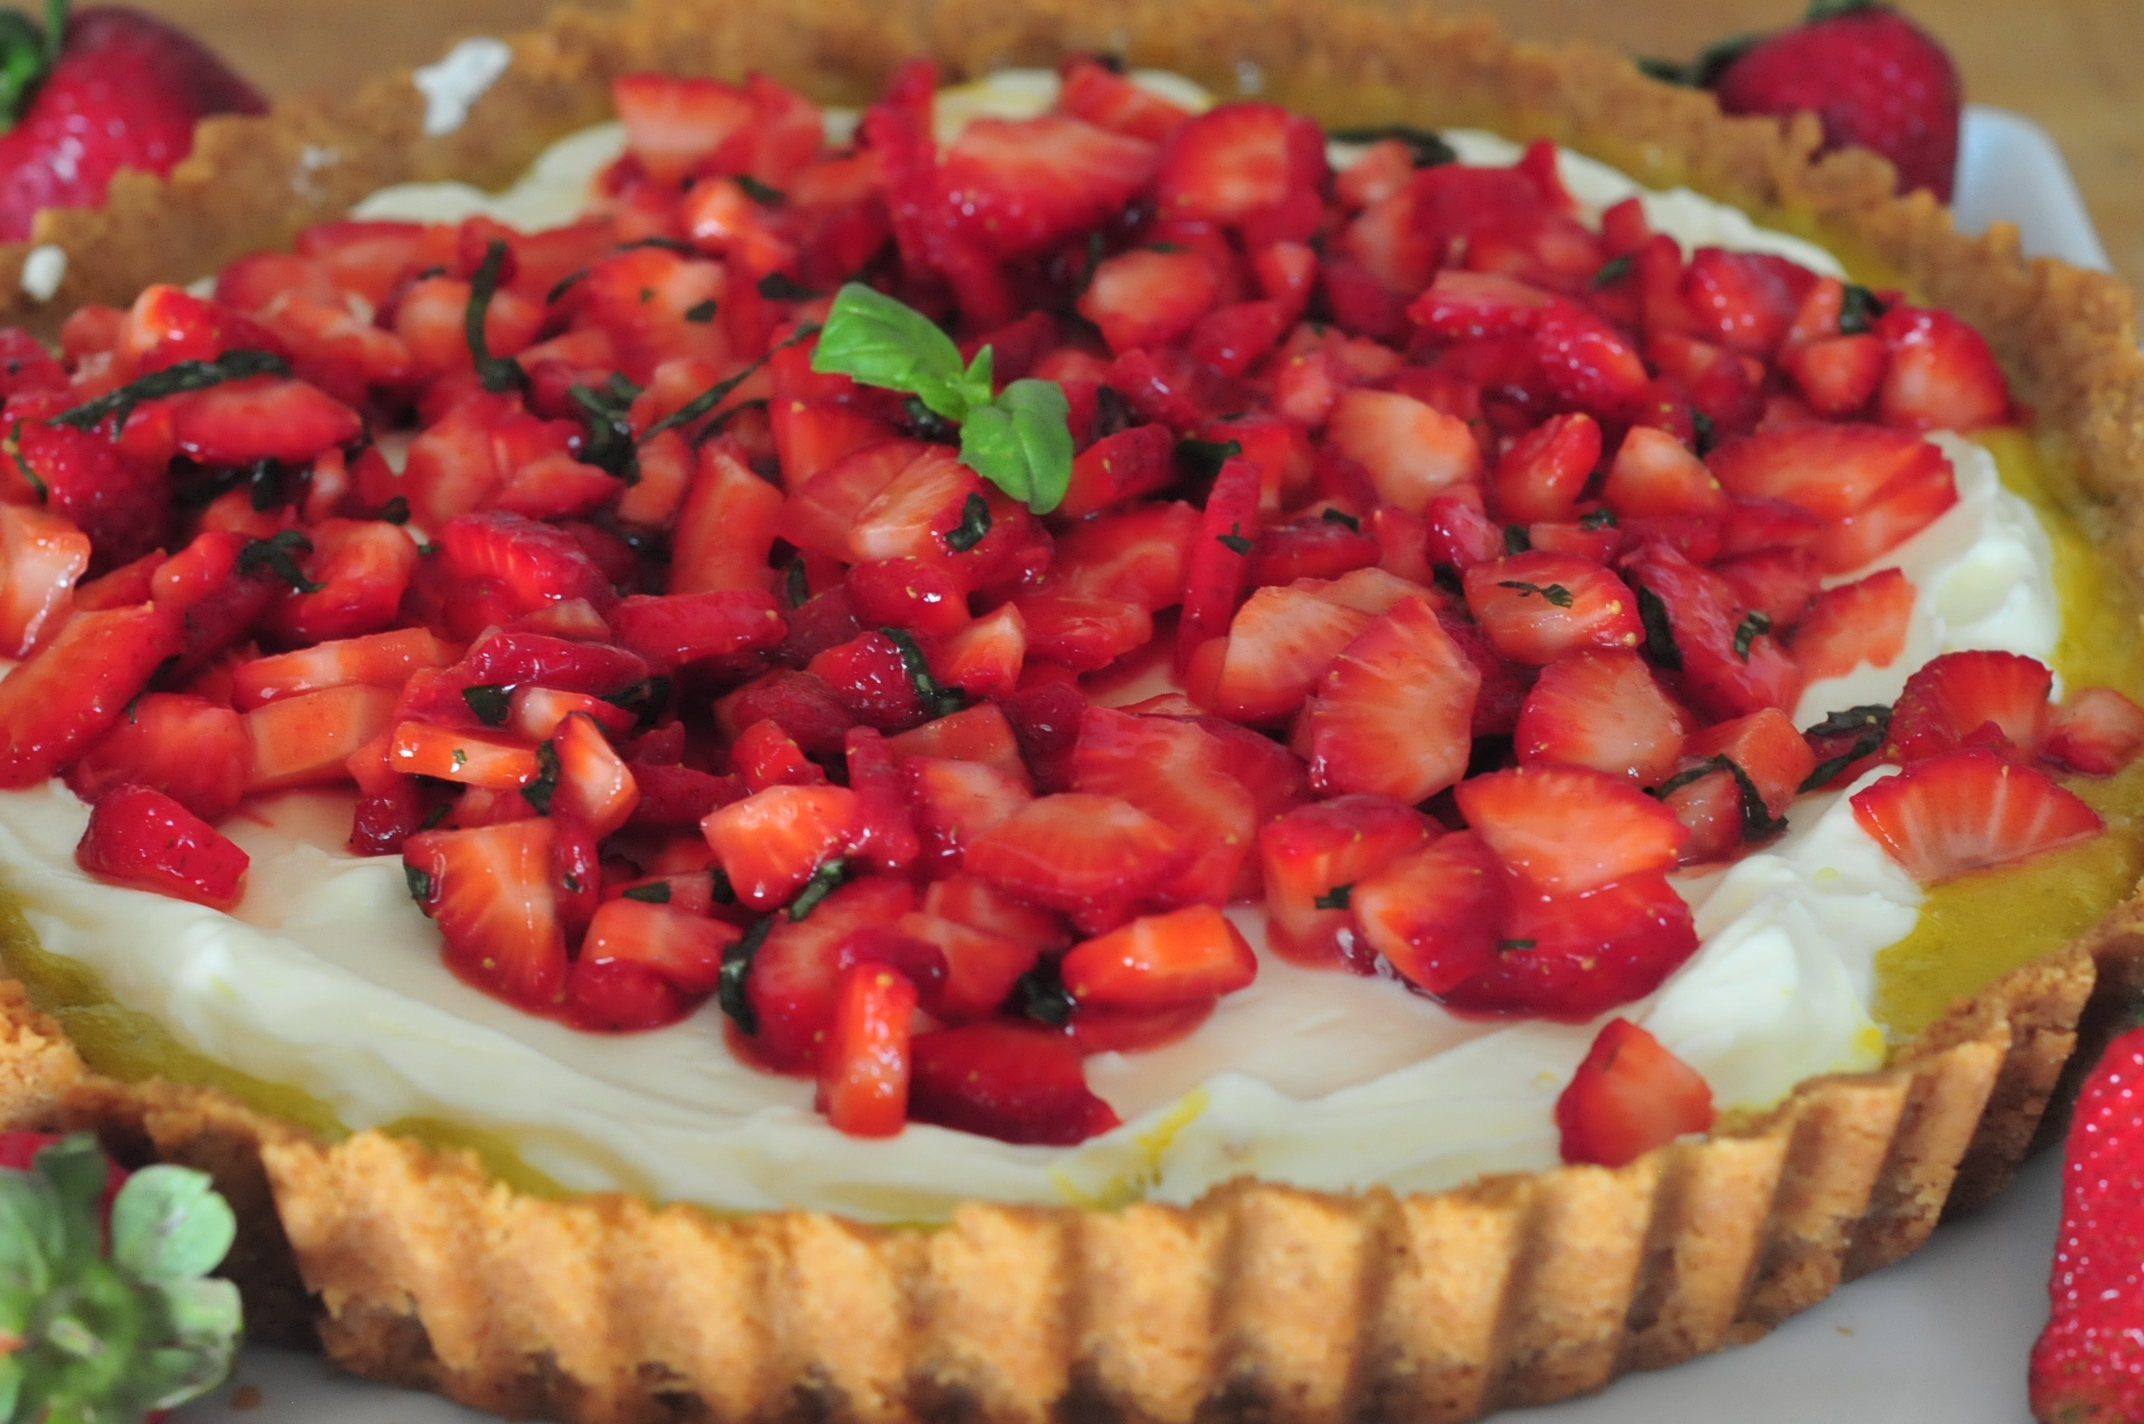
Strawberry season comes in fierce here in California. All of the sudden, those red little beauties are everywhere and so cheap, they’re practically free. This week, at my favorite local market, I bought 3 pounds for only $2.50. So let the baking begin!
Preheat oven to 350
The crust. My favorite part of any tart. I used lemon shortbread cookies, about three cups in my food processor
Add five tbs of melted butter and 2 tbs of brown sugar. The brown sugar will give you a nice caramel flavor that you won’t get with white sugar. Pulse away until it looks like wet sand
Spray the inside of your tart pan with butter flavored cooking spray. I like to dump the contents of my food processor into the tart pan (use a tart pan with a removable bottom) and then assemble the sides before packing the bottom, it makes it easier to get even, sturdy sides
Then move on to the bottom and pack it really tight
Cook tart crust for 10-12 minutes or until lightly browned, allow to cool.
Then make the curd. It’s really an unappealing term for such a lovely treat. Lime curd is:
2 tbs lime zest
5 egg yolks
1/2 cup white sugar
3/4 cup lime juice
5 tbs unsalted butter, cut into cubes
Add the first 4 ingredients to a bowl and mix well then add to a pan over medium/low heat along with the butter
Whisk until thickened, about 8 minutes
Pour the curd into the cooled tart crust and chill until set, about 15-20 minutes.
Then I made some whipped cream. Not because this was my original plan but because I felt there was a desperate need, and because I love homemade whipped cream. Now, you can add this to the top, but I didn’t want to hide the beauty of the berries under all of that fluff, so I added it to the middle.
3/4 cup whipping cream, 1/4 cup sugar, blend in a stand mixer on high for about 4 minutes or until stiff peaks form. Add this to the top of the cooled and set curd.
Cut the berries. I make two cuts down the center of the strawberry like this
Then chop them to make little triangle pieces, about 1 1/2 cups total
Then stack up about 5 basil leaves and roll them up tight like a cigar and chop them really finely to make skinny tiny ribbons
Then add the berries and the basil (about 1 tbs) to a bowl with 1/4 cup of powdered sugar
Mix away until well combined and then add it to the top of the tart and serve fairly immediately.
If you plan to make the tart ahead of time, it really doesn’t sit well. You can make the tart crust, curd and whipped cream (store curd and whipped cream in Tupperware), cut the strawberries and basil but keep them separate, and assemble it all right before serving.
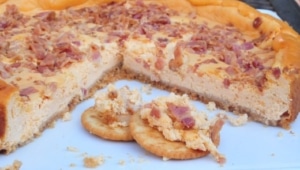
Savory cheesecake. Really, an invention of necessity. I want cheesecake, but it’s not dessert time. The solution? Pre-diner cheesecake. Brilliant. Then add the candy of the meat world: Bacon. Yum. E.
1 baguette, thinly sliced and toasted (optional, for serving)
Steps
Roast the garlic: (your kitchen is about to smell SOOO good) Preheat the oven to 400. Place the five cloves of garlic on a small sheet of aluminium foil. Drizzle with the olive oil and sprinkle with the 1/8 tsp salt. Fold up the aluminium foil into a tight pouch; you don’t want any of that goodness to seep out. Roast in the oven until garlic cloves are soft, about 20 minutes. Allow to cool (seriously, you really want to allow those suckers to cool) then remove the skins. Once garlic is done cooking, reduce oven temp to 350.
Bacon time: While the garlic is roasting, cook the bacon in a skillet over medium heat, turning frequently. Again, your kitchen probably smells so amazing that you may need to lock your doors. Remove bacon from the pan once it is dark pink and the fat is mostly rendered, allow to cool on paper towels.
Crust o’clock: In a food processor, add the crackers and pulse until reduced to crumbs and then add the butter, pulse until all that remains is a beautiful, buttery, crumbly pile that looks like wet sand. Press the cracker crumbs into the bottom of a 6 inch spring form pan.
Blend well: in a stand mixer, add the cream cheese, your yummy garlic, eggs, salt, pepper, smoked paprika, rosemary, sour cream and mix the crap out of it. Seriously, don’t be shy, show that cream cheese who’s boss.
Puttin’ it all together: Add the cream cheese mixture to the spring form pan. Chop the cooled bacon and sprinkle over the top of the cheese cake (it’s OK if you take a nibble or two of the yummy bacon).
Bake: In the oven for 35 minutes or until top is golden brown. Allow to cool completely and serve with bread, or eat alone. And by alone, I don’t mean "by yourself" because, really, if you have a Bacon Garlic Cheesecake, you will never be lonely again. Enjoy!!
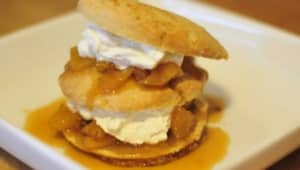
Why should strawberries have all the fun? Shortcakes are an amazing vessel for so many different types of fruit. Now that the fruit producing summer is almost upon us, the shortcake options are limitless. Blueberry Balsamic, Spiced Apple, Raspberry Apricot…great, now I just want to stop typing and go bake some more! There is a good chance there will be more bake good posts shortly.
Ingredients:
Shortcakes:
2 cups of flour
1/4 cup sugar
1/8 tsp salt (pinch)
2 1/2 tsp baking powder
1 stick unsalted chilled butter, cut into small cubes
3/4 cup heavy cream
2 egg yolks
1/4 tsp butter extract
Pineapples:
I large pineapple, rind and core removed, diced
2 tbs butter
1/2 cup packed brown sugar
3/4 cup white sugar
Whipped Cream:
1 cup heavy cream
1/2 cup white sugar
2 tbs vermouth
This is the Pineapple that inspired this dessert. He was delivered to me in my weekly produce delivery from Love Deliveries out of Venice Beach. He just sat on the counter begging to be used (cue Bill Withers “Use Me”)
Preheat oven to 350. In a large bowl, whisk the flour, sugar, salt and baking powder together. Add the butter cubes and mash it through with your fingers until all the butter cubes are completely mixed.
In a small bowl, add the cream, yolks and butter extract and mix until well combined. Add the cream mixture to the flour mixture and stir with a fork until just combined, don’t over mix of your dough will be tough.
Then put the big dough lump on a floured surface
Just knead the dough three times. Three times? You ask. Yes, that’s my magic Shortcakes dough kneading number. Two isn’t enough and four may just be too many. Roll a rolling pin over Dough Lump, one or two times in each direction, or until the dough is about one inch thick. Then cut out circles with a 3 inch biscuit cutter. This will make about 9.
Place the shortcakes on a greased cookie sheet and bake until they are golden brown, about 12 minutes.
Add all the pineapple ingredients to a large skillet over medium high heat.
Stir constantly until the sugar and butter has reduced so much that it looks like the pan only contains pineapple and frothy bubbles, about 10-15 minutes. Remove from heat to check the consistency, you want the caramel sauce thick and to leave a large track when you drag your spatula through it.
Once the shortcakes are baked and cooled, cut them in half the long way. I stacked them up in this order, using 3 shortcake halves: Shortcake, pineapples with sauce, whipped cream, repeat. Then top with a final shortcake.
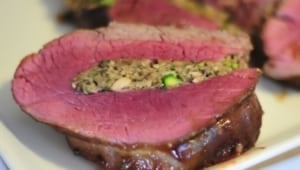
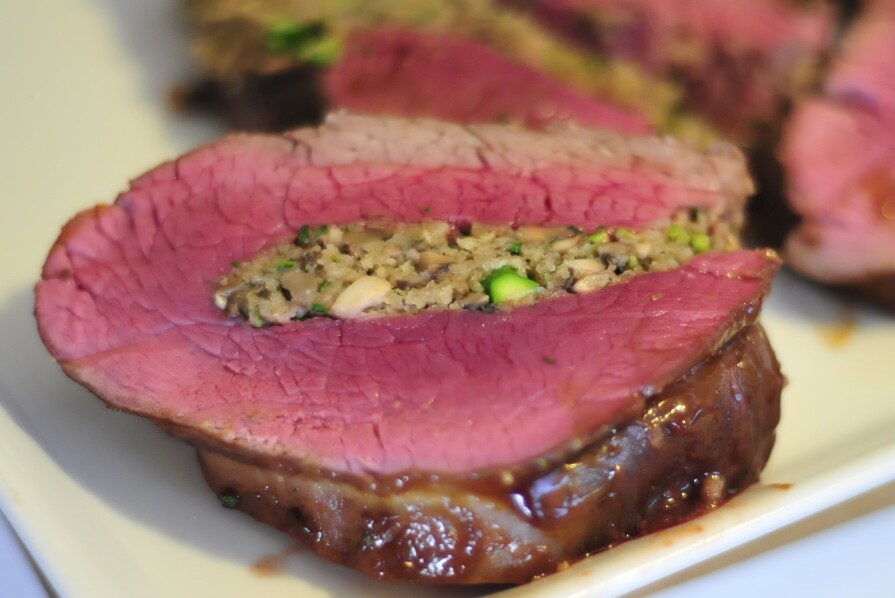
Tenderloin is one of my favorite go-to meals when I have guests over. Mr. Fits parents were in town this week and I love cooking for them. Even when things don’t go as planed, they are always impressed and gush for days over how much they loved my food. “Wow, that chicken you made the other day was really something special!” Really? The overcooked, under seasoned chicken? Well thank you.
Ingredients
4 tbs butter
1/4 cup chopped yellow onions
3 cloves of garlic, minced
1 cup of mushrooms, chopped
5 large spears of asparagus (trimmed the ends about 2 inches) chopped
1/4 cup cooking sherry
1/2 cup Panko bread crumbs
2 tbs olive oil, plus 2 tbs, divided
Salt and Pepper
1 2lb beef tenderloin
(more salt and pepper)
1/2 cup Hoisin sauce
2 tbs soy sauce
Preheat oven to 350
Heat the butter in a large pan over medium heat until melted. Add the onion and cook until softened, then add the garlic, cook for about 30 seconds. Add the sherry, scraping to deglaze the pan, then add the mushrooms and asparagus.
If the pan starts to look too dry, you can add olive oil or more butter to moisten things up a bit. Cook, stirring frequently until mushrooms are darker and softened. Add the olive oil, and Panko and stir until it resembles a paste, salt and pepper to your liking.
Cut the tenderloin down the middle, making sure not to cut all the way through and then open it up like a book. Pile the stuffing in the middle of the tenderloin, forming into a tight log with your hands.
Roll the tenderloin up tightly and secure with kitchen twine. If you have never used kitchen twine, its really easy. Here is a simple how to:
Once the twine is secure, heat the last 2 tbs of olive oil in a pan until hot and shimmery. Sprinkle all sides of the tenderloin with salt and pepper. Once the pan is hot, brown the tenderloin on all sides. It should take about 4 minutes per side, roll it until all sides are brown, remove from pan and add to a glass baking dish.
In a bowl, combine hoisin and soy sauce. Brush all sides with the hoisin mixture. Cook in the oven for about 25-30 minutes or until the internal temp reaches between 130-140 for medium rare (meat will continue to cook after it is removed from the oven.) About every ten minutes during the cooking, re-brush the beef with the hoisin glaze. Remove from the oven and allow to rest for about 5 minutes. Cut into rings and serve.
Gratin simply means “with a browned crust of bread crumbs and cheese” or, “Yummy, creamy and Melty.” OK, that last one is just mine, but in my opinion, pretty darn accurate. Sadly, too many people have never formed a relationship with Gratin outside of a dehydrated Betty Crocker box that my Grandmother called “Potatoes All Rotten”. Y’all are missing out. Homemade Gratins are fantastic and easy and will most likely always grace my holiday tables. This one is my favorite. I hope that if you are one of those who still bares the scars of adolescent forced prepackaged food trauma, that you will give this recipe a try. Really, its like therapy.
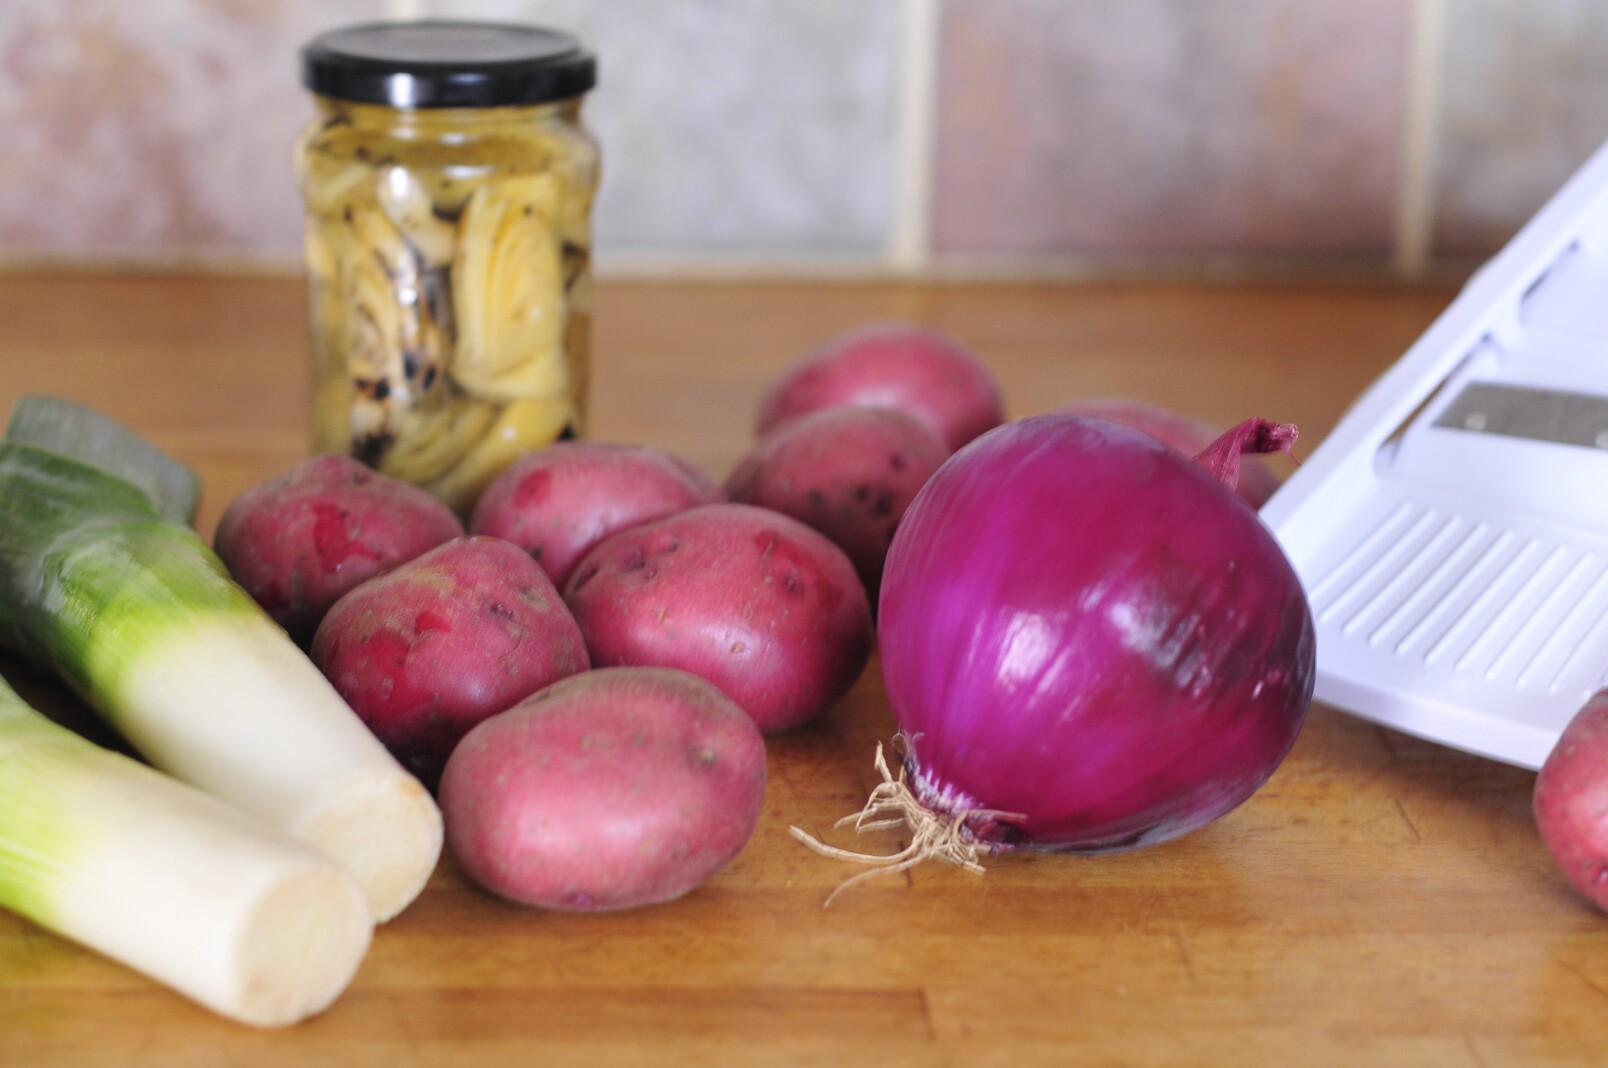
Ingredients:
3 large leeks
1/2 a large red onion
8 medium sized red potatoes, peeled
1/4 stick of butter
3 cloves of garlic, minced
12 oz of artichoke hearts (2 small jars, drained)
1 cup heavy cream
1 cup grated Swiss or Gruyere plus 1/2 cup, divided
If I were writing this for one of those cooking contests I love to enter, I would tell you to boil the potatoes for 5 minutes in lightly salted water. BUT for you, I’ll give the shortcut. In a microwave safe bowl, add the potatoes and cover completely with water. Microwave for about 8 minutes or until you are able to get a fork through the potatoes, but they are still a little firm, check after 5 minutes in case your microwave is WAY more powerful than mine, it’s old. This will allow all the veggies to cook at the same rate while in the oven rather than over cooking some and under cooking others.
Then remove them and place on paper towels to soak up excess liquid, if not, you’ll have a soupy gratin
In a large sauce pan over medium high heat, heat the butter until melted. Add the garlic, onions, & leeks and cook until soft and slightly caramelized. Then add the cream, salt and pepper and reduce heat and bring to a gentle simmer. Add one cup of the cheese and the artichokes and cook until cheese is melted.
In a baking dish (I used 8 inch round) arrange the potatoes in tight concentric circles
Using a slotted spoon, top the potatoes with a layer of the veggie/cheese mixture.
Add another layer of potatoes and another layer of veggies. Spoon about 1/2 a cup of the remaining cheesy cream mixture that the veggies where just in, onto the gratin. Top with remaining 1/2 cup Swiss cheese and then Panko, salt and pepper.
Cover in foil and bake for 20 minutes. Uncover and bake for an additional 15-20 minutes or until the top lives up to its Gratin title and the center is no longer cold. You can also make this a day ahead of time, just increase the cooking time to 30 minutes covered and then 20 uncovered if it’s out-of-the-fridge-cold.
As I’m putting the final touches on my Easter Ham, I’m chatting with a friend of mine. A friend who wasn’t spending the holiday with his family, well, because he’s Jewish. It occurs to me, as I’m glazing my large hung of pork with smaller hunks of pork, how Un-Jewish Friendly this holiday is. Not only is it a celebration of the resurrection of Jesus, it’s signature dish is Ham. SO, I apologize to all of my Jewish friends for the excessive use of bacon on this blog, and I promise my next post will be Kosher.
For those who would don an “I Heart Pork” t-shirt, this is my hands down favorite ham recipe. I was very happy with the end results and it was one of the few times I was able to eat a meal that I prepared without thinking of all the things I would change for next time.
Ingredients
1 10 lb ham
1 1/2 cup apple juice plus 1/2 cup, divided
4 strips of bacon
2 tbs butter
1/4 cup Bourbon (I used Buffalo Trace)
1 1/2 cups packed brown sugar, plus 2 tbs, divided
1 cup pecans
1/4 cup grade B maple syrup
1 tsp coriander
Place the ham in a roasting pan, fat side up. Add 1 1/2 cups of apple juice to the bottom of the pan. Cook at 325 for 1 1/2 hours (for a 10 pounder, or 9 minutes per pound).
Cut the bacon into small, 1/4 inch strips
In a sauce pan over low heat, melt the butter. Add the bacon and spread out in the pan, sprinkle with 2 tbs brown sugar. Cook slowly until the fat is mostly rendered.
In a small bowl, add the remaining 1/2 cup apple juice and the bourbon. In another bowl, add the brown sugar, coriander, maple syrup and pecans, mix well. A side note about Maple Syrup: Grading doesn’t have to do with the quality, like some might assume. Syrup is graded according to color and translucency. Typically, grade A is much lighter (and mellower in flavor) than grade B.
Add the bourbon mixture to the pan, increasing the heat to medium, and cook until reduced by 3/4. Reduce the heat to low and add the brown sugar mixture and stir until well combined and thick.
Once the ham has cooked for 1 1/2 hours, remove from the oven. Increase oven temp to 375. With a sharp knife, score the ham in a diamond pattern.
Cover the top of the ham, and as much of the sides as possible with the glaze. Cook for an additional 20-30 minutes, or until glaze is dark and bubbly. Remove from oven and allow to rest for 10 minutes. Cut the ham in slices, from front to back, and spoon the pan drippings over the pile of meat, or put it in a gravy boat to serve along side.
The trick to cooking a juicy ham is to under cook it. Remember that ham comes to you already cooked, you’re just heating it up and glazing it. If you cook it to the recommended 140-160 degrees, it will be dry and over cooked. Most meats will continue to cook, even up to 15 percent more, after you remove it from the oven. If you want to thermometer cook it, shoot for closer to 110 degrees. Remember, its much better to serve slightly cold ham than dry overcooked ham.
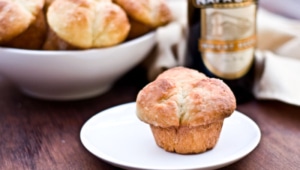
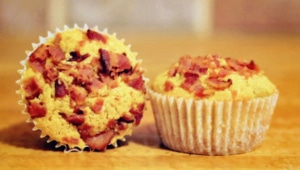
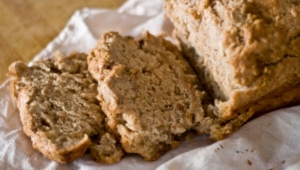
Bacon and Jalapenos are the new peas and carrots, the new beets and goat cheese, tomatoes and basil. The sweet saltiness of the pork and the acidic spice of the jalapenos make these two a perfect pair. And with a textured backdrop of cornbread to highlight this union’s symbiosis, I am also in love. I wish the happy couple a long and prosperous relationship.
Although this past weekend gave us beautiful weather, this recipe is best eaten on a cool day, along side a steamy bowl of Chili.
1 1/3 cups coarse yellow cornmeal
1 cup buttermilk
6 strips of bacon, (make sure to reserve bacon grease)
1 cup unbleached all purpose flour
½ tsp smoked paprika
2 teaspoons baking powder
1/2 teaspoon coarse kosher salt
1/4 cup sugar
1 stick unsalted butter, melted
2 tbs olive oil
¼ cup picked Jalapenos, diced
1 large egg plus 1 large egg yolk
2 tbs honey
In a bowl, combine the cornmeal and the buttermilk; allow to soak at room temperature for one hour. Preheat oven to 375 degrees. Cook bacon in a skillet over medium heat, turning frequently. Remove from the pan when slightly underdone. Reserve grease. In a bowl, combine flower, paprika, baking powder, salt, and sugar, whisk until well combined. In a separate bowl combine the melted butter, olive oil, jalapenos, eggs, honey and ¼ a cup of the bacon grease. Staring and ending with the dry ingredients, add both the dry and the wet ingredients to the cornmeal mixture a bit at a time. Stirring after each addition until all three batters are combined. Line muffin tins with muffin papers. Add ¼ a cup of the batter to each muffin paper. Coarsely chop the bacon and evenly sprinkle on top of each muffin. Bake for 18-20 minutes or until toothpick in the center of the muffin come out clean.
My favorite part about these decorations are the brads. I haven’t used brads since I was in 4th grade and I think I’ve been missing out. I love the birds, and the bunnies add a subtle Easter touch without having to write “HOPPY EASTER” on a pastel banner. The process and materials are similar to my Paper Lantern post, so if you’ve attempted those you’ll be ahead of the game. Change the colors and they aren’t just for Easter. I would also love these for a baby shower or with patriotic colors for a 4th of July party.
Materials (per four hanging flowers and one 12 foot garland strand)
12 to 14 Feet of jute or twine, Plus 2 feet for each hanging flower (the stuff I used)
Hole punch
Paper cutter
Start by cutting your 12X12 inch sheets into about 1.5 inch strips. I just pushed them flush with the edge of my paper cutter and the strips turned out great.
Then punched a hole in each end of the strip
Then stack up all the strips, then put a brad through the holes in one end and bend the stack around to also put the brad through the holes in the other end, making a teardrop shape. Then pull the strips out the make the flower shape
Use about 2 feet of string to hang the flower decoration
I made the garland the same way, using the 6×6 sheets
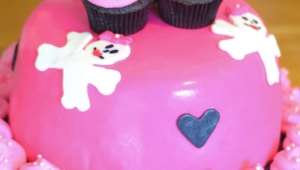
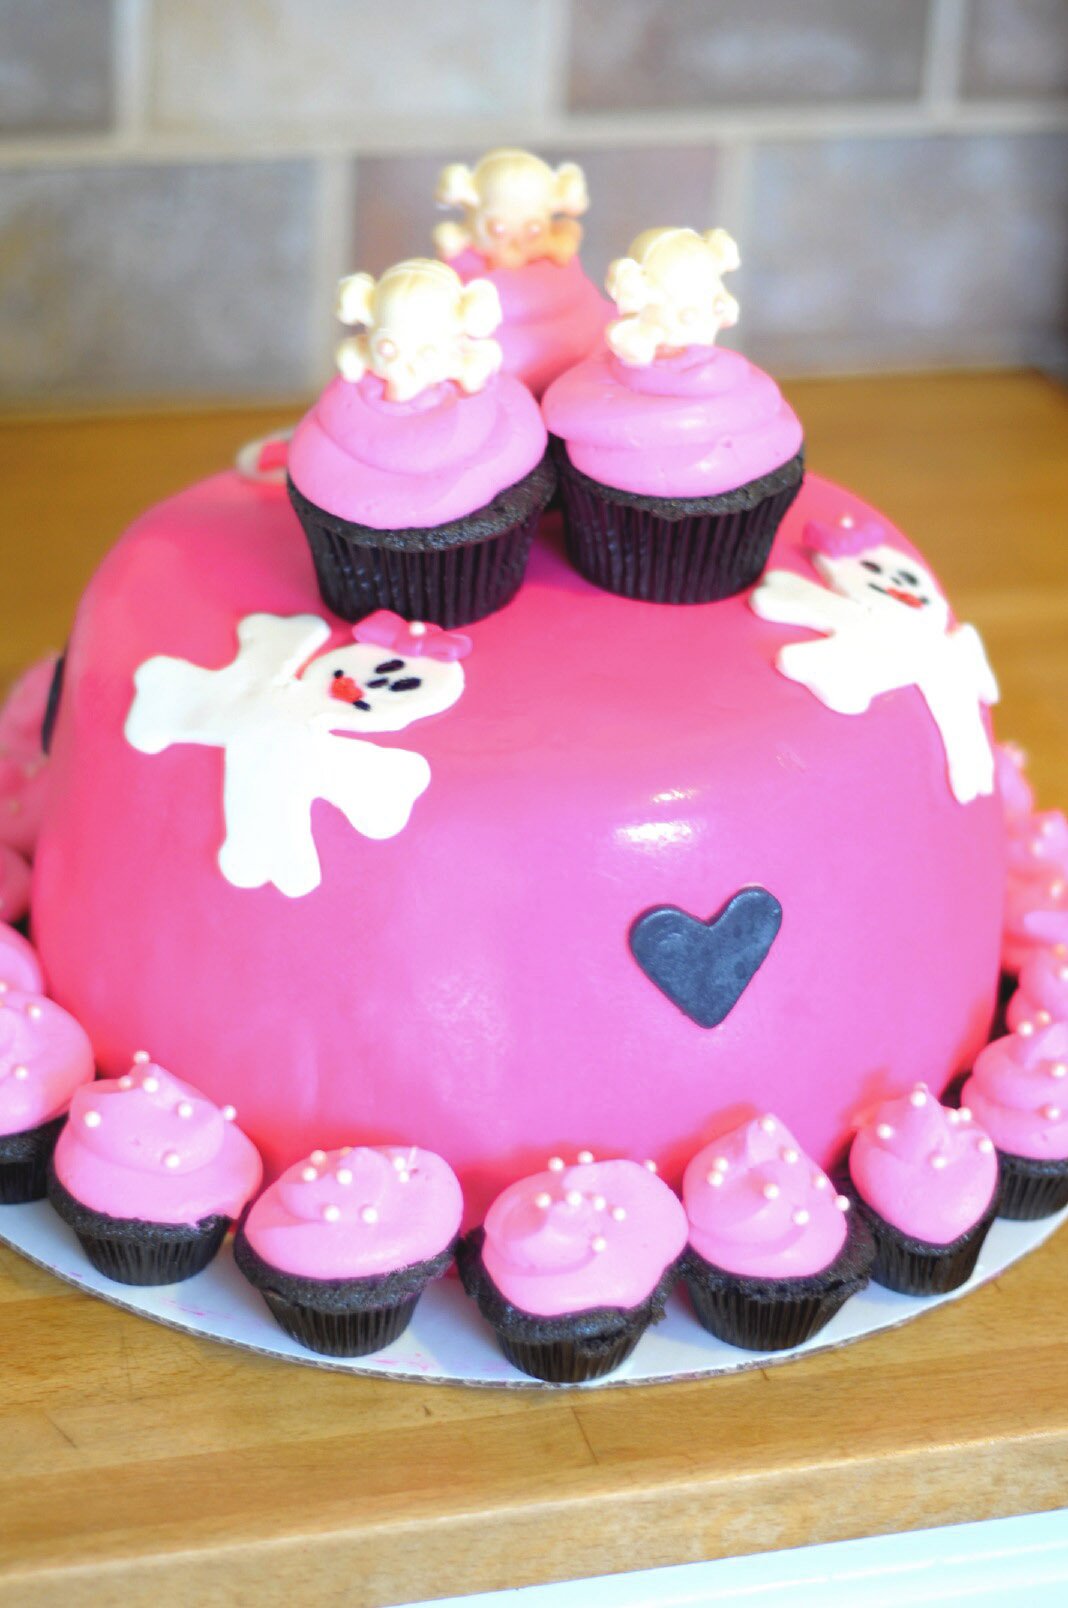
Somehow, over the past half a decade, the iconic symbol of rebellion, mayhem and destruction has morph itself into an adorable emblem of girly fun. I’m not sure who does PR for the Skull, but BRAVO! This cultural make-over surpasses even Mark Wahlbergs move from the Funky Bunch to Oscar Nominee. My current cake creation was in celebration of my wonderful friend, (who is a symbol of Girly Fun times in my life) and her most recent birthday.
To start, I made a four layer lemon cake. I decided to make Mango Cream Cheese frosting because that is a favorite of the birthday girl. It was good, but the mango bits made the frosting a bit chunky and it wasn’t mango-y enough. If you like mild mango flavor, here is the recipe. To mango it up a notch, you can add Mango Extract: http://www.amazon.com/Natural-Mango-Extract-29-Fl/dp/B002BX351A
In a sauce pan over low heat, add 2 cups of sugar, 1/4 cup of butter and one large mango, diced, skin removed. Stir infrequently until the mango chunks are super soft and falling apart, about 30 minutes. I left this on the stove, semi-forgotten, while I gave Tater a bath, so you really don’t need to babysit it as long as the heat is on low and you stir it occasionally. Let it cool to room temperature, then puree in a food processor until as smooth as you can make it. The biggest rule for making cream cheese frosting is that your ingredients NEED to be at room temperature. You can’t cheat and try and trick your frosting, you’ll end up with a big mess the consistency of ground beef. In a stand mixer, put 32 ounces of room temp cream cheese 2 sticks of room temp butter and mix well. Then add the room temp mango mixture and blend well. Everyone likes a different sweetness level on their frosting, I like mine closer to savory than overly sweet. I added about 1 cup of powdered sugar to this, taste and add more depending on your preference. I also added quite a bit of pink food coloring
Starting with a white 14 inch cake board circle (you can buy at cake supply stores or Michaels Arts and Crafts) I stacked up the layers with a hefty amount of frosting in between each layer. After that, I iced the cake completely, this will be the first coat. Some call it crumb coat, because the cake crumbs will invade this first layer, and others (including myself) call it dirty ice, because it sounds more fun. Allow that to set completely, about an hour.
The next coat is your final coat and it helps to sooth everything out and cover any bumps or holes in your cake. Think of fondant as that super shiny, thin bridesmaid dress that makes you look awful and shows every flaw, and you would never be caught dead it in it, let alone PHOTOGRAPHED in it over and over, if you didn’t really love your friend–and the final ice is the Spanx that allowed you to keep your sanity and hit on the cute bartender. The final ice is the compression garment of the cake world, makes everything look smooth and pretty.
Fondant is tricky and unforgiving. There are several different kinds of fondant, including homemade. The easiest to work with, although the yuckiest to eat, is Wilton’s. It would probably be the most accessible for you because it is the most widely carried. I do recommend using it for beginners because it is the most forgiving and will allow you to get a feel for fondant work before moving on the bitchier fondants. Just tell your guest that it is edible, but that you recommend they peel it off and don’t eat it. I used Fondx, actually pretty tasty but very soft and unforgiving. You can buy it in all different colors but I would recommend white and then color it yourself. Just use gel food coloring instead of liquid and if it gets too goopy, add powdered sugar. Then grab an unspecified amount (just gonna have to guess based on your cake size) and put on a clean surface dusted with powdered sugar. I used a softball size, colored hot pink
Then roll it as close to a circle as you can. I would highly recommend the use of a marble rolling pin.
Slowly and carefully pick it up (you can use your rolling pin for assistance) and move to the cake. Here is a good picture tutorial from Satin ice: http://www.satinfinefoods.com/how.htm
Starting at the top, gently smooth the fondant. This will cause the bottom of your fondant to have bit of a ruffle effect
To cut the ruffle off, I use a sharp paring knife that I push the fondant a bit under the cake. A lot of people use a pizza cutter. Just use what works for you.
You will notice quite a bit of powdered sugar left on your pretty cake. You can buy a brush at cake supply stores, I used a clean make-up blush brush. Just brush the cake until all the sugar is gone. You will still have a light layer. The next step is vodka! Not a shot for the weary baker, but a spray for the cake. Vodka is used in nearly every bakery to clean up cakes and give them a pretty shine. I use a small travel size spray bottle, probably intended to transport hairspray across FAA lines, but works really well in my kitchen. Just spray a light layer over your cake for a pretty, powder sugar free shine
I rolled a small hunk of white fondant on my cuttin’ surface and used a skull cookie cutter to cut out some decorations for the cake.
I used food coloring and a small artist brush to make a boy skull and a girl skull as well as left over fondant to make little bows
I decided that the boy and girl skulls made for a Hot Topic Wedding Cake look that I wasn’t diggin’ so I just used the girl skulls
At some point in this decorating furry, I managed to make about 18 mini cupcakes and 3 regular sized cupcakes in black cupcake papers. I also ran out of pink frosting, as well as cream cheese, so I made Vermouth Whipped Cream. Sounds super hard and fancy, right? Not really. In a stand mixer, combine 2 cups heavy cream (or whipping cream, both will work just fine), 1 cup of sugar, 1 shot of vermouth and I added the pink food coloring. beat on high for about 4 minutes or until stiff peaks form. Opposite of the cream cheese, the cream has to be chilled or you’ll be churning butter. Then spoon it into a large Ziplock bag for the cheater piping bag. Cut the corner off, about the size of your pinky nail. Then pipe the whipped cream on in a swirl pattern. Looks SO fancy and it’s easier and faster than any other frosting method.
Then I sprinkled the cupcakes with small pink sugar pearls. I placed them on the cake board at the base of the cake, securing them the the Wilton’s Candy melts that I use so often for my pastry glue. Just put a small amount of candy melts in a glass bowl, microwave for 30 seconds, stir and repeat until melted. Smear a bit on the bottom of each cupcake and place on the cake board.
The top cupcakes I used a wooden skewer to secure in place, I didn’t want those babies going anywhere
I used those same Wilton’s candy melts in a Pirate Skull Pick Mold
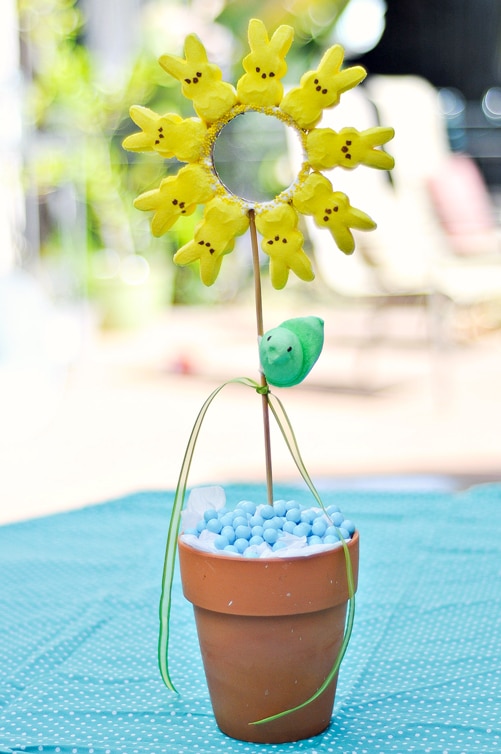
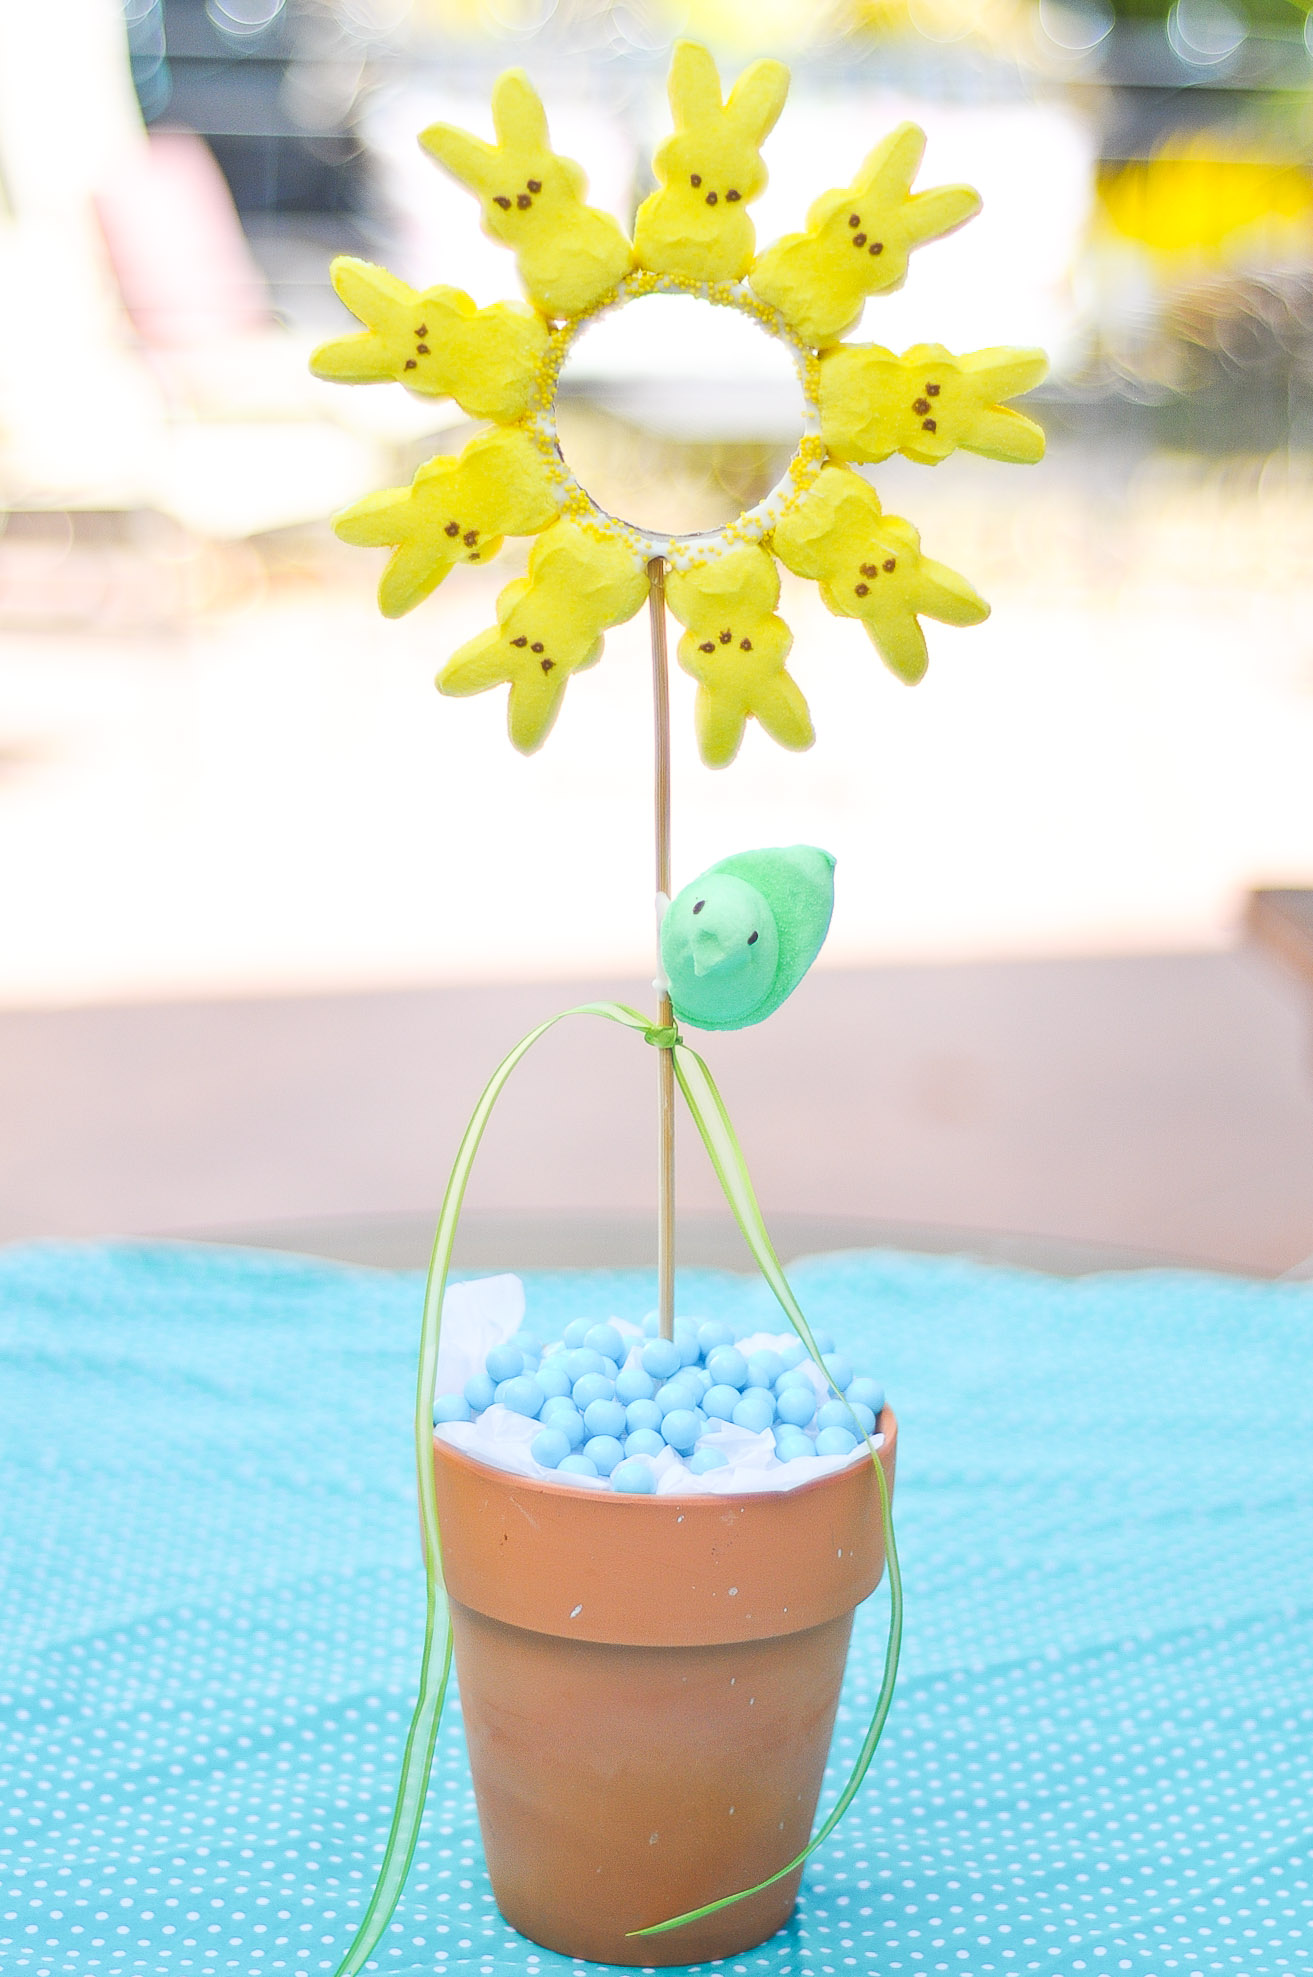
Peeps, love ‘em or hate ‘em, will always conjure up spring time memories of pastel plastic baskets and egg hunts on the back lawn. Even as a kid I was never a huge fan of sugar coated sugar in the shape of farm animals, but I would have been disappointed had I not seen a row of co-joined marshmallow quadruplets on top of my green plastic Easter Grass. This center piece (oh, excuse me, Center Peep) was made to bring those lovely memories into my current day celebration, a way to reminisce without the calories.
Materials (per one center peep)
One empty ribbon spool, about a half inch wide
9 Bunny Peeps (I used Yellow)
1 green chick Peep
Wilton’s Candy Melts (can be used in the color of your bunnies, or in white)
1 plastic squeeze bottle, like a mustard bottle (can be found most craft stores, restaurant supply stores and sometimes grocery stores)
1 wooden skewer
Hot glue gun, with glue
Sprinkles in the color of your bunny
Floral Foam
1 Terra Cotta pot (or any color that you choose)
1 sheet of tissue paper
Start by ripping the ribbon spool apart so that you just have the middle cardboard hoop
The hot glue the flat end of the wooden skewer to the hoop and don’t be shy with the hot glue, really slather it on for a strong hold.
The pull your bunnies apart and castrate them (yikes!) so that their bottom is flat
Then put about 3/4 cup of candy melts in the squeeze bottle. Put in the microwave for thirty seconds, remove and shake a bit. Repeat until candy is melty and squeezes out of the bottle easily.
Squirt a bit of the candy melts on the freshly exposed bunny undercarriage
Push against the cardboard ring. I made two of these and the easiest way to do it is to start close to the stick and crowd the bunnies close together so that all nine will fit on the ring.
The rim the exposed carboard ring with the candy melts. This makes it look prettier as well as provides a stronger hold for the rouge bunny. Before the candy melts dry, cover it with the sprinkles.
The take your green chick peep and cut a bit of an angle where his shoulder would be
Fill his cut with the candy melt and place him on the stick, a bit higher up that you might want so that the bottom half of the stick can go into the pot without a problem.
You can also add more candy melts when he is on the stick to make the hold better.
The cut a wedge of floral foam to fit snugly inside your pot
Put your foam into your pot and cover with the tissue paper, tucking the ends into the pot. Allow your Center Peep to cool completely before moving. It will take about 20 minutes. When you lift it up, support the head so that all the weight isn’t on the hot glue joint. Then skewer it all the way into your pot
Cover the tissue paper with your favorite Easter candy (jelly beans, mini candy eggs, pastel M&M’s) I just used candy left over from the Candy Buffet at Tater’s first birthday party.
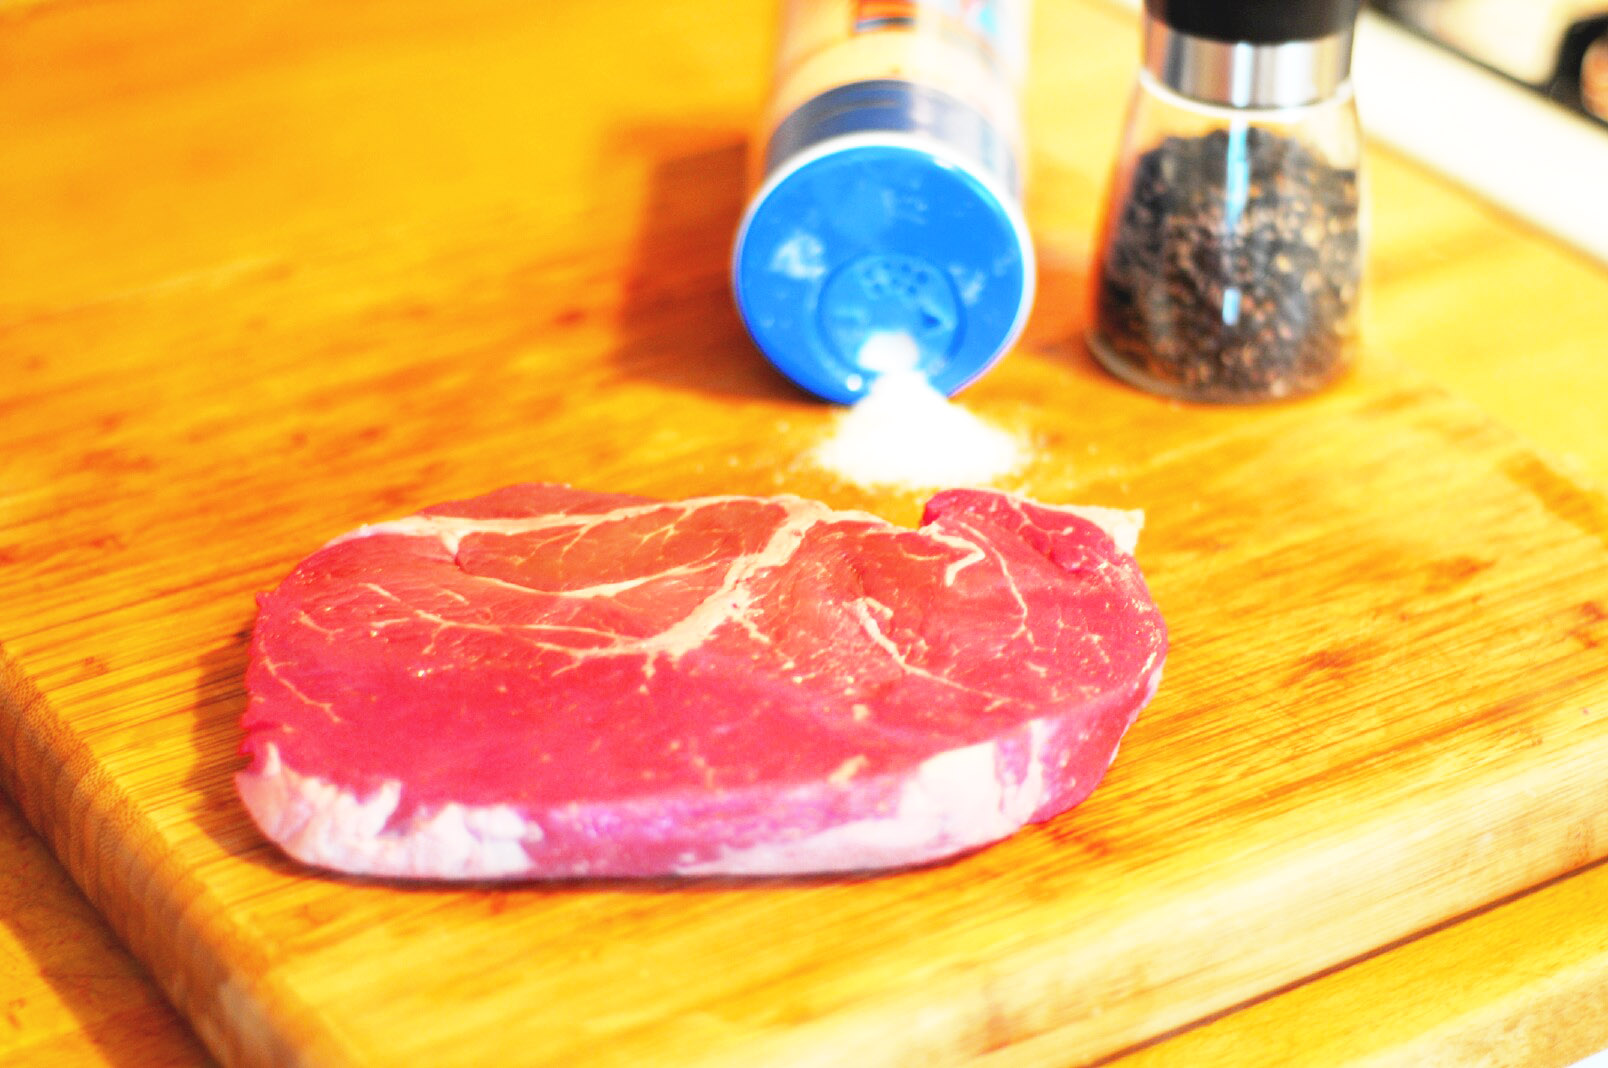
Really, is there anything better? A beautiful crust, tender, pink in the middle. Cooking a lovely cut of beef at home, on par with your favorite steak house, is completely possible. Years ago, I set out on a journey for the wisdom of the beef that would enable me to cook up a beautiful hunk of meat in a way that would WOW my guests (and by that, I mostly mean my husband). It was much simpler that I had expected.
First, pick the right cut. Of course a $50 steak is going to taste amazing, but you can also get a great meal out of a $5 steak as long as you know what to look for and how to read the label.
USDA Grades
Prime, Choice, Select? What the heck? Here’s the basic rule: stick with only Prime and Choice, don’t select Select and NEVER choose ungraded for this cookin’ method.
Prime is the best and Choice is the second choice. Select is a passable cut, but for only a few dollars more, a Choice cut will taste twice as good. All meat is inspected my the USDA, so don’t let that label fool you. If it just has a “Inspected by USDA” sticker and no grade sticker it just means the meat didn’t meet standards for a grade. If a cut has a grade, the sticker will be on the package. If there isn’t a sticker, it’s not going to be a tasty, tender cut. Although there are a lot of ways to make a cheap ungraded cut of beef taste great, it involves quite a bit of marinatin’ and manipulatin’.
Remove excess moisture. Although it sounds counter-intuitive when you want a juicy steak, patting the outside of the meat with paper towels is important. If you don’t, you’ll end up with gray meat (and that’s no metaphor).
SALT!!! I’m a huge fan of salt, but even if you would rather pass on this seasoning, ALWAYS SALT YOUR MEAT (also not a metaphor). It’s essential. Not only is salt a tenderizer, it also brightens flavors and aids in a perfect crust. Just sprinkle each side of your meat with salt before you add anything else, and don’t be shy with it. I’ve concocted dozens of steak rubs, but its hard to go wrong with just salt and pepper. You can also add just about any seasoning that you love: onion powder, garlic powder, mustard, even a sprinkle of sugar will add a beautiful caramelization to your crust.
Hot Pan. Get out the best quality pan that you have, add olive oil and let it get hot, about 4 minutes. You don’t want the oil smoking, but you want it hot enough to let out a loud sizzle as you throw your meat in. Cook for about 2-3 minutes on each side. If your meat sticks to the pan, it’s OK. Don’t frantically pull it in an attempt to rescue it, it will release from the pan when it’s done.
Finish in the oven. I once took a cooking class from a fancy chef who spent years as a personal chef to celebrities in Beverly Hills. He said that this was his “steak cooking secret.” Not so much a secret, most restaurants do this, but it’s the best way to get a perfect crust and a pink-not-red center. 350 degrees for about 7 minutes for a 1 1/2 to 2 inch thick steak (Medium rare).
The feel test. This has been a technique of line cooks for a century. Put your thumb and forefinger together. With your other hand, feel the fleshy part of your palm, just below your thumb. That is what a rare steak will feel like. Then put your thumb and middle finger together. The fleshy part of your palm will now feel medium rare. Thumb and ring finger: well done. This is a way to get the doneness you want without having the unsightly cut marks in your beautiful steak.
My favorite really-impressive-really-easy steak topping is Gorgonzola Butter. In a food processor put one stick of softened butter, two tbs Gorgonzola cheese, pinch of salt and 1 tsp garlic powder and pulse until well combined. lay out a sheet of plastic wrap and put the Gorgonzola butter in the middle. Roll up the butter in the plastic wrap into a log shape and secure the ends. Place the log in the fridge until firm. Cut off slices of the butter and place a few pats on top of a warm steak. Gorgonzola butter is also really good on asparagus.
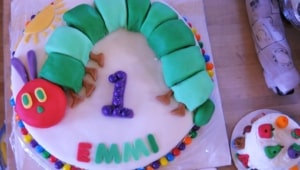
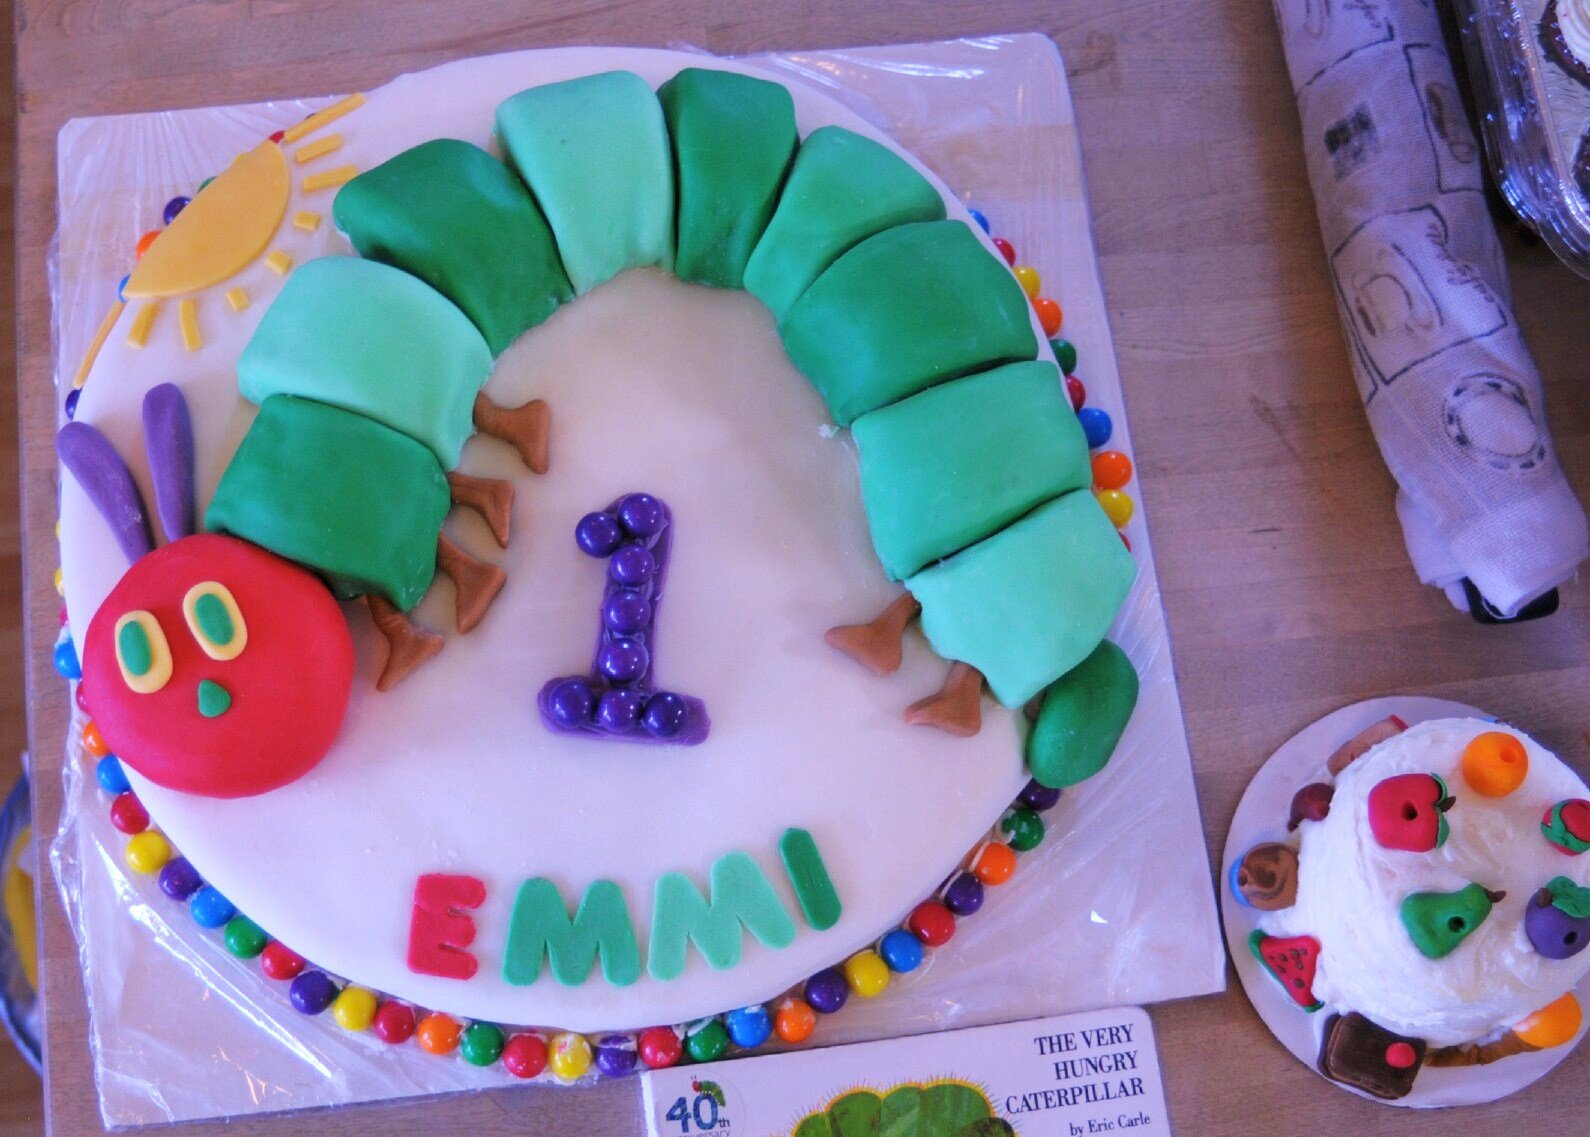
The adorable Miss Emmi turned 1 just a few days after Tater. Emmi loves the Very Hungry Caterpillar more that I have ever seen a kid love a book, it’s quite adorable. She’s that bugs #1 fan. So of course, her party had to follow suit. Tater and I spent Saturday afternoon hagnin’ out with Emmi and her fabulous mother and we made a cake.
First, I made a 20 inch 2 layer strawberry cake
The we covered it in cream cheese frosting and then a layer of white fondant and put brightly colored gumballs at the bottom
We then cut out three inch circles from another sheet cake, cutting off the rounded top and cut those circles in half
We frosted those half circles and then covered them in different shades of green fondant
We covered one of the cake circles in red fondant to use as the head
On went the body
Although Miss Emmi’s house is filled with every baby toy imaginable, the ladies spent most of the day playing on the stairs
Emmi’s mom was a quick study with the fondant and was able to make her name, Caterpillar legs, antennae and eyes as well as an adorable sun
And check out that mini smash cake, made by Emmi’s aunt. Very adorable!
I love these. Not only are they so so so cute, they cost less than $10 in materials and took me less than 30 minutes. Plus, look adorable on Taters little head.
Materials, all can be found at a craft store:
Elastic stretch lace, large fancy buttons, less than a foot or marabou(I found this in the ribbon section), about 2.5 feet of ribbon, large snaps, felt circles (about 1 inch in diameter)
First, I cut the lace to the size I needed and hot glued the ends together. Although I was skeptical of this method, it worked great
I cut a small piece of the marabou, just enough to wind around the back of the pretty button. I lined the back of the button with hot glue and attached the feathers
Then glued the felt circle to the back of the feathered button and then one side of the snap to the felt. Make sure that the felt is glued to the button, not just the feathers
I glued the other side of the snap over the hot glued seam of the elastic. The decal will completely cover the seam.
I also had an idea for a button in the middle of a ribbon flower. I started with 4 strips of ribbon, 7 inches long each. Then hot glued the strips into loops
I hot glued the middles of the loops to make smashed loops
hot glued two smashed loops into an X shape
Glued loops behind the X, one in each direction
Then glued the button in the middle
then glued the felt on the back and half the snap on that
I glued half of a snap onto each headband. It really doesn’t matter which side you use for the decal and which side you use for the headband as long as you are consistent, so that each decal has the exact same side and each headband has the other.
I also made another decal, the same way as I did with the first black and silver decal. I love this one, red flower and black marabou, so pretty
Our little lady, with a nickname of Tater Tot, is an entire year old! We had a bash at our place to celebrate her, as well as to commemorate our first year as parents. I obsessed over the every detail, my poor husband had to put up with a house covered in red and aqua crafting supplies for months! I was happy with how things turned out and although there is a list of things I wanted to do but didn’t have enough time for, it was a great day. Of all the party offerings, my two favorite were the Tater tot/French Fry Bar and the Candy Buffet. Both were huge hits.
Tater Tot bar!! Of course our Tater needed Tater Tots at her birthday party, it was an obvious paring. I made a cone holder for those deep fried nuggets of goodness
and they went much quicker than I had expected (we needed double that amount) and ended up using plastic cups as portable potato vessels. I made 3 sauces, Chipotle Ketchup, Blue Cheese Sour Cream and Garlic Aioli. Although the Blue Cheese Sour Cream was my fave, the Chipotle Ketchup was the runaway hit.
I also had a selection of mini sandwiches, Pulled Pork Sliders on mini Hawaiian Buns, Caprese BLT Sandwiches & Pork Free Caprese Sandwiches (both on sour dough), and a childhood favorite of most Americans: Mini PBJ on white bread (crust-less, of course). I Also made fruit skewers and served them stuck into a half of a watermelon, in a way the reminded me of a 1950′s Luau.
The Candy Buffet turned out exactly how I wanted (rare, isn’t it!). I spent weeks searching for red or aqua candy, used clear glass pedestal bowls that I already had, and bought a yard of Micheal Miller fabric to match the scheme.
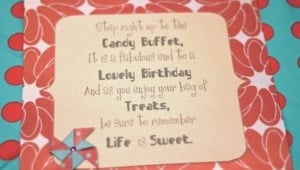
I also borrowed the wording for the sign from a wedding blog and changed it a bit to fit a birthday party. I can’t remember the exact blog to offer credit.
I baked a two tiered cake that did not go as planned (my one “mini disaster” of the day) as well as two dozen cupcakes with edible pinwheel cupcake toppers. I posted a DIY for the edible pinwheels last week. The cake looked “OK” from a distance, but was mess up close. Tater seemed to enjoy it and that’s what’s important.
Over the dessert tables I had a Happy Birthday banner that I made out of paper circles and chipboard letters, as well as a Month by Month banner that I made with photos that I took each month of Tater in a corresponding onesie. My sister is a party throwin’ genius and made those adorable onesies, using them as decorations at my baby shower. One for each month all the way up to one year. I used the One Year picture on a separate banner over the food table with a picture of myself and one of my husband at one year of age. It was a great contrast for my guests to be able to see which features she gets from each of us.
I made 15 paper lanterns, and posted a detailed DIY a few weeks ago. They looked great hanging over the food and dessert tables
I used 10 sheets of tissue each and was able to find 40 sheets for a dollar at the 99 Cent’s Only store, a very affordable, although time consuming, decoration project.
I found some really great aqua and white polka dot table covers at Marshall’s for only $4 each
I had two centerpieces on each table, one with a homemade pinwheel and red and aqua suckers, and one with chocolate covered strawberries and marshmallows. I found some really cute sugar ladybugs at www.orientaltrading.com that I loved and used on the strawberries.
I half way attempted a photo booth but didn’t have enough time to really bring it together.
The favors that I made were one of my favorite touches! I used standard clothes pins, 1.5 inch wood circles, scrapbook paper and round magnets to make personalized favor bag holders that also doubled as a fridge magnet for the “photo of the moment” for all those parents who still love a printed photo on their fridge. In the bags, that I also found at www.shopsweetlulu.com, I put age appropriate toys.
I am hoping to post a DIY on those soon, very easy and super cute. I love a personalized touch! I did the math and I believe that each favor clip cost me about 35 cents each.
Some of Taters adorable little friends who partied with us
All in all, I had a great time and so did my little lady. She is an amazing little human and I am so lucky to be her mom, I hope that she will always know that. There are not enough parties to be able to express the celebration I feel in having her in my life.
Over the course my event planning, my Daughters first birthday morphed into a pinwheel theme. Maybe because they are easy to make or just so darn cute, its hard to say, but the idea of making edible pinwheels just wouldn’t get out of my head. Edible pinwheel cupcake toppers!! Could it be possible? Oh, I made it possible. It was quite a crafting adventure from start to finish and if you plan to attempt these, I hope that you can learn from my mistakes.
First, although I know that printed and colored rice paper exists, I wasn’t able to locate any in the short time I had allotted for the task, so I started with plain white sheets of rice paper that I cut with a standard paper cutter:
To get the pinwheel in the right shape, you need a square piece of paper. I tried 4×4, 3×3 and 2.5×2.5. My favorites were the 2.5 squares, big enough to be put on an edible stick or to be used on its own. Because I wanted the pinwheels to match the red and aqua color scheme that I had going, I tried to paint the rice paper. Really, I wouldn’t advise this but if you want to attempt, it didn’t go horribly awry. I used a clean standard paint brush and put a small amount of gel food coloring in a small bowl. I put a small amount of vodka in another bowl. With all the squares on a sheet of wax paper, I dipped my brush just a tiny bit in the vodka and then mixed it into the gel just enough to make it spreadable. I then painted each side of the rice paper squares.
Then I painted the other side and covered the painted squares with wax paper and flattened them so that they wouldn’t curl
I let them dry overnight. To be honest, some didn’t survive. the ones that had too much food coloring stuck to the wax paper and tore when I tried to remove them. Not a pretty sight. I was able to save about 2 thirds of them, dried and ready for the next step. I have made so many pinwheels in the past few weeks that I just took out my scissors and eyeballed the cuts. But if you want to be a touch more accurate, you can draw a line from corner to corner, cut towards the middle leaving about 2cm between each corner cut. I just started at one corner and aimed for the opposite corner making sure to stop short of the middle
Then I attempted to glue to corners into the center, one at a time, using some store bought icing in a tube that I had on hand
It worked OK. I also made some royal icing and tried that as well. I was marginally more successful with that. I then placed sugar pearls in the center to cover up the ugliness left behind by the icing “glue”. Still, I wasn’t happy. The food coloring left inconsistent color variations and although technically edible, the excessive amounts of gel coloring left a flavor that I describe as “kinda yucky.” Next, I went back to the plain white squares of rice paper. I cut them the same way I did the red dyed ones but decided to “glue” the flaps to the center with melted white Wilton’s Candy Melts. MUCH BETTER!
I added the sugar pearls again to cover the mess. Although this process was much easier and faster than the painting fiasco, they looked too plain. I had some Disco Dust on hand, as well as a mini spray bottle. I found the mini spray bottle at the trial size section of Target, but you can also over pay for them at cake supply stores. I filled the bottle with vodka. A little side note about the vodka: my double mention of liquor as well as its residence in travel size containers isn’t because motherhood has driven me to alcoholic tendencies, it’s a common practice among cake bakers. Vodka will evaporate completely (not a trace of alcohol left behind so it’s safe for the little one) so it won’t water down color or dissolve sugars the same way water will. OK, back to the pinwheels! I just sprayed one spray of vodka on the pinwheels and then sprinkled them with the aqua colored disco dust. I tried two sprays and that made the pinwheel curl up and there wasn’t anymore dust that adhered then with one spray.
I loved them! I then decided to go on a mission to find some sort of edible stick to put them on. After wandering around the grocery store, I happened upon Pocky in the Japanese section of the market. YAY!! SO perfect, other than the fact that this is the one thing that deviated from my aqua and red color scheme, I was happy. Perfect size and actually yummy.
I glued these on the back with the candy melts as well and they looked perfect.
So my lessons learned are:
If you want colored rice paper, buy it that way.
2.5 inch squares are the perfect size for cupcake toppers